Full Text Searchable PDF User Manual
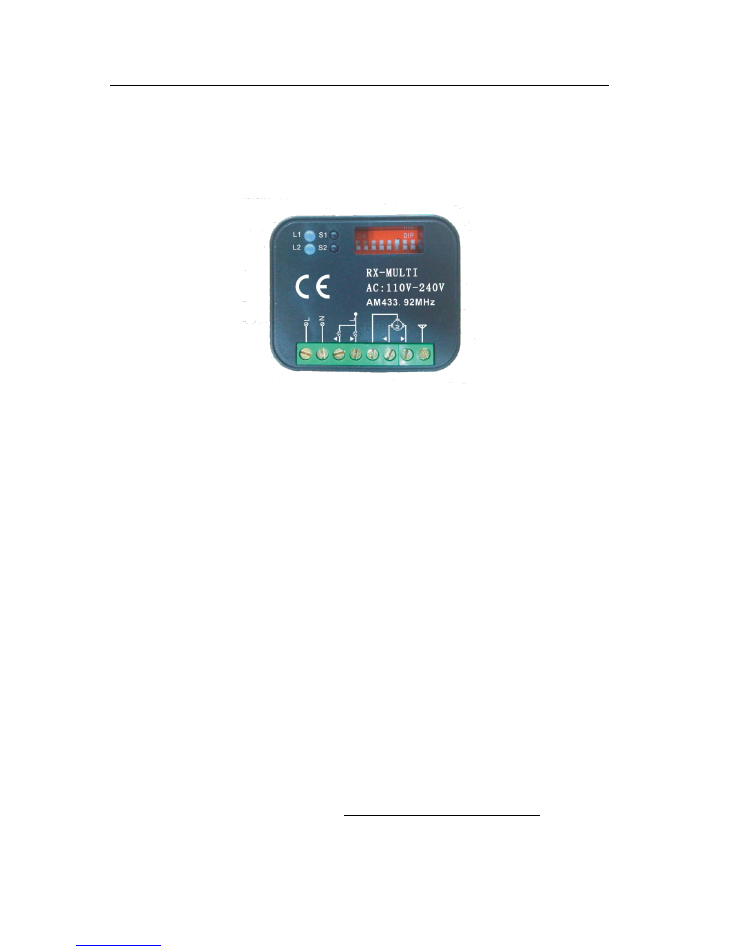
RX MULTI 240v: CONTROL BOARD FOR ROLLER SHUTTER
MANUAL OF CONTROL BOARD FOR
ROLLER SHUTTER
ATENCIÓN: NECESITA ANTENA
1. Selección de marca
Con los 8 interruptores DIP , el usuario puede seleccionar diferentes
combinaciones de DIPs para las diferentes marcas.
Seleccione la marca antes de usar la central (se ubica final del manual).
2. Botón S2 (TEST) y LED L2
Con función OPEN/STOP/CLOSE.
3. Botón S1 Abrir/Parar/Cerrar y LED L1
El botón S1 de la persiana enrollable trabaja con la función Abrir/Parar/Cerrar.
4. Entrada Abrir/Parar/Cerrar
Además, la persiana enrollable puede funcionar con la entrada externa
OP/STOP/CL. Las entradas se conectan via switch con AC. Entrada OP para abrir
y parar, CL para cerrar.
5. Salida del motor
Las tres salidas U,V, W son para la conexión del motor. El condensador se debe
conectar entre la salida V y W.
6. Antena
La última conexión es para la antena. Es necesario conectar la antena.
La distancia será diferente según las diferentes frecuencias. La antena incluida de
fábrica funciona con la frecuencia 433.92 MHz.

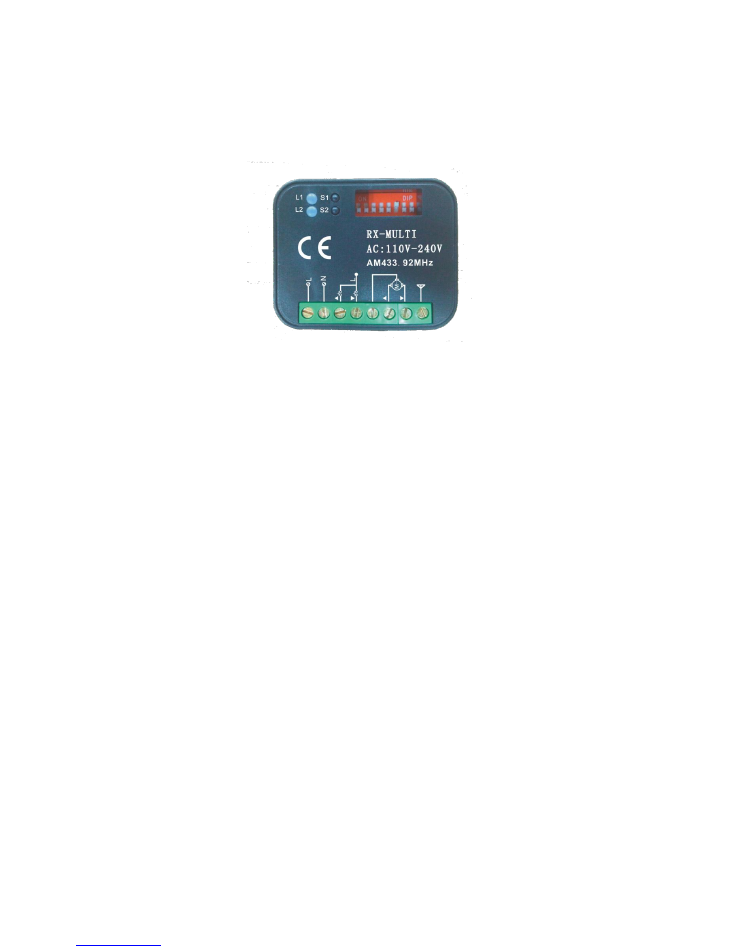
RX MULTI 240v: CONTROL BOARD FOR ROLLER SHUTTER
7. Cómo entrar un mando y cómo borrar la memoria
Programar un botón para abrir o cerrar
1.
Presione el botón S1 hasta que el LED L1 Se encienda. Presione cualquier
botón del mando dos veces, el LED L1 parpadeará rápidamente durante 4
segundos.
El mando ya está programado.
2.
Repita este paso para incluir hasta 250 mandos.
Borrar todos los datos de la memoria:
Mantenga presionado el botón S1, el LED L1 empezará a parpadear. Mantenga
presionado este botón hasta que el LED se apague. Todos los datos de la tarjeta
de la memoria se borrarán permanentemente.
Atención: recuerde que al borrar todos los datos en la tarjeta de memoria no se
podrán recuperar.
8. Cómo funciona
Una vez que el mando se programe en la central para la persiana enrollable,
podrá funcionar con el mando y/o el botón externo.
Trabajar con el mando
Los diferentes botones del mando funcionan como comandos diferentes, por
ejemplo, un botón funciona para abrir, otro para cerrar y otro para Parar. En la
tabla 1 se muestran los detalles.
1.
Presione el botón ABRIR en el mando programado. El motor se abrirá hasta
que alcance el límite de apertura.
2.
Presione el botón CERRAR en el mando programado. El motor se cerrará
hasta que alcance el límite de cierre.
3.
Presione el botón PARAR en el mando programado. El motor se parará.
Trabajar con el botón externo OP/STOP/CL
El botón externo OP/STOP/CL funciona como el botón ABRIR/CERRAR en el
mando.
1.
Presione el botón externo SWITCH1, el motor se abrirá hasta que alcance el
límite de apertura.
2.
Si presiona DURANTE LA APERTURA el botón externo SWITCH 1, el motor se
detendrá.
3.
Presione el botón externo SW2, el motor se cerrará hasta que alcance el
límite de cierre.
4.
Si presiona DURANTE EL CIERRE, el botón externo SWITCH 1, el motor se
dendrá.
Trabajar con el botón S2 (Test)
El botón S2 (test) funciona con el modo ABRIR/PARAR/CERRAR.
Presione una vez el botón S2 para abrir, presione otra vez S2 y el motor se parará.

RX MULTI 240v: CONTROL BOARD FOR ROLLER SHUTTER
Presione otra vez y el motor se cerrará.
Presione en el siguiente orden, ABRIR, PARAR, CERRAR, PARAR, ABRIR, … El LED L2
se encenderá mientras el motor está funcionando, y se apagará cuando la
motor se pare. Además, el LED L2 se encenderá/apagará mientras el motor esté
funcionando con el mando.
RX MULTI 240v: CONTROL BOARD FOR ROLLER SHUTTER
MANUAL OF CONTROL BOARD FOR
ROLLER SHUTTER
ATTENTION: IT NEEDS TO USE AN ANTENNA
TO WORK PROPERLY
1. Brand selection
With 8 bits DIP switches, the user can make different combination for different
brands. Select the brand before the roller box will be used.
The brands selection is showed in table 1.
2. Learn button S2 (TEST) and LED L2
Before the remote can work, it must be entry into the roller box.
Button S2 can work as OPEN/STOP/CLOSE.
3. Open/Stop/Close button S1 and working LED L1
Another button S1 on the roller box works as OPEN/STOP/CLOSE function.
4. Open/Close input
Also, roller box can work by external input, OP/STOP/CL. The inputs are connected
via switch with the AC power. OP input for openning and stop, CL for close.
5. The motor output
3 outputs, U, V, W are for motor connection. The capacitor should be wired
between the output V and W.
6. Antenna
The last connector is for antenna. The antenna must be connected.
For different working frequency, the lenght is different. The antenna supplied by
Factory works for 433.92 Mhz.

RX MULTI 240v: CONTROL BOARD FOR ROLLER SHUTTER
7. How to entry a remote and erase memory
Entry one button for Open or Close:
1. Press button S1 until the LED L1 turns on. Press any button on the remote
twice, LED1 L1 will flash quickly about 4 seconds. The remote is working now.
2. Repeat step for up to 250 remotes.
Erase all data in memory:
Pressing and holding the button S1, the LED L1 starts flash. Keep pressing this
button until the LED turns off. All data in the memory card will be erased
permanently.
Attention: be careful of erasing all data in the memory card. The data will be
erased and can not be recovered.
8. How to work
After the remote is programmed into the roller box, the box can work by remote
and/or button on board or external button.
Work by remote
The different buttons on the remote work as different commands, for example,
one button works for Open, another one for Close and the other for Stop. The
details are showed in the table 1.
1. Press OPEN button on the learnt remote. The motor will work opening until it
reaches full open limit.
2. Press CLOSE button on the learnt remote. The motor will work closing until it
reaches full close limit.
3. Press STOP button on the learnt remote. The motor will stop.
Work by external button OP/STOP/CL
External button OP/STOP/CL works similar to the remote.
1. Press external button SWITCH1, the motor will work opening until it reaches
full open limit.
2. If SWITCH 1 is pressed WHILE OPENING MANEUVER, the motor will stop.
3. Press external button SWITCH2, the motor will work closing until it reaches full
close limit.
4. If SWITCH 1 is pressed WHILE CLOSING MANEUVER, the motor will stop.
Work by button S2 (Test)
Button S2 (test) works OPEN/STOP/CLOSE mode.
Press S2 once, the door will open, press S2 again, the motor will stop.
Press again, the motor will close.

RX MULTI 240v: CONTROL BOARD FOR ROLLER SHUTTER
Press sequentially, the motor OPEN, STOP, CLOSE, STOP, … The LED L2 turns on
while the motor is running, and turns off while the motor stops. Also, the LED L2 will
turn on/off while the motor is operated by a remote.
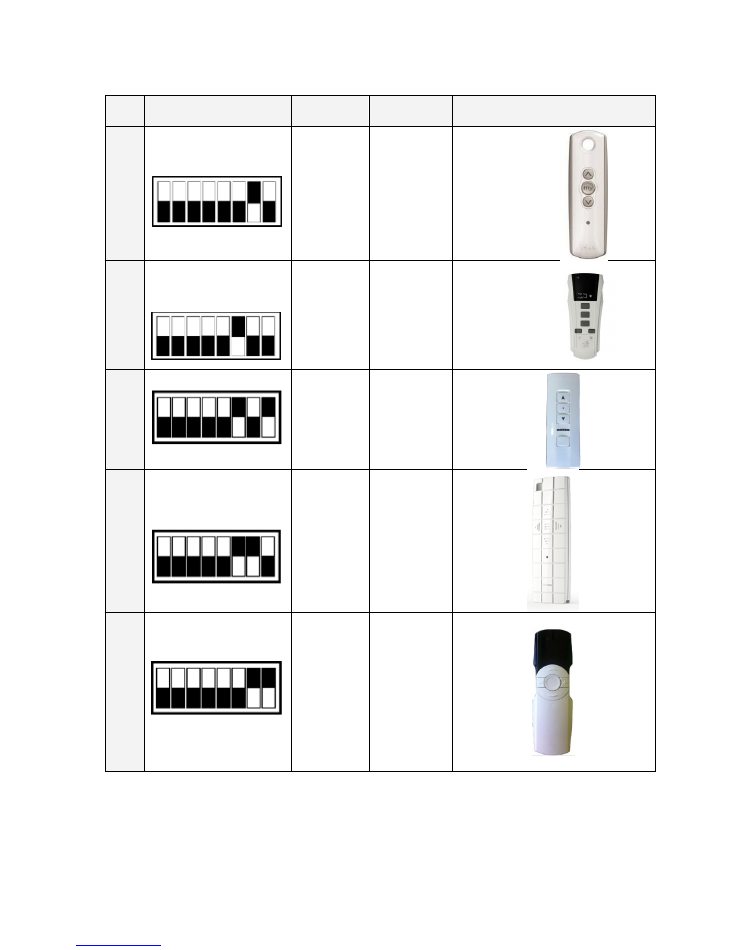
Table 1: Brands selection
RX MULTI 240v: CONTROL BOARD FOR ROLLER SHUTTER
ITEM
DIP SWITCH
BRAND
FREQUENCY
ORIGINAL REMOTES
1
1 2 3 4 5 6 7 8
SOMFY
433.92 Mhz
UP: OPEN
MIDDLE: STOP
DOWN:CLOSE
2
1 2 3 4 5 6 7 8
V2
433.92 Mhz
U/LEFT: OPEN
UP-RIGHT: CLOSE
OTHERS: STOP
3
1 2 3 4 5 6 7 8
JOLLY
MOTORS
433.92 MHZ
4
1 2 3 4 5 6 7 8
DOOYA
433.92 Mhz
5
1 2 3 4 5 6 7 8
ABC
remote
433,92 Mhz