Full Text Searchable PDF User Manual
OWNER'S MANUAL
fisher spas·
AUSTRALIA
Phone: 1800 833 977 www.fisherspas.com.au
P.O. BOX 2040, GATESHEAD, N.S.W. 2290 AUSTRALIA.
NEW ZEALAND
Phone: 0800 108 004 www.fisherspas.co.nz
P.O. BOX 2564, STOKE, NELSON 7041 NEW ZEALAND.
YOUR PERSONAL SPA RECORD
INSTALLATION DETAILS
Dealer:
Installer:
Date Of Delivery:
SPA DETAILS
Spa:
Model:
Serial Number:
Colour:
Equipment Pack:
Circulation Pump:
□
FITTED
□
NOT FITTED
Sanitiser:
OozoNE
Ouv
Jet Pumps:
Heat Pump:
□
FITTED
□
NOT FITTED
SIZE ___ KW
Dear Spa Buyer,
Congratulations on your purchase of a new Fisher Spa. You now possess the
ultimate passport to tranquility, a miniature vacation at home, ready and
waiting for you in your own backyard!
We want you to enjoy your Spa. Many hours of research have gone into the
design of your spa, to ensure the ultimate in hydrotherapy and relaxation.
Only the highest quality components have been used, to ensure years of
trouble-free operation. Your comfort and enjoyment has been designed into
your Spa from the start.
Please take the time to read through this Owners Manual. In it, you will find
guidelines on caring for your spa, a complete explanation of the controls,
safety instructions, a troubleshooting section, and lots more.
Once again, we welcome you to the family of Fisher Spa owners.
Sincerely,
Adam Fisher

SAFETY INSTRUCTIONS AND WARNINGS
When installing and using this electrical equipment, basic safety precautions
should be followed, including the following:
1. READ AND FOLLOW ALL INSTRUCTIONS.
2. WARNING:
To reduce the risk of injury, do not permit children to use this
product unless they are closely supervised at all times.
KEEP SPA COVER
LOCKED WHEN NOT IN USE.
3. THIS APPLIANCE MUST BE INSTALLED BY A QUALIFIED SERVICE TECHNICIAN.
All electrical connections must be performed by a licensed electrician and
must conform to all national, state and local electrical codes in effect at
time of installation.
4. The appliance must be connected to a suitably rated and weather protected
power supply.
5. The supply line should be a dedicated power circuit and means for
disconnection must be incorporated in the fixed wiring in accordance with
your local wiring regulations.
6. Means for disconnection from the supply mains should have a contact
separation in all poles that provide full disconnection under overvoltage
category Ill conditions.
7. The appliance should be supplied through a residual current device
(RCD) having a rated residual operating current not exceeding 30mA.
8. If the supply cord is damaged, it must be replaced by the manufacturer,
its service agent or similarly qualified persons in order to avoid a hazard.
9. The appliance is not intended for use by young children or infirm persons
unless they have been adequately supervised by a responsible person to
ensure they can use the appliance safely.
10. Young children should be supervised to ensure they do not play with the
appliance.
11.
In order to avoid the possibility of hyperthermia (heat stress) occurring
it is recommended that the average temperature of the spa pool water
should not exceed 40oC.
12. The control box, heater, pumps and other electrical items should only be
serviced by a qualified spa service technician
13. Do not operate electrical appliances within 1.Sm of the spa.
NOTE: It is the owners responsibility to display all required safety notices
within view of the spa.

BASIC INSTALLATION INFORMATION
Your new portable spa must be placed on a uniformly firm, flat, and level surface.
A concrete pad 100mm thick is recommended. Your spa may need to be fenced
with the fencing meeting relevant building and council standards. Gates must be
self-closing and self-latching. If your spa is located near sprinklers, adjust or cap
them so as not to hit the siding of the spa.
If the spa is to be installed on a deck, the decking must be constructed to building
standards and should be capable of supporting the expected load of the spa
when filled. If decking is to be constructed around the sides of the spa the owner
must remember to make provision and access for the side panels of the spa
cabinet to be removed in case of the need for future servicing.
Initial start up procedure
1. 10 & 15 amp spas are supplied with a power cord but must be connected
to a weatherproof 10-1 SA outlet. 32 amp 60 amp spas must be hardwired
directly to your house supply. All electrical connections must be performed by
a licensed electrician and must confirm to all national, state and local electrical
codes in effect at time of install.
2. DO NOT turn power ON to the spa until it is filled with water.
3. Remove the cabinet door panel on the electronic keypad side of the spa and
check that the pump(s) and heater barrel unions are tightened (NOTE: It is
possible for these connections to become loose during transportation).
Also check that all T-handled gate vales are pulled UP in the open position.
4. Ensure that the external drain valve is firmly tightened and the jets are in the
open position.
5.
Remove the filters from the spa and fill the spa using a garden hose by
inserting the hose down into the filter pipe. This will flood the pipe work
during filling to help prevent air locks. If you have 2 x filters, alternate the
hose into each filter for the first 5 minutes.
6. Spas should be filled until the water level is at least 50mm above the
skimmer (a water fill level is marked on the side of the filter area).
Maximum water depth in any part of the spa should not exceed 1100mm.
Maximum water depth in any seat should not exceed 600mm.
7. Once spa has been filled with water to the correct level, plug the power cord
into the power point and switch the power ON. If the spa is hardwired, switch
the spa ON at the isolation switch.
8.
The filtration pump will start immediately after the power is turned on.
ENSURE THAT YOU SEE WATER CIRCULATING.
If water is not visibly moving,
switch the spa OFF, wait 30 seconds and try again, if you still do not have
water flowing, turn the power off and refer to the troubleshooting section at
the back of this manual for fixing an air lock.
9.
Once you have the water circulating, adjust the water temperature to the
desired level and set the time (please refer to separate instructions provided
for the control panel).
10.
Add and adjust your chemicals to the spa water following the chemical start
up procedure supplied to you by your spa dealer.
11.
Ensure that the hard cover is placed on the spa & locked as this will greatly
reduce heat up time.
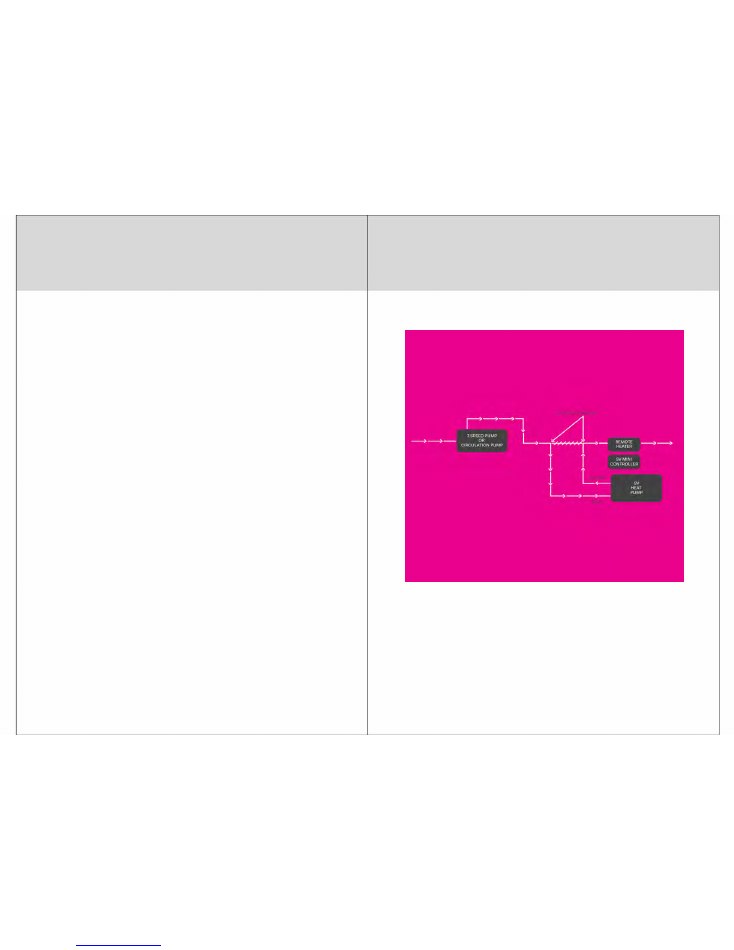
HE
AT PUMP CONNECTION
SpaNet SV Mini Controller
F
isher
S
pas are all equipped with the
S
pa
N
et
SV
M
ini Controller and if you have
purchased a heat pump with your spa you will need to follow the guidelines and
diagram in this document.
Before installing your heat pump consult the
S
pa
N
et Installation
G
uide to ensure that
it follows all of the manufacturers recommendations.
F
ailure to install your heat pump correctly could void your warranty.
START UP OR REFILL CHECKLIST
Remove spa cabinet side panel (on keypad side) to access equipment bay.
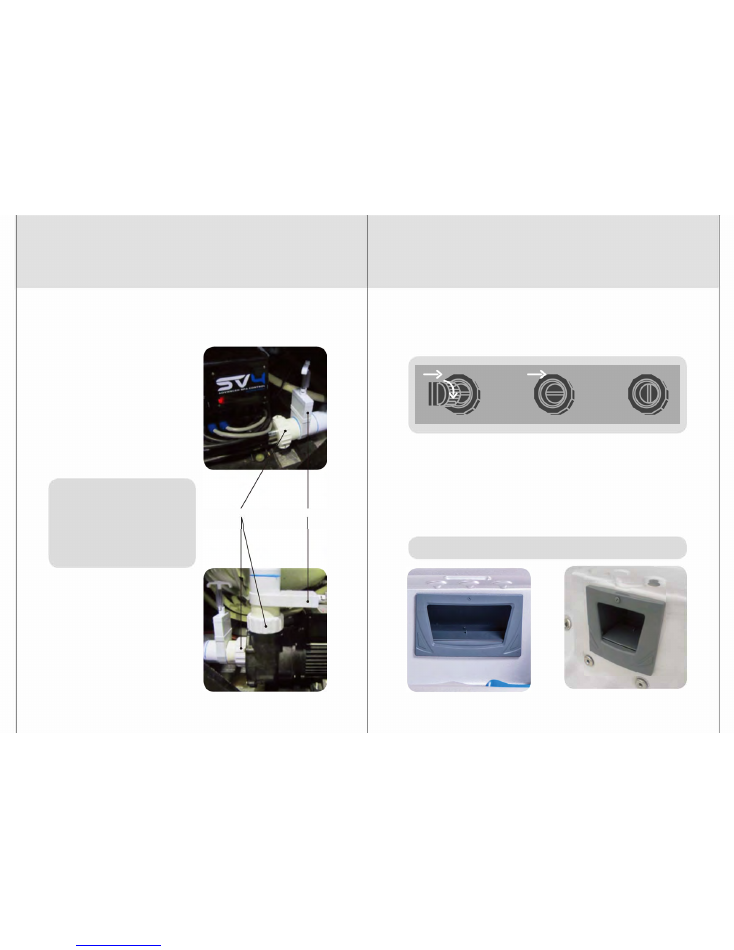
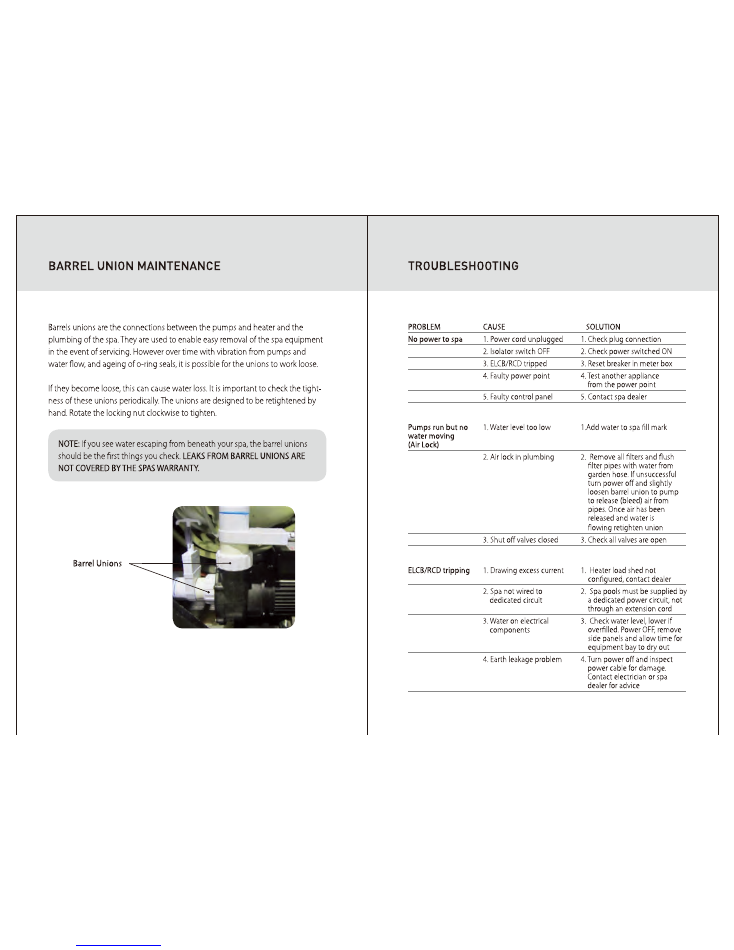
1. Check Barrel Unions are tight
Barrels unions are the connections
between the pumps and heater and the
plumbing of the spa. If they become loose,
this can cause water loss. It is important
to check the tightness of these unions
periodically, and especially when spa is first
delivered. The unions are designed to be
retightened by hand. Rotate the locking
nut clockwise to tighten.
NOTE:
If you see water escaping
from beneath your spa, the barrel
unions should be the first thing
you check.
LEAKS FROM BARREL
UNIONS ARE NOT COVERED BY
THE SPAS WARRANTY.
2. Check valves are open
T-handled valves enable the water fiow
to be closed to allow removal of spa
equipment for servicing without the
need to empty the spa water.
The T handles must be pulled UP to be
OPEN and allow water fiow, and they
should be secured open with clips.
Barrel Unions Valves (Open)
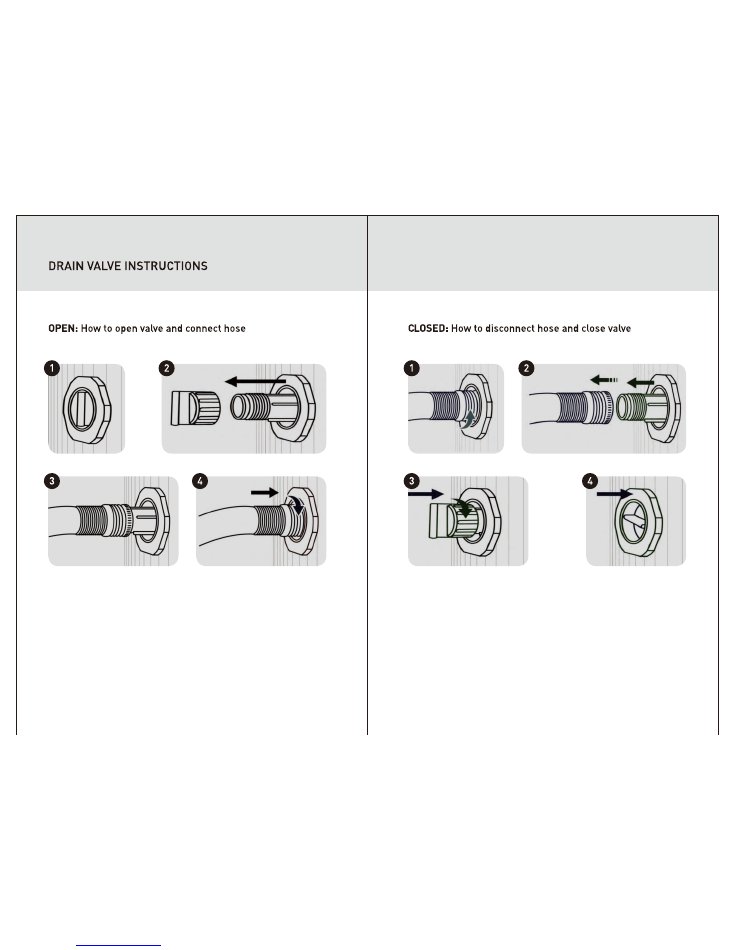
3. Check drain valve is closed and firmly tightened
Please refer aside illustration showing the valve being closed.
4. Check all jets are open
Water fiow to most jets can be turned on or off by rotating the jet face clockwise
(on) or anti-clockwise (off). Check to ensure all jets are open before filling with water.
5. Fill water to correct level in spa
The spa should be filled until the water level is at least 50mm above the skimmer.
NOTE: Always remember to remove the filters and fill spa through filter pipes
GETTING TO KNOW YOUR SPA
Your new Fisher portable spa has many features to help adjust and customize
the water fiow to your chosen configuration and enjoyment. Individual jets
can be turned on and off, aeration to water fiow can be adjusted, water can be
diverted to certain specific zones and jets of the spa or mixed throughout, and
waterfalls and fountains can be turned on and off. The following pages and
pictures will give you a brief overview of how to adjust and use some of the
various features.
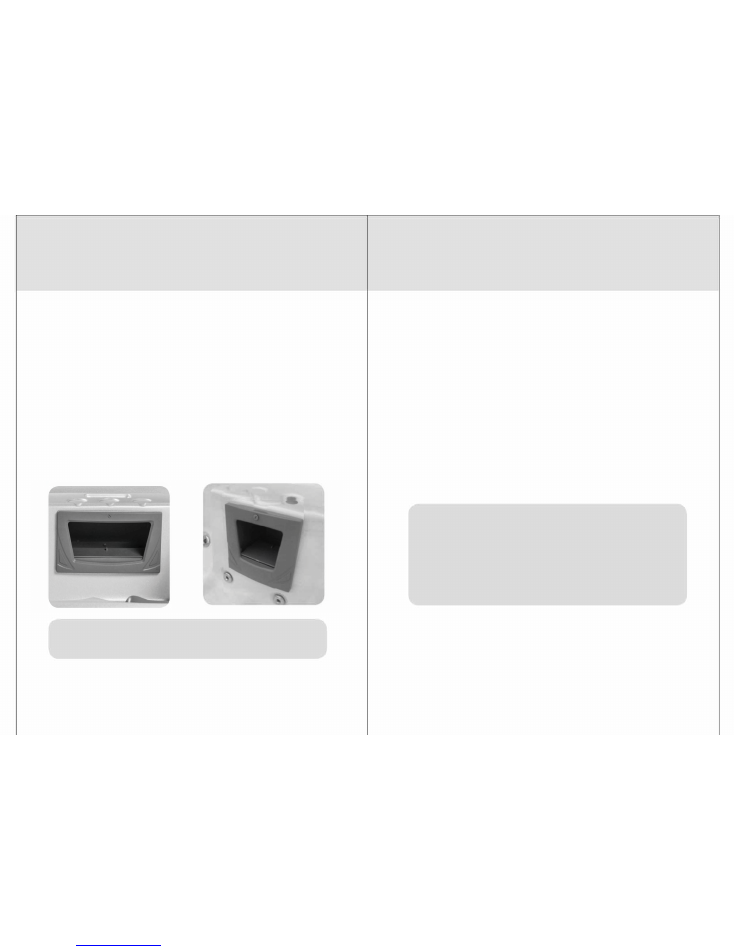
Filter Cartridges
Most Fisher Spas are equipped with one or two filter cartridges (depending on
pump configuration). Refer picture below depicting differences in filter cartridges.
NOTE: Filter cartridges may require replacement or cleaning more
frequently depending on length and frequency of regular spa use.
Removing filters
To remove filters simply unscrew the cartridge in an
anti-clockwise
direction and
pull out from spa pool.
A tool is required to unscrew the face and access the filter. To remove the
face undo the screw at the top, then slide the face upwards to release it
from the filter frame Ensure you use the screw to re-fit the filter face after
cleaning for safety reasons.
Reinstalling filters
When reinstalling filters first hold the cartridge underwater until the air stops
bubbling (at this point most air has been removed from the cartridge).
Then screw the cartridge back into place in a
clockwise
direction.
NOTE: DO NOT screw the cartridge back into place excessively tight.
Only screw the cartridge until it no longer spins freely. The suction
from the pumps will pull the cartridges in further once operated.
If the cartridge is screwed in place excessively tight before pump
operation the cartridge may be difficult to remove or could even
cause the filter thread connection to twist or break the next time
the cartridge is removed and breakage is not covered by warranty.

SPA POOL MAINTENANCE
If you own a spa pool or hot tub, it is important to understand that it requires a
certain amount of owner maintenance to ensure it operates properly and that the
water remains clean and healthy. The water treatment requirements for a spa pool
differ from those for a swimming pool, because you are dealing with hot water.
Hot water requires different treatment to prevent the growth of bacteria and algae.
The correct use of chemicals will maintain the water in a clean and healthy
condition. The parameters that need to be regularly checked are, total alkalinity,
pH and sanitiser level. Your local spa retailer should be able to supply a suitable
test kit and advise on its correct use. It is advisable to test the water on a
daily basis.
SPECIAL NOTE:
Do not mix chemicals
Do not add water to the chemicals, only add chemicals to the water
Changing the water
The spa water should be changed every three to four months, or remove and
replace approx 30% or 1/3 of the volume of water every three to four weeks.
Total alkalinity
The total alkalinity should be in the range of 90 - 150 ppm (parts per million).
A spa or hot tub with low total alkalinity would require constant adjustment of
the pH. To raise total alkalinity, add sodium bicarbonate in small quantities.
To lower the total alkalinity, add acid (Dry Acid Sodium Bisulphate) in small
quantities. Test in one hour.
The pH level
pH is the measure of the acid/alkaline level of the water. It is important to
maintain the correct pH level as iteffects the action of other chemicals.
The pH is measured on a scale of 1 to 14. Seven is neutral, below seven is
acidic, and above seven isalkaline.
Incorrect pH levels can cause poor sanitiser efficiency, eye and skin irritations,
corrosion ofmetal fittings, cloudy water and formation of scale on the pool walls
and fittings. The pH should always be above 7.0 (measured at room temperature,
not hot) to avoid possible corrosion of equipment. However, itshould not be
higher than 7.8, as this would reduce the efficiency of the sanitiser.
If the pH level needs to be increased, add soda ash; to reduce the pH level,
add dry acid. Wait for one-hour and test again.
Sanitising the spa
Sanitising your spa is essential for safe, healthy water, free of harmful
micro-organisms. The most commonly used sanitiser for spa pools is a form
of chlorine (Lithium Hypochlorite). Ozone may also be used, but because there
can be no residual, a form of chlorine must be used in conjunction with it.
The amount of disinfectant required depends on a number of factors, including,
water temperature, the frequency of use and the number of people using the
spa. It is most important to always keep the sanitiser level at 2.00 to 3.00 ppm.
In very hot water the sanitiser can be used up very quickly, and should be
checked regularly whilst the spa is being used.
After heavy use of the spa or on a weekly basis, the water should be shock dosed
with sanitiser. Be sure to check the level again before use. If the spa or hot tub is
not being used, add sanitiser every second day to prevent contamination.

Recommended Levels
ITEM
LEVEL
Sanitiser (Chlorine)
2.0 3.0 ppm
Total Alkalinity
90 110 ppm
pH Level
7.4 7.6
It is important to note that if the right pH and sanitiser levels are maintained,
viruses and bacteria should not survive in the water. In terms of general hygiene,
it is important to keep the filter and pump clean. Clean the filter regularly and
where ever possible always shower before spa use.
PUMP MAINTENANCE
The pumps in your spa are high performance motors that require regular
checking. It is a requirement of your spas warranty to check the pumps every
four (4) months for signs of leaking or corrosion.
Any sign of leaking or calcium build up at the bottom of the pump between
the plastic wet end and metal part of the motor indicates that the seals of your
pumps are worn and need replacing. It is recommended that you contact your
local spa dealer to arrange a service of your pump before the motor develops
further problems.
Pump seal corrosion and wear is generally caused by incorrect pH and alkalinity
levels within the spa, or heavy use /excessive dosage of sanitisers such as
Chlorine or Bromine. In order to avoid problems, please follow the water
chemistry instructions provided to you by your dealer.
PROBLEM
Will not heat
Water not clean
ER-3 Water Prime
& ER-4 Thermal
Trip Errors
CAUSE
1. Time not set correctly
2. Sleep timers or power
save settings incorrect
3. Heating Mode set to
Away or Weekend
4. Air blower ON all the time
5. Thermostat turned down
6. Excessive heat loss
1. Filter clogged or due
for replacement
2. Poor water chemistry
3. Filter duration not set
high enough
1. Low water level
2. Dirty filters
3. Air lock in pipe work
4. Fault with filtration pump
SOLUTION
1. Set the clock on control pad
2. Read control pad manual &
check timer settings, consult
spa dealer for assistance
3. Check heating mode in
control pad menu is set to
normal (NORM)
4. Turn air blower off. Heating is
inefficient when the blower
is running
5. Check set temperature point
and raise if needed
6. Fit hardcover to spa and
ensure it is fitted correctly
1. Clean and soak filters.
2. Check water balance and
sanitiser levels. Refer to
chemical instructions.
3. Increase daily filtration time
in control pad setup menu
1. Refill spa if necessary
2. Clean, soak or replace filters
3. Bleed air from pipe work by
loosening barrel unions
4. Contact dealer for service
MAINTENANCE RECORD
DATE
DETAILS
If any errors occur relating to Touch Pad, consult your SpaNet manual first.