Full Text Searchable PDF User Manual

IP-SDI gateway SFP+
(coaxial front end)
User guide
v0.4
Product:
EB22 family
April 7
th
, 2016

EB22 Family
IP-SDI gateway SFP+
User Guide
Document version 0.4
2
Table of contents
1.
Introduction
......................................................................................................................................... 3
2.
Overview
.............................................................................................................................................. 3
3.
Required tools
..................................................................................................................................... 3
4.
Installing SFP+ modules
.................................................................................................................... 3
5.
Removing SFP+ modules
.................................................................................................................. 4
6.
Connecting SDI signals to the SDI to IP gateway
.......................................................................... 5
7.
Configuring the SDI to IP gateway by the 10GE network
.............................................................. 6
8.
Updating the SDI to IP gateway (by the internal webpage)
.......................................................... 9
9.
Troubleshooting the modules
......................................................................................................... 11
EB22 Family
IP-SDI gateway SFP+
User Guide
Document version 0.4
3
1.
Introduction
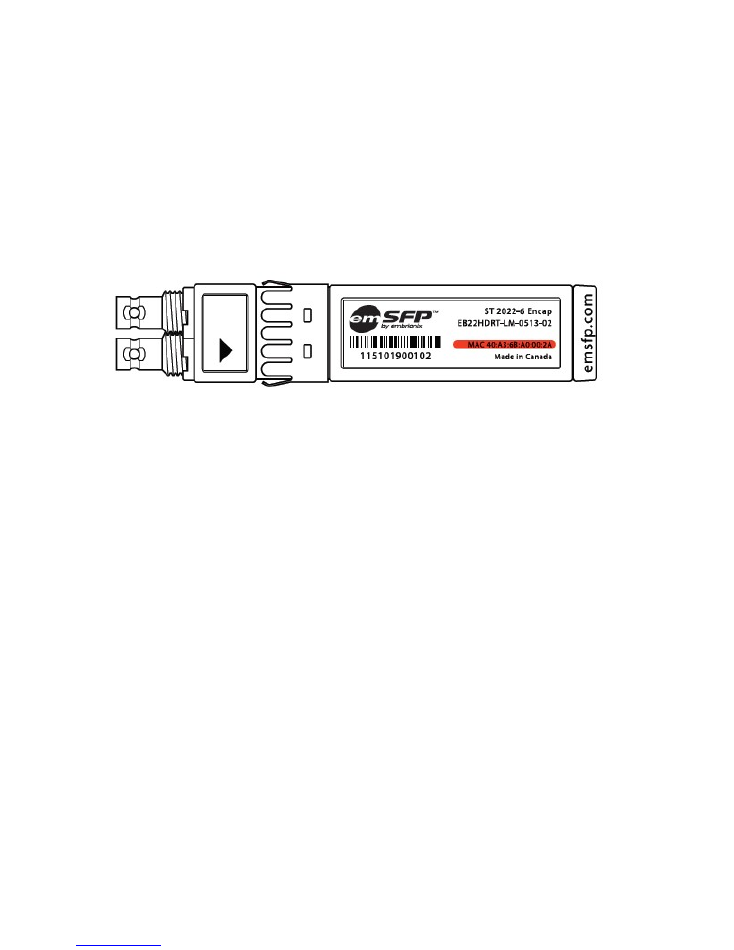
This installation & configuration quick user guide provides the installations for the Embrionix
SDI to IP coaxial gateway SFP+ (emSFP). These gateway modules are hot-swappable devices
that plug into a 10GE MSA SFP slot; 10GE (2022-6) signal is received/transmitted on host
interface.
Figure 1. SDI to IP coaxial gateway
2.
Overview
The SFP+ (emSFP) modules are hot-pluggable I/O devices that plug into sockets (SFP/SFP+).
3.
Required tools
ESD-preventive wrist strap
4.
Installing SFP+ modules
Step 1
Attach an ESD-preventive wrist strap to your wrist and to the ESD ground connector or a
bare metal surface on your chassis.
Step 2
Remove the SFP transceiver module from its protective packaging.
Step 3
Position the SDI to IP coaxial gateway SFP+ in front of the empty cage.
EB22 Family
IP-SDI gateway SFP+
User Guide
Document version 0.4
4
Step 4
Insert the SFP+ like the following pictures.
Figure 2. SDI to IP coaxial gateway insertion
Note
Ensure the ejector is at rest position before inserting the SFP+ in the cage.
Step 5
Press the SFP+ until you feel the connector latch into place.
Step 6
Verify the SFP+ is seated and latched properly by grasping the SFP+ and try to remove it
without releasing the latch.
5.
Removing SFP+ modules
Note
The SFP and SFP+ are static sensitive devices. It is recommended to use an ESD wrist strap or
similar grounding device when handling the modules.
Step 1
Attach an ESD-preventive wrist strap to your wrist and to the ESD ground connector or a
bare metal surface on your chassis.
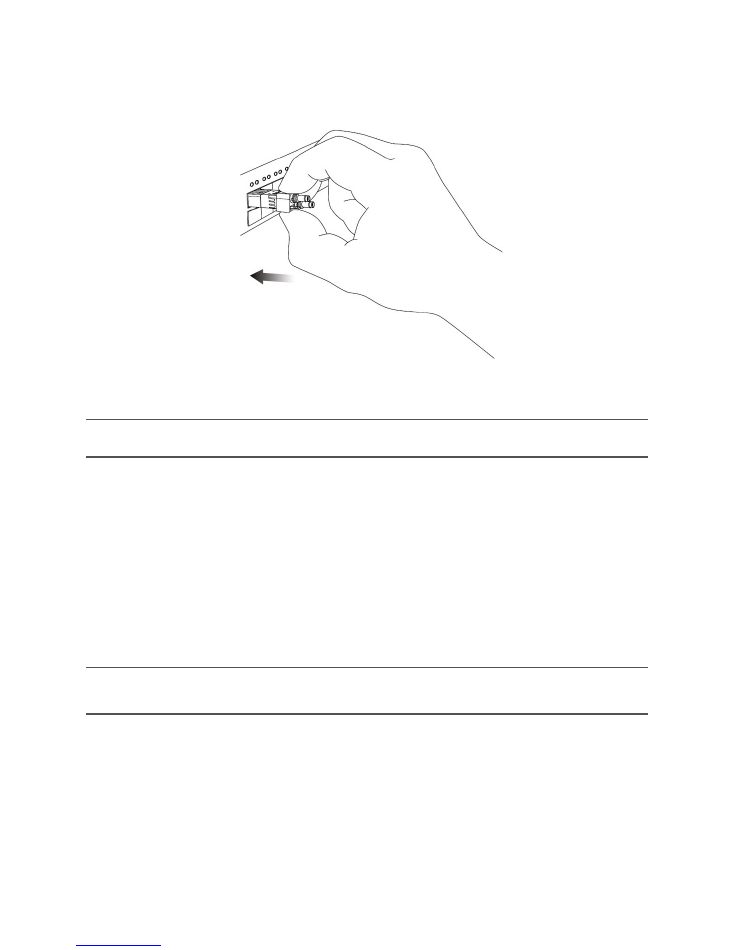
Step 2
Release and remove the transceiver module from the socket connector, as shown in
next figure (Step 2a) push the ejector gently in a slightly upward direction until the transceiver
EB22 Family
IP-SDI gateway SFP+
User Guide
Document version 0.4
5
disengages from the socket connector, and then pull the SFP transceiver module straight out
(Step 2b).
Figure 3. SDI to IP coaxial gateway extraction
6.
Connecting SDI signals to the SDI to IP gateway
Step 1
E
nsure that the SFP+ is seated and latched properly.
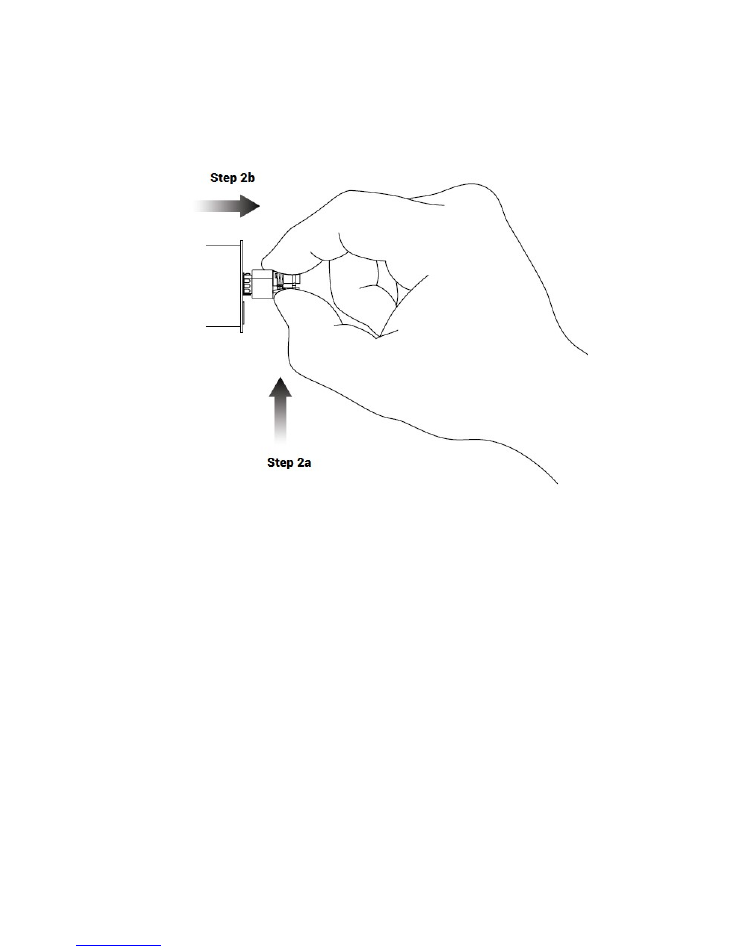
Step 2
Connect the HD-BNC by pushing the HD-BNC inside the connector (Step 2a), and then
turn (clockwise) the HD-BNC to lock the cable (Step 2b) as shown in the next figure.

EB22 Family
IP-SDI gateway SFP+
User Guide
Document version 0.4
6
Figure 4. Connecting SDI signals
Note
Supported SDI format as of publication of this manual : 1080p50/59/60, 1080i50/59/60,
720p50/59/60, 525i59, 625i50. Other rates have not been tested yet.
7.
Configuring the SDI to IP gateway by the 10GE network
Note
Steps described below are an
example
of a possible connection and tool to use to configure
the
Gateway SFP
. One may have other solution to connect an application to send JSON commands
to the
Gateway SFP
on the 10GE link.
Step 1
Insert the
Gateway SFP
into the 10GE host.
At that point, there should be a link established for the
Gateway
SFP (status led
on the 10GE host).

EB22 Family
IP-SDI gateway SFP+
User Guide
Document version 0.4
7
Note
Gateway SFP
(encapsulator and decapsulator) can take up to
10sec
to establish
the link on cold boot.
Step 2
Insert an 1GE RJ45 SFP into the 10GE/1GE equipment.
Step 3
Connect a 1GE-enabled PC to the 1GE RJ45 SFP.
At that point, there should be a link established between the PC and the RJ45
SFP (status led on the switch).
Step 4
Configure the PC’s Lan Adapter to be on the same subnet as the
Gateway SFP
Step 5
Using Windows Command Prompt, ping your
Gateway SFP
.
Encap :
192.168.39.215
Decap :
192.168.39.216
Note
Depending on the 10GE equipment configuration, it may have traffic contention between
10GE/2022-6 traffic and 1GE/management traffic (for API access). For first tests, we recommend to
have only management traffic in the 10GE equipment.
Step 6
Start
Firefox HTTP Requester
(free Mozilla Firefox plugin –
WINDOWS platform
).
See emSFP Devices
IP gateway REST API Userguide.pdf
document for the complete
description of readable/writeable information AND for HTTP requester use.
EB22 Family
IP-SDI gateway SFP+
User Guide
Document version 0.4
8
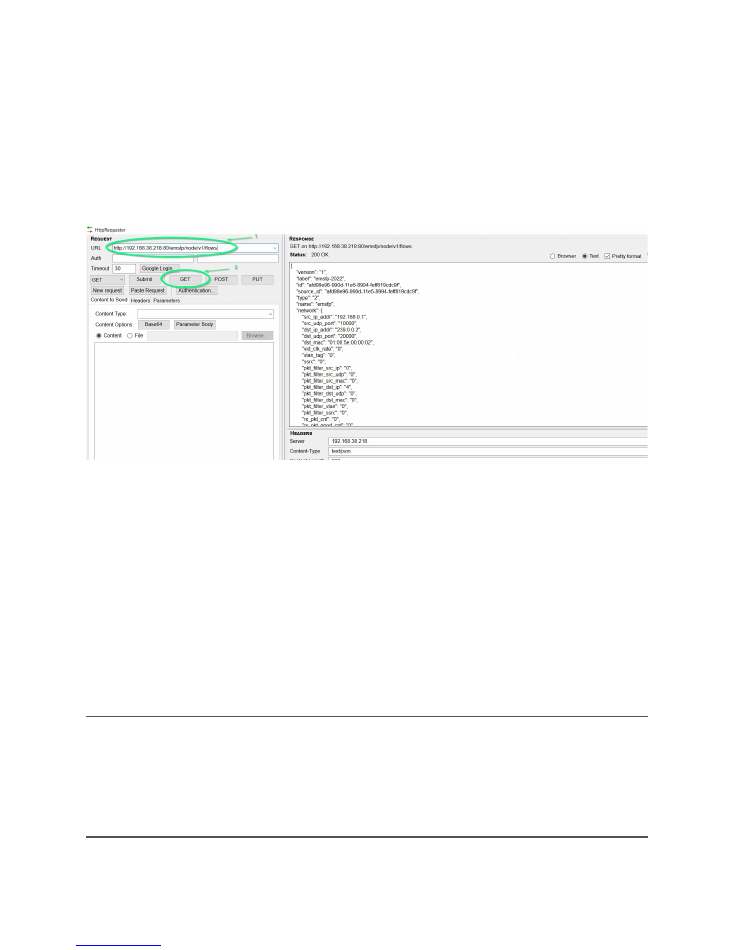
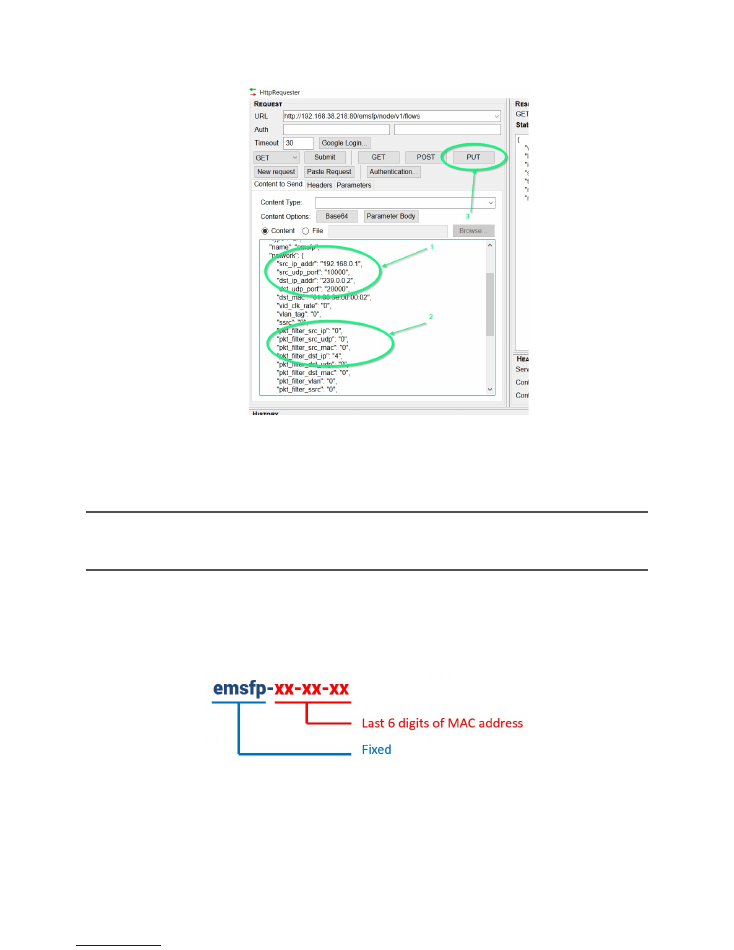
Step 7
Get 2022-6 configuration from the
Gateway SFP
1.
Specify your
Gateway SFP
address (or hostname: emsfp-a0-xx-xx, where the xx-xx are
the last digits of the
SFP
MAC address found on the label).
2.
Press
GET
button
Command answer will be displayed on the right.
Step 8
Change 2022-6 configuration of the
Gateway SFP
1.
Specify your
Gateway SFP
address (or hostname: emsfp-a0-xx-xx, where the xx-xx are
the last digits of the
SFP
MAC address found on the label).
2.
Press
GET
button
Command answer will be displayed on the right.
3.
Copy the answer from the right side to the left side text box
Content to send
.
4.
Edit the desired values.
5.
Press
PUT
button
Note
Shown below is information for decap; encap is a bit different – there is no
pkt_filter_xyz
parameter to manage (item 2 in image below).
Note
Configuration showed below for 2022-6 traffic is used to build / retrieve the packets so both
encap and decap should have the same content based on the decap’s
pkt_filter_xyz
setting. Shown
below is
destination IP address filtering
.
EB22 Family
IP-SDI gateway SFP+
User Guide
Document version 0.4
9
8.
Updating the SDI to IP gateway (by the internal webpage)
Note
Communication with the SFP+ is only feasible if the network is properly configured and the
computer used to communicate is in the same IP subnet (as shown in previous section).
The
Gateway SFP
possesses a webpage to ease update over the network. This intelligent SFP+
is DHCP ready, if a DHCP exist, the SFP+ will request an IP address and will request an
HOSTNAME in the network. The HOSTNAME is composed like this:
As example an SFP+ gateway with a MAC finishing by 0a-01-dd will have an hostname: emSFP-0a-01-dd
EB22 Family
IP-SDI gateway SFP+
User Guide
Document version 0.4
10
Step 1
Ensure that the link is established between the PC and the
Gateway SFP
(see steps 1 to
7 in previous section).
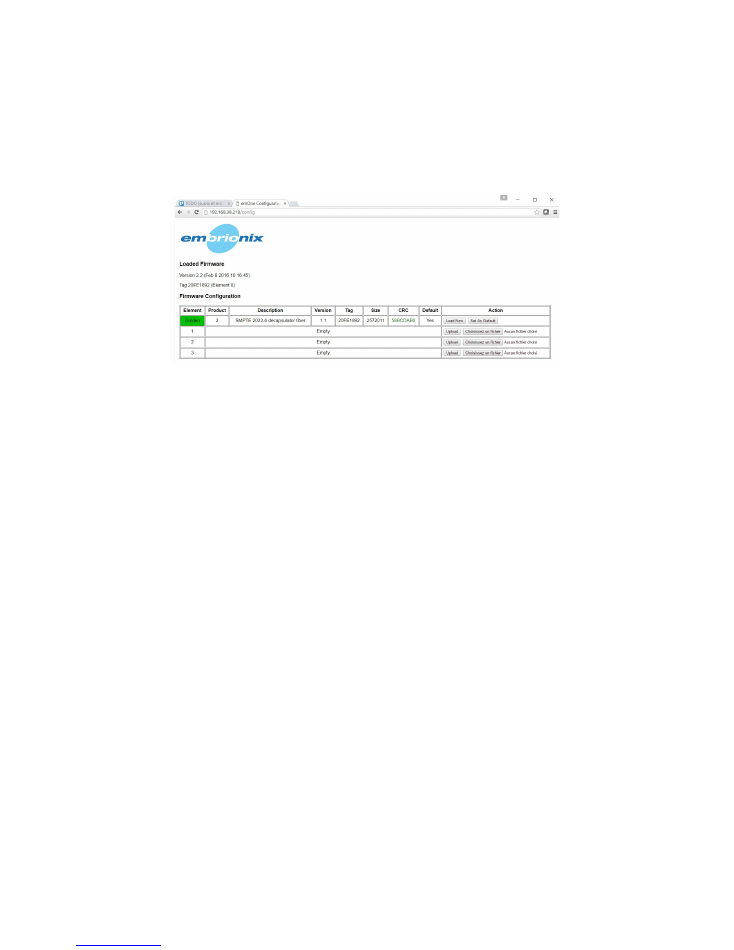
Step 2
Using Google Chrome on Windows, access the
Gateway SFP
webpage
Type
http://HOSTNAME (or IP address)/config
.
Step 3
Upload and run a new code
Please refer to the image above.
To upload a new code:
1-
Choose an empty element and click on “Choose File” (button naming is browser
dependent).
2-
Browse to and select the provided
.img
file.
3-
Click on “Upload”. The upload and verification process will take about 30 seconds.
If no empty element is available to upload a new code, you can free one by clicking on “Clear”
and wait until the element is cleared (about 40 seconds).
If the upload process was successful, CRC value will be shown in green for that particular
element. If not, it will be shown in red. In the unlikely later case, click on “Clear” and then repeat
above steps.
To run a new or existing code:
1-
Click on “Set As Default” to select this code as default when inserting or power cycling
the SFP+.
2-
Click on “Load Now” and wait until the page reloads.
3-
Running image is the one marked in green (element number background, 0 on the above
image).

EB22 Family
IP-SDI gateway SFP+
User Guide
Document version 0.4
11
Under some circumstances (slow switch port bring-up time, slow DHCP server response time),
the loading will take more time and the page will not reload by itself.
Allow some more time and
refresh the page manually, up to 1 minute.
Note
Do not remove the SFP+ while uploading a new code or clearing an element.
Note
It is not possible to clear or upgrade the code located in element labeled “Golden”
.
This
ensures that the product will always have a working code to load.
9.
Troubleshooting the modules
Step 1
If the SFP is accessible for configuration but the video path is not working :
1.
Make sure the
flows
configuration matches between encap and decap.
2.
Make sure to disable IGMP snooping.
3.
For decap, make sure that the
packet filter
selected is well defined so data from only
one encap is selected. For example, if filtering on destination IP, make sure that only
one encap is sending to that specific destination IP.