Full Text Searchable PDF User Manual
Advanced Display Systems
H170 LCD Monitor User Manual
www.edge10.com
The display comes with a three years on site warranty. To
activate your warranty please register your display at
www.edge10.com/support

Contents
1. Instructions for Federal Communications Commission Compliance……..2
2. CE Statement………………………………………………………………….4
Safety
E
G
M
A
P
T
P
O
O
MC
3. Introduction…………………………………………………………………...6
eneral Specifications
onitor Characteristics
ccessories
recautions
4. Installation……………………………………………………………………..7
erminal Connection
re-installation Check
5. Operation……………………………………………………………………....8
Keypad Operating
SD Menu
SD Icon Overview
6. Specification &Technical Data…………………………………………….....13
7. Energy-saving Modes…………………………………………………………14
8. Supported Timing…………………………………………………………......15
9. FAQ (Frequently Asked Question)………………………………..…………16.

1.0 Instructions for Federal Communications Commission (FCC)
Compliance
This d
to
for
by
the
op
int
cas
pre
ate the reception antenna of the equipment
quipment
ent into sockets
——
d technician familiar with wireless networking
In o
to satisfy the limitations regarding electromagnetic emissions and to
acc
wit
.0 CE Statement
evice has passed the tests stipulated by Article 15 of FCC Compliance and conforms
the limitations and provisions for Class-B digital equipment. The restrictions are
mulated to prevent the harmful interference with radio frequencies produced by or used
household appliances. This unit will emit electromagnetic waves during operation and
refore, it may interfere with the radio-frequency signal if it is not configured and
erated as directed in the user manual. It is not guaranteed that this device will not cause
erference with specific equipment--in particular when it is being powered on or off. In
e this device interferes with TV sets or wireless networking equipment, the user may
vent the interference by using one or several of the methods stated below:
——Reloc
——Increase the distance between this device and the e
——Connect the power plug of this device and that of the equipm
for different lines
Contact an experience
equipment or TV sets
rder
prevent interference with TV sets and/or wireless networking equipment nearby, the
essories provided with this unit should be used. This device should not be modified
hout the authorization or confirmation of the manufacturer.
2

This is to state that this 17” LCD monitor complies with the following compulsory regulations:
z
Safety
pliance complies with LVD-73/23/EEC Low Voltage Direction (EN60950-1:2001)
This ap
requirements:
Electrical s
•
hock protection
•
•
•
etic emissions protection
•
uced during normal operation or
a
•
nd moving parts hazards
z
ments.
Electro
han that produced by radios
ternal
EMI:
Rad
EN55022:1998 + A1: 2000 + A2:
EN61000-3-
c Current Emission
EN61
EMS:
:2001 + A2: 2003
nt
IEC
IEC61
IEC61
IEC61
IEC61
IEC61
unity
IEC61
Safety Ins uctions
Energy risk protection
Fire hazard protection
Hazardous electromagn
Protection against hazardous substances prod
m lfunction
Mechanical a
EMC
complies with the 89/336/EEC require
This device
magnetic interference generated by this device is less t
or other long-distance communication equipment. During normal operation, interference
n
effects should be at an acceptable level; this device also incorporates a sound i
anti-interference design. When correctly configured and maintained, it should operate
normally in typical home or office environments.
io interference characteristics are in conformity with
2003 Class B
Limit Value & Test Method for Radio Interference Characteristics for
Information Technology Equipment
A)
Electromagnetic emissions
B)
Conducted emission
armoni
2:2000; Class A H
000-3-3:1995+A1:2001 Voltage Fluctuation & Flicker
+A1
Anti-interference levels are in conformity with EN55024:1998
class B
Limit Value & Test Method for Anti- Interference Level for Information Technology Equipme
61000-4-2:1995+A1: 1998+A2:2000 Electrostatic (ESD)
000-4-3:2002+A1: 2002 Immunity to RF field strength
000-4-4:2004 Electrical fast transient
000-4-5:1995+A1 :2000 SURGE
000-4-6:2003 CS
000-4-8:1993+A1:2000 Magnetic-imm
000-4-11:2004 Voltage Dips/Interruptions
tr

1.
Please carefully read this manual before operating the device and keep it available for future
2.
e danger of the monitor falling and thereby possibly causing injury and/or serious
3.
t or where water or other liquids may come in
4.
5.
6.
y occur.
le
12.
ediately
13.
r:
ocedures are followed. In that case,
14. In cas
reference.
To avoid th
damage to the monitor itself, do not place it on unstable cars or desks. Be careful to avoid placing
any stress on the LCD screen during handling.
Do not place this monitor in areas that are we
contact with it, such as bathrooms, kitchens, wet floors, near washing machines or by swimming
pools.
Remove the power plug from the electrical socket before cleaning. No water-containing cleaning
agent should be used to clean the screen, but only cleaning agents formulated specifically for
cleaning LCD screens. Do not put any liquid cleaning agent directly on the screen, but put it on a
soft cloth first and then gently apply the cloth to the screen.
In order to guarantee reliable operation and adequate heat dissipation, do not cover or block vent
holes on the monitor. Do not put the monitor close to heat sources. Do not place the monitor on
furniture such as a bookshelf, unless sufficient ventilation is available.
A 3-pin grounding plug is provided for this monitor. In order to guarantee normal operation and
safety of this unit, this plug should be used with a matching grounded power socket.
7.
Please follow all warnings and instructions that accompany the monitor.
or fire ma
8.
Please pay special attention to power supply overloads, as electrical shock
9.
Do not place anything on the power cord. Do not hang the power cord over an area where peop
or objects may pass.
10.
In case the monitor is not be used for an extended period, turn off power to avoid the possibility
of short circuits caused by lightning.
11.
In order to avoid electrical shock or fire risks, do not insert any object through any openings in
the monitor’s enclosure. Do not allow any liquid to come in contact with the monitor.
In case of any abnormal noise or odor caused by incorrect operation, turn off power imm
and contact a professional technician. Do not attempt to repair this monitor by yourself, as
electrical shock may occur when opening the back cover or accessing internal components.
If any of the following conditions occurs, turn off power and contact a repair service provide
1)
the power cord is damaged or worn;
monitor has experienced immersion or wetting;
2)
liquid has gotten into the monitor, or the
3)
the monitor has fallen;
ce shows obvious changes;
4)
the monitor’s performan
5)
the monitor fails to work normally when correct pr
please make any adjustments in accordance with instructions supplied with the monitor; do
not attempt any changes to established procedures, as further damage may occur, making
successful repair of the monitor more difficult.
e parts need to be replaced, you must use identical parts or those supplied by our certified
manufacturers. Any other parts used without our authorization may result in electrical shock or fire
risk.
3.0 Introduction
General Specifications
This high-quality
17”
monitor is based on a liquid crystal display (LCD) with exceptional
resolution and features multi-frequency intelligent scanning in the range of 30 to 80 KHz.
Caution: In order to maintain this monitor in optimal working condition, please carefully read
this manual before use.
Monitor Characteristics
z
17” viewable-area screen
z
1280 x 1024 resolution, 300cd/m
2
, 500:1 (subject to panel specification)
z
Wide viewing angle (subject to panel specification)
z
Color temperature : Standard :9300K, 7500K, 6500K, 5400K, 4200K, Custom R,G ,B
z
Low power consumption
z
Automatic power switching: AC 100~240V, 50~60Hz.
z
User image adjustments: Brightness, contrast, H./V. position, phase adjust, clock adjust,
language, color, volume, reset, exit
z
Choice of eight languages: English, France, German, Italian, Spanish, Sweden, Traditional
Chinese and Simplified Chinese.
Pa
Ca
shipp
Pr
ckage includes:
z
17” LCD monitor
z
AC Power cord
z
Instruction manual
z
Warranty Card
z
D-Sub 15 Cable
z
DVI-D Cable (optional)
z
Audio cable (optional)
ution: Please keep the original packing materials including cartons for possible future use in
ing or moving the monitor.
ecautions
z
Please turn off power before cleaning this monitor. Use a soft cloth with clean water and
lightly wipe the LCD screen surface.
z
This monitor operates at a high voltage and is potentially hazardous. Only qualified
technicians are permitted to assemble or disassemble the device or access internal
components.
4.0 Installation
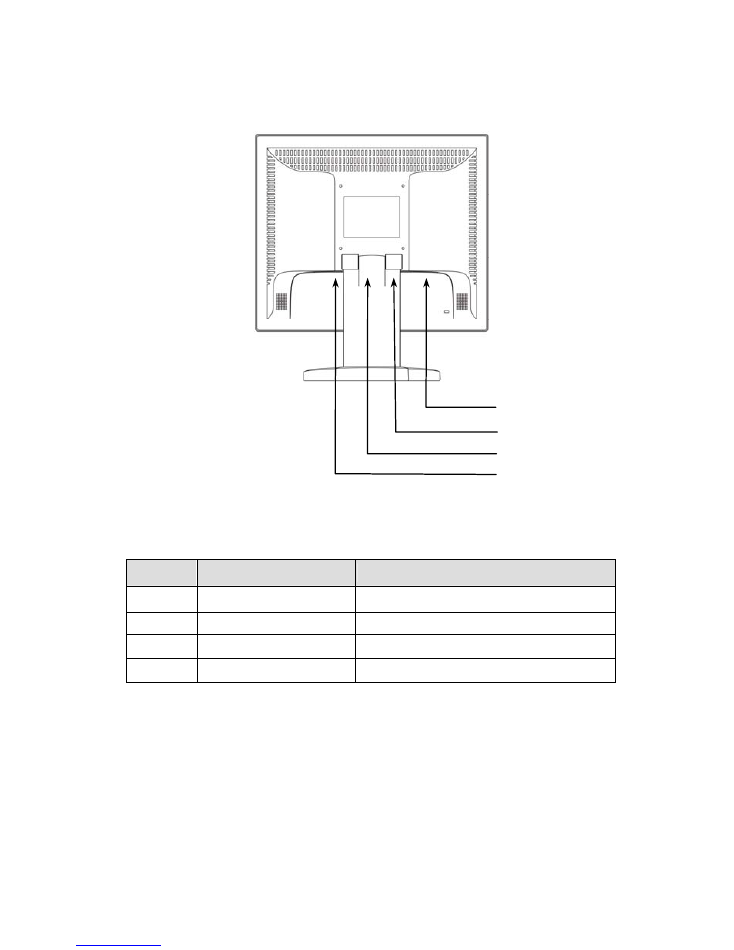
Terminal Connection
f
e
d
c
NO.
Terminal
Function
c
AC-In
AC power input 100~240V, 50/60HZ
d
Audio-In (optional)
Audio input
e
DVI-In (optional)
To PC DVI
f
D Sub 15 VGA -In
To PC D Sub 15 VGA
Pre-installation Check
Please check the label on the nameplate on the back cover first. Input voltage between 100V and 240V should be
used with this monitor. Also please make sure this monitor and your main system (computer) is powered off before
attaching any connectors.

5.0 Operation
Keypad Operating
The LCD monitor has been preset at the factory with the Timing shown in Appendix to create optimal
picture. Users are also able to adjust the picture to the desired brightness and sharpness by following the
instructions.
Normal Key Define
Hot Key Define
Buttons
Functions
EXIT Button
Exit the OSD (On Screen Display)
d
Press to bring up the On Screen Display and select main menu items
X
Press to bring up the On Screen Display and select sub menu items
-
Adjust sub-setting bars i.e. CONTRAST, BRIGHTNESS, etc. to
decrease setting values of the OSD
+
Adjust setting bars i.e. CONTRAST, BRIGHTNESS, etc. to increase
setting values of the OSD
LED power
status display
Green – Normal operation
Amber – Power Management
Off – Power turn off
Power Switch
For turning ON/OFF the monitor
Buttons
Functions
EXIT Button
Auto setup
-
Volume Mute
+
Volume Adjust
OSD Menu
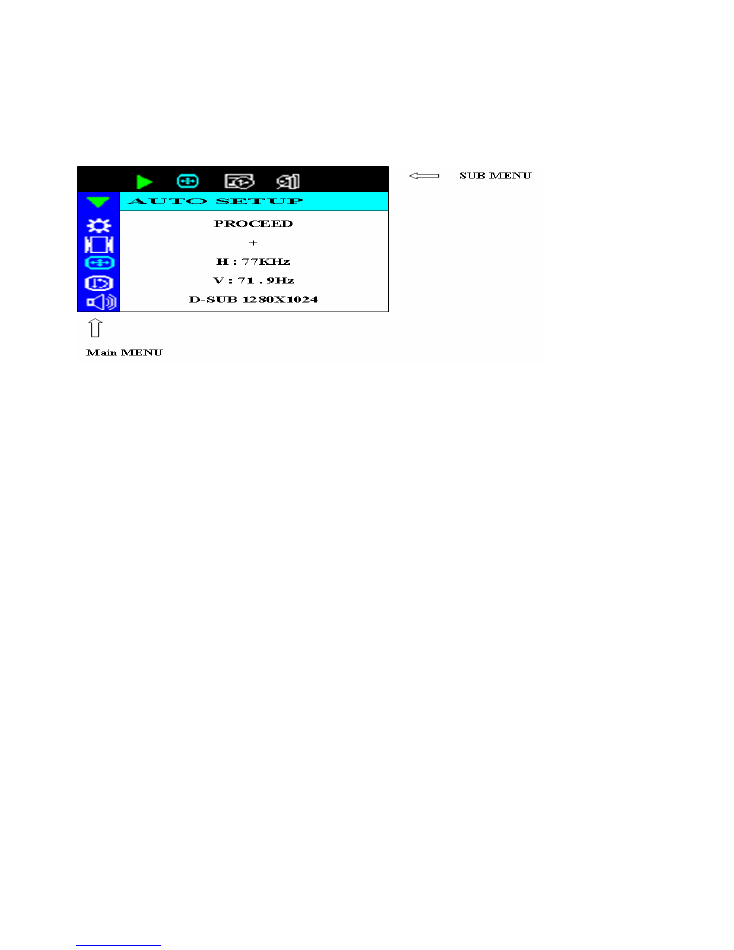
OSD function allows the user to easily adjust the display to the desired quality.
Structure of OSD
Operating Procedure
1.Power on the LCD monitor.
2.Press “
d
” or “
f
“ to pop up OSD menu.
3.Press “
d
” to select main menu item.
4.Press “
f
“ to select sub menu item.
5.Press “+” and “-“ buttons to adjust.
6.Press the EXIT button when finish adjusting.
The Adjustment of Monitor’s Screen Display
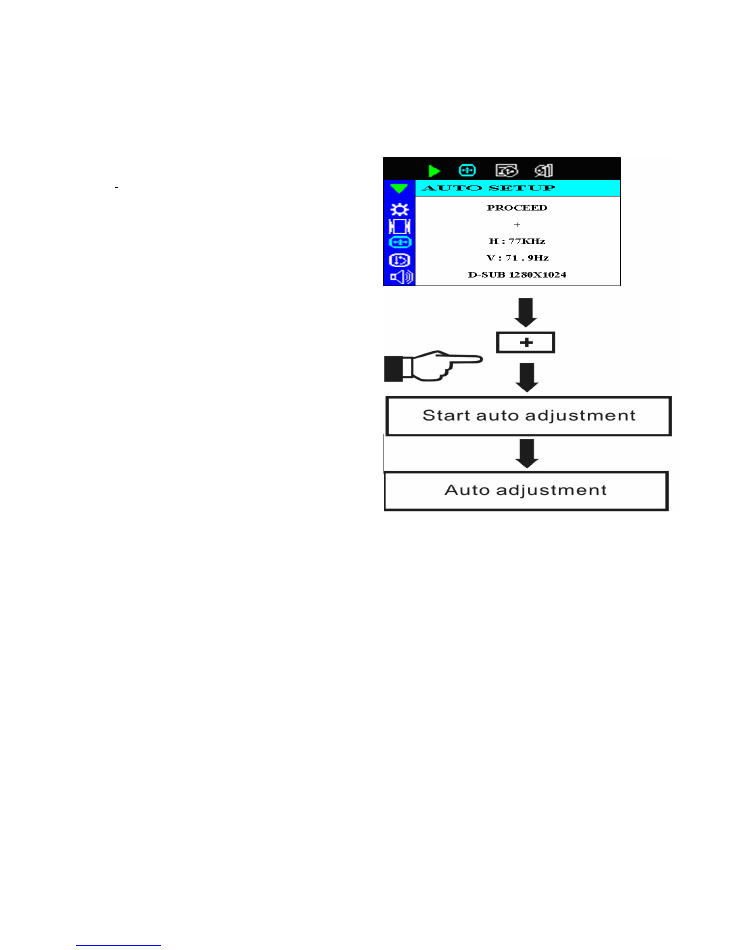
There are two ways to adjust the monitor’s screen, i.e. auto adjustment and manual adjustment
.
Auto adjustment
1.
Power ON the LCD monitor and computer.
2.
Select “AUTO SETUP” of OSD screens by
pressing the“
d
” button to “AUTO
SETUP”.
3.
Press “+” button while displaying “AUTO
SETUP” screen.
4.
The auto adjustment is started. “AUTO
SETUP” will be displayed during auto
adjustment. It takes about 10 seconds to
finish adjustment.
Manual adjustment
a)
Power ON the LCD monitor and computer.
b)
Adjust according to the aforementioned “Operating Procedure” and “Menu Table” to adjust the
screen to your favorable screen display.
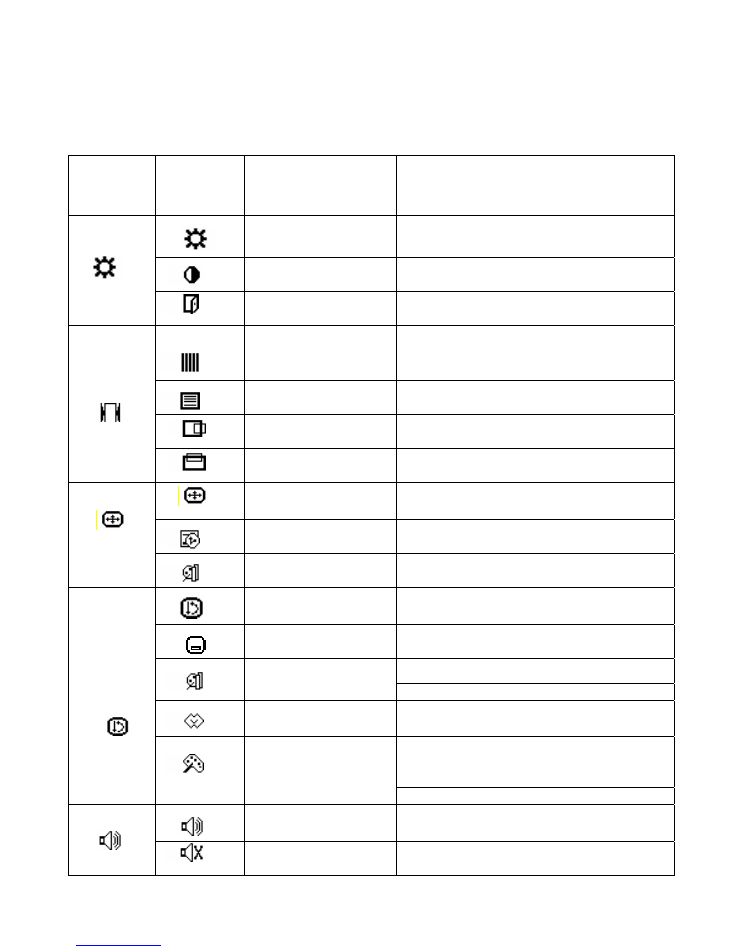
6.0 OSD Icon Overview
Main
Menu
Sub Menu
Function Name
Function
BRIGHTNESS
Adjusts the level of brightness and darkness
CONTRAST
Adjusts the RGB color pattern set of the
contrast
EXIT
Tune off OSD window
CLOCK
Adjusts the number of pixels from source
video
CLOCK PHASE
Adjusts the phase relative to video H-sync
signal
H POSITION
Moves the screen horizontally (left/right)
V POSITION
Moves the screen vertically (up/down)
AUTO SETUP
To auto adjust press the “+” button
OSD TIME OUT
Auto tune off OSD window timer
A/D
Select input port is analog or digital
ALL RESET
Return to factory preset value
OSD POSITION
Changes the OSD position
“-” Represents the TEXT mode
DISPLAY MODE
“+” Represents the GRAPHIC mode
LANGUAGE
Press “+” and “-” to choose OSD language
STANDARD: Factory preset color select
(9300K, 7500K, 6500K(default), 5400K,
4200K)
COLOR
CUSTOM: Preferred color is adjusted
VOLUME
Adjust the volume of built-in speaker
MUTE
Disable or enable sound

NO SIGNAL
INPUT
1.
If this warning appears, please check the connector. If it is bent or damaged, the signal
cable may be affected.
2.
If the monitor is in “sleep” mode to save power, please move the mouse or press any key
to “wake” it and return to working mode.
3.
Please check relevant diagrams, and make sure the monitor has been properly
configured.
4.
Please check the signal cable. If the type is incorrect, please use the cable that came with
the monitor.
This warning indicates that the input signal frequency does not match those supported by
this monitor. For this model, horizontal frequency must be in the range of 30 ~ 80 KHz and
vertical frequency in the range of 55~75Hz. Please make sure your input signal is within
these ranges.
OUT OF RANGE
H : 35KHz
V : 86.8Hz

7.0 Specification & Technical Data
Model No. H170
Input Signal
Analog RGB 0.7Vp-p /75 ohm, TTL Sync,Digital RGB TMDS(optional)
Scan Frequency
~80 KHz ,V: 55~75 Hz
H: 30
640x400,720x400,640x480,800x600, 832x624, 1024x768, 1152x864,
1152x870,1280x960, 1280x1024
RGB Mode OSD
Brightness, contrast, H./V. position, phase adjust, clock adjust, language,
color, volume, reset, exit
Color: Standard (93
Custom R,G ,B
00K, 7500K, 6500K (default), 5400K, 4200K)
Language: English, France, German, Italian, Spanish,Sweden,
Traditional Chinese ,Simplified Chinese
Audio (Option)
2W*2 THD: 3% Input 0.5 Vrms
Power Adapter Input
AC 100~240V, 50~60 Hz Current: 1.6A
Power
Consumption
45
W
(max)
/
Standby
under
2W
Operation Environment
Temperature: 0~40
Humidity:
Less
than
80%
Altitude:
To
10,000
feet
Plug & Play
DDC 2B/2Bi
Power Management
VESA DPMS
Dimensions (W x H x D)
374 x 397 x 195mm
Weight
(w/
Stand)
3.7
kg
Terminal
AC power jack, D-Sub 15 VGA ,DVI-D (optional),audio jack (optional)
Control Button on front frame
Power, Exit/Auto, Increase (+), Decrease (
─
),Down(
d
),Right(
f
)
Accessories
AC power cord, User manual, Warranty card, D-Sub 15 cable
DVI-D cable (optional), audio cable (optional)
Export carton with monitor &
Accessories
Dimensions W x H x D
420 x 457 x 145mm
Weight (G.W.)
5.5 kg
*** The above specifications may differ depending on the actual LCD panel utilized and are subject to
change without prior notice.
8.0 Energy-saving Modes
W
hen this product is operated, it complies with relevant power-saving measures stipulated by the
Energy Star and VESA (Video Electronics Standards Association) standards. When the monitor is left
unused, it can also automatically eliminate unnecessary power consumption. If the user intends to use
this feature, the monitor must be connected to a computer with a power management system that
complies with VESA standards. There are three energy-saving modes that users may choose, as listed
below (at this time, the computer must also be configured for these modes to take effect):
POWER SAVE
* Stand By Mode
The monitor enters the Stand By mode after the line signal is cut off. At this time, power
consumption is less than 2W, the screen will turn dark, and the power indicator turns amber .If
there is any input from the keyboard or mouse, the monitor will re-enter the on mode immediately.
* Suspend
The monitor enters the Suspend mode after the field signal is cut off. At this time, power
consumption is less than 2W, the screen will turn dark, and the power indicator turns amber . If there is
any input from the keyboard or mouse, the monitor will re-enter the on mode immediately.
* Off Mode
The monitor enters the Off mode after both the line signal and field signal are cut off. At this time,
power consumption is less than 2W, the screen will turn dark, and the power indicator turns amber . In
case there is any input from the keyboard or mouse, the monitor will re-enter the on mode immediately.
* The user can view the status of the power-saving modes through the LED on front panel.
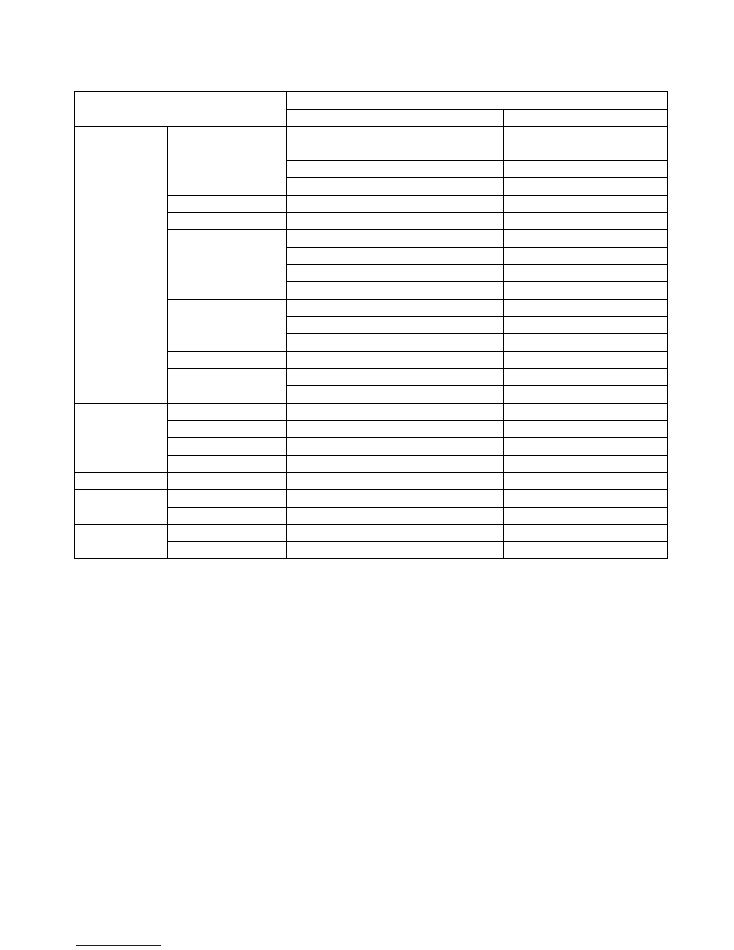
Signal Power
Mode
Line Signal
Field Signal
Video
Signal
Power
Indicator
Power
Consumption
On
Y Y Y
Green
<45W
Stand
By
N Y N
Amber
<2W
Suspend
Y N N
Amber
<2W
Off
N N N
Amber
<2W
NOTE:
It is better to remove the power cord from the electrical socket when the
monitor is not in use for an extended period of time.
9.0 Supported Timing
Display Mode
Horizontal Frequency
Vertical Frequency
31.4 KHz
59.9 Hz
37.8 KHz
72.8 Hz
640 x 480
37.5 KHz
75.0 Hz
720 x 350
31.4 KH/z
70.0 Hz
720 x 400
31.5 KHz
70.1 Hz
35.1 KHz
56.3 Hz
37.9 KHz
60.3 Hz
46.9 KHz
75.0 Hz
800 x 600
48.1 KHz
72.0 Hz
48.4 KHz
60.0 Hz
56.5 KHz
70.0 Hz
1024 x 768
60.0 KHz
75.0 Hz
1280 x 960
60.0 KHz
60.0 Hz
63.9 KHz
60.0 Hz
VESA
1280 x 1024
79.9 KHz
75.0 Hz
640 x 480
35.0 KHz
66.7 Hz
832 x 624
49.7 KHz
74.6 Hz
1152 x 864
63.8 KHz
70.0 Hz
Macintosh
1152 x 870
68.6 KHz
75.0 Hz
PC-9800
640 x 400
24.8 KHz
56.8 Hz
1152 x 900
61.8 KHz
66.0 Hz
SUN
1280*1024
71.6 KHz
67.1 Hz
1280 x 960
62.5 KHz
62.5 Hz
1280 x 1024
81.1 KHz
76.1 Hz
10.0 FAQ (Frequently Asked Question)

Question: What should I do if there is no picture?
z
Make sure the cable is connected to the port on your PC’s display card.
z
Make sure the computer and screen are both turned on.
z
Make sure the pins on the connector head of the cable are not bent or broken.
Question: What should I do if a
mber
LED lights are on but there is no picture?
z
Make sure the cable is connected to the port on your PC’s display card.
z
Check if the computer is in sleep mode or not.
Question: What should I do if green LED lights are on but there is no picture?
z
Check if the output frequency of computer is outside the monitor’s range. Refer to the material
above on timing mode .
z
Check and adjust BRIGHTNESS, CONTRAST, BACKGROUND BRIGHTNESS using the OSD
menus.
Question: What should I do if RGB NO INPUT SIGNAL is displayed on the
screen?
z
Make sure the signal cable is connected to the port on your PC’s display card.
z
Check that your computer is operating normally.
Question: What should I do if SIGNAL OVER RANGE is displayed on the screen?
z
Check your PC’s display card specification, set vertical frequency to 55 ~ 75 Hz, and make sure
resolution is less than 1280 x 1024. Refer to the material above on timing mode for further
information.
Question: What should I do if the screen image is not clear?
z
Confirm that the computer signal output is normal, and then check the AUTO ADJUST and Recall
items in the OSD menu.
z
Check the PHASE & Clock items.
z
Set the screen image to 1280 x 1024 @ 75Hz.
Question: What should I do if the screen image size is incorrect?
z
Check the Recall & AUTO ADJUST items of the OSD menu.
z
Adjust horizontal and vertical position using the OSD menu.
z
Make sure that your display card is compatible with the LCD specifications. (Please refer to
relevant diagrams or manual and updated information as well).

www.edge10.com