Full Text Searchable PDF User Manual
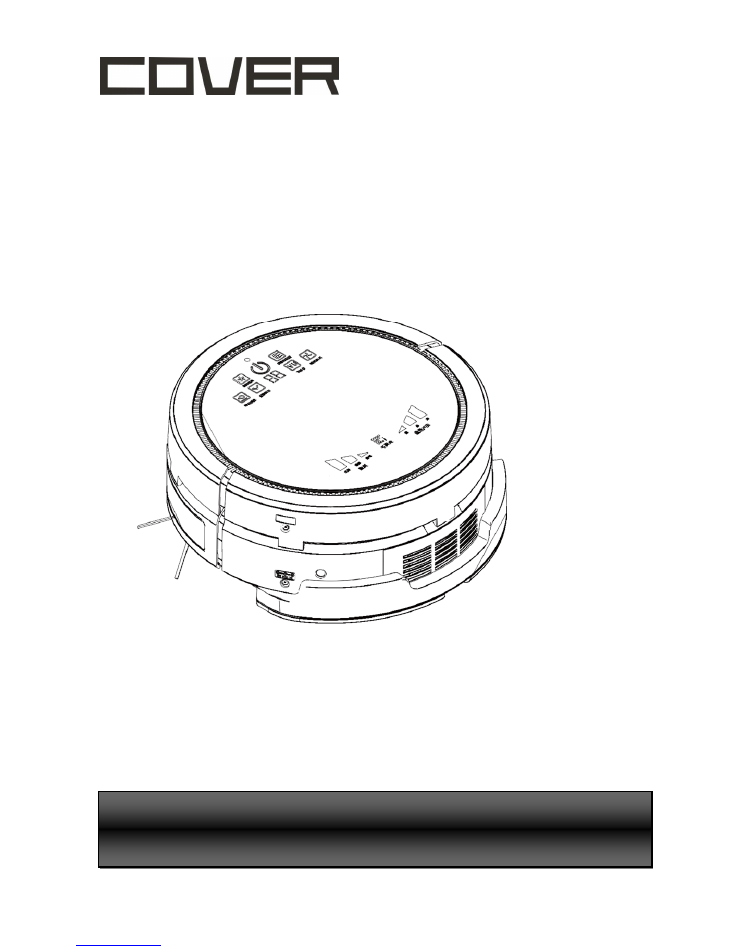
CR-V01K
All-in-one cleaning
& air purifying robot
SERVICE HOTLINE
:
1-888-566 6736
Or visit : www.COVERproducts.com/support/
Please read this user manual thoroughly before operating the product & retain this document for
future reference
This product is for indoor use only. Store and operate in room temperature only
USER M
ANUAL

2
Contents
General Safety Instructions ...................................................................................................................... 3
Content .................................................................................................................................................... 5
Features .................................................................................................................................................. 6
Robot Top (without Air Purifier) .................................................................................................. 6
Bottom ....................................................................................................................................... 6
Setup ....................................................................................................................................................... 7
Setup Home Base ..................................................................................................................... 7
Docking Test ............................................................................................................................. 7
Battery installation ..................................................................................................................... 7
Battery removal ......................................................................................................................... 8
Virtual Wall ................................................................................................................................ 8
Basic Operation ..................................................................................................................................... 10
Robot Panel ............................................................................................................................. 10
Remote Control ..................................................................................................................................... 12
Schedule Setting ................................................................................................................................... 13
Maintenance .......................................................................................................................................... 14
Dust Bin and Filter Basic Cleaning .......................................................................................... 14
Deep Cleaning ......................................................................................................................... 14
Side Brushes ........................................................................................................................... 15
Rolling Brush ........................................................................................................................... 15
Air Purifier Module ................................................................................................................................. 16
Control Panel ........................................................................................................................... 16
Features .................................................................................................................................. 16
Installing Purifier to Cleaning Robot ......................................................................................... 17
Purifier Filter Replacement ...................................................................................................... 17
Mopping Module Replacement .............................................................................................................. 18
Damp Mop Module ................................................................................................................................ 19
Install Mopping Cloth on Damp Mop Module ........................................................................... 19
Install Damp Mop Base on Robot ............................................................................................ 19
Useful Tips ............................................................................................................................................ 20
Troubleshooting ..................................................................................................................................... 23
Specification .......................................................................................................................................... 23
Warranty Statement ............................................................................................................................... 24

IMPORTANT SAFETY INSTRUCTIONS
3
General Safety Instructions
THE USERS OF THIS APPLIANCE SHOULD HAVE FULL KNOWLEDGE OF THE SAFETY
INSTRUCTIONS AND UNDERSTAND THE POSSIBLE RELATED HAZARDS. THIS IS NOT A TOY.
CHILDREN SHOULD NOT USE THIS WITHOUT SUPERVISION OF PARENTS OR ADULTS.
TO REDUCE THE RISK OF FIRE OR ELECTRIC SHOCK, DO NOT EXPOSE THIS ROBOT AND ALL
OTHER PARTS TO RAIN OR MOISTURE.
1. Safety Precautions
Please read the following safety and operation instructions thoroughly before you use
this robot
Please retain this manual for future reference
Heed all warnings on the product to prevent any possible hazards or damages such
as fire, short-circuiting or injury
Please follow all safety operations and processes stated in this manual
Please make sure you have full understanding about the safe use of this robot and
related parts
Don not use corrosive cleansers or chemical solvents to clean the product
2. Safety Instructions
This robot is for indoors use only
This robot is NOT a toy. Sitting or standing on this robot is strictly prohibited
Since this robot is an electronic product, never immerse it in water or use it in a moist
or wet environment
Before the robot starts the cleaning process, please tidy up small items, such as
clothing, power cords, cables, and lose fringes of rugs, to prevent any possible jam of
the robot's rolling brush or suction nozzle.
When the robot is working, please pay additional attention to children or pets nearby.
it is highly suggested to keep them away from the robot
This robot is not designed to pick up debris that is still burning, smoking, or wet. Tis
is also strictly prohibited to use this robot to clean up chemical particles or volatile
liquids such like gasoline.
In case the robot is not used for a long period of time, please recharge the battery at
least once every other month and store it in a cool and dry place after it is fully
charged.
IMPORTANT SAFETY INSTRUCTIONS
4
Use only attachments, accessories and spare parts specified by the manufacturer.
Remove the battery from the robot and make sure a ll power is off before you start
cleaning the robot.
Never touch the robot and any other parts, including the battery charger, power plug
and power cord, when your hands are wet.
Warning
Do not look directly into the UV light and do not touch the UV light bulb with
bare hands or any sharp or conductive tools.
The UV light is a permanent fixture. Do not attempt to remove or replace the UV
light. This replacement can only be performed by professional personnel
authorized by the manufacturer.
CONTENT IN PACKAGE
5
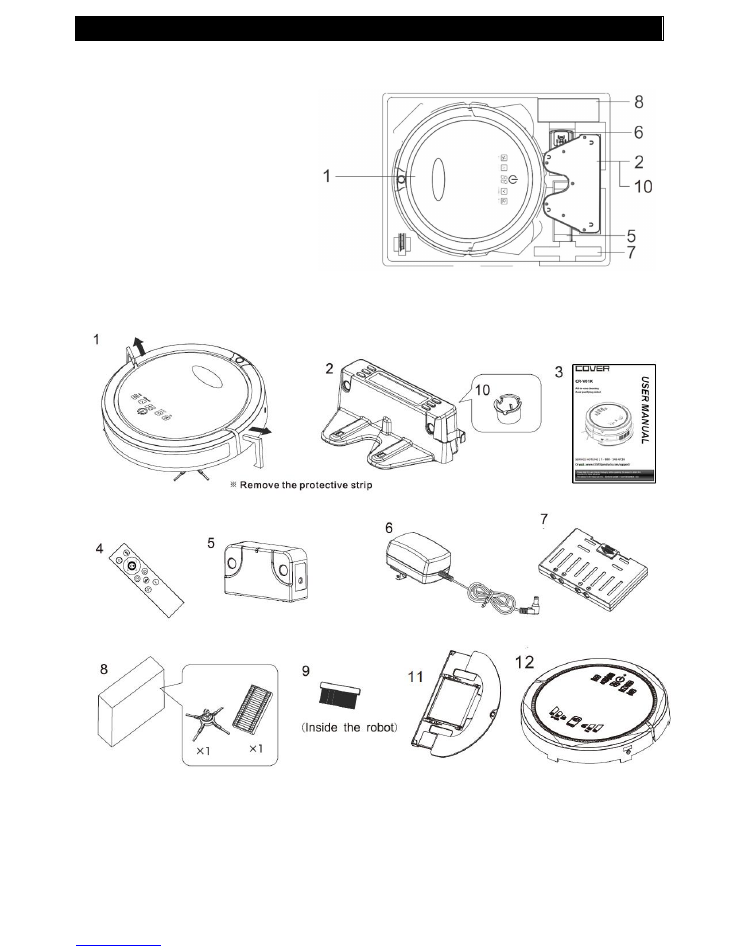
Content
1.
V01 Vacuum Robot
2.
Charging Home Base
3.
User Manual
4.
Remote Control
5.
Virtual Wall
6.
Adaptor
7.
Battery
8.
Spare Parts Box
9.
Cleaning Brush
10.
Hair Removal Tool
11.
Wet Mopping Module
12.
Air Purifier (SKU# CR-V01K)

UNDERSTAND THE PRODUCT
6
Features
Robot Top (without Air Purifier)
Bottom
Robotic & Sensing Systems:
Scheduler/Auto Recharging Home
Base
Ultrasonic Obstacle Detection /
Collision Obstacle Detection / Anti-
falling Sensors
Ultrasonic Dust Sensors - perform
detail cleaning with spiral mode on
dirty area
Ultrasonic Virtual Wall - When needed,
use Virtual Wall to limit cleaning area
Cleaning System:
Side Brushes and Focused Suction
Inlet
Floating Roller Brush
Debris Filter & HEPA Filter
UV Light - Exterminate bacteria and
mites
Mop / Damp Mopping Module - for
wood or tile flooring
Air Purifying Module (V01K)
PRODUCT SETUP
7
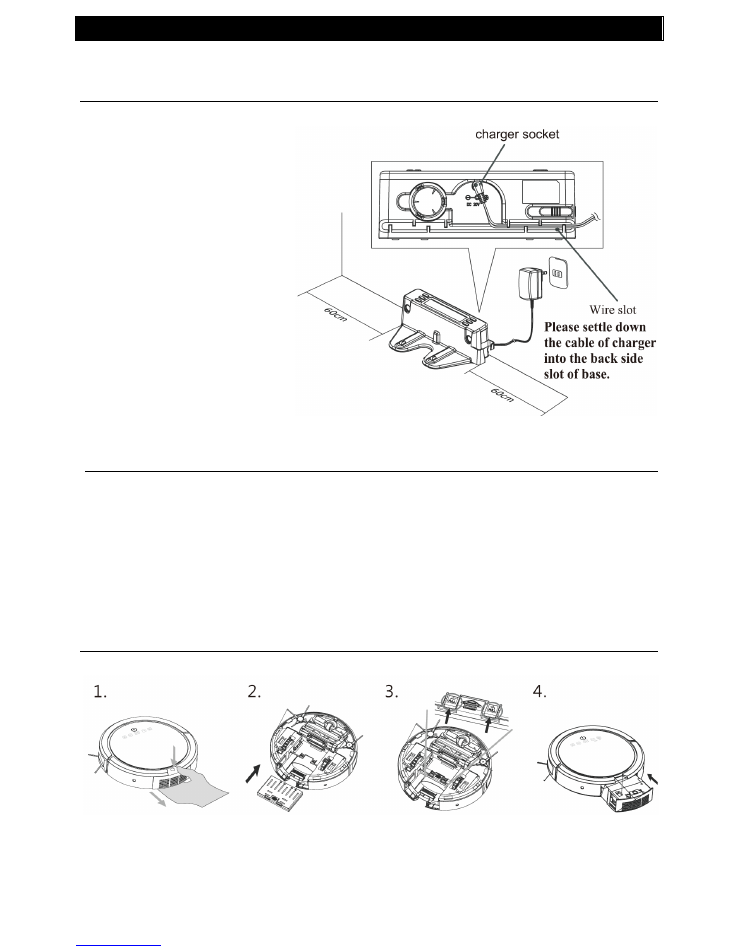
Setup
Setup Home Base
Position Home-base on
an even floor surface
against wall
Position it at location
with at least a 0.6m (2 ft.)
clearance around
Connect the AC adaptor
to the power socket on
the rear side. Only use
the AC adaptor provided
Always keep the
Recharging Home Based
power plugged in.
Docking Test
Leave the robot on the floor somewhere near the Recharging Home Base.
Press the "Home" button on the remote control.
The robot will return to the Recharging Home Base automatically.
If the robot fails to dock, check the installation process to make the necessary
adjustments to the Recharging Home Base until the robot can dock properly.
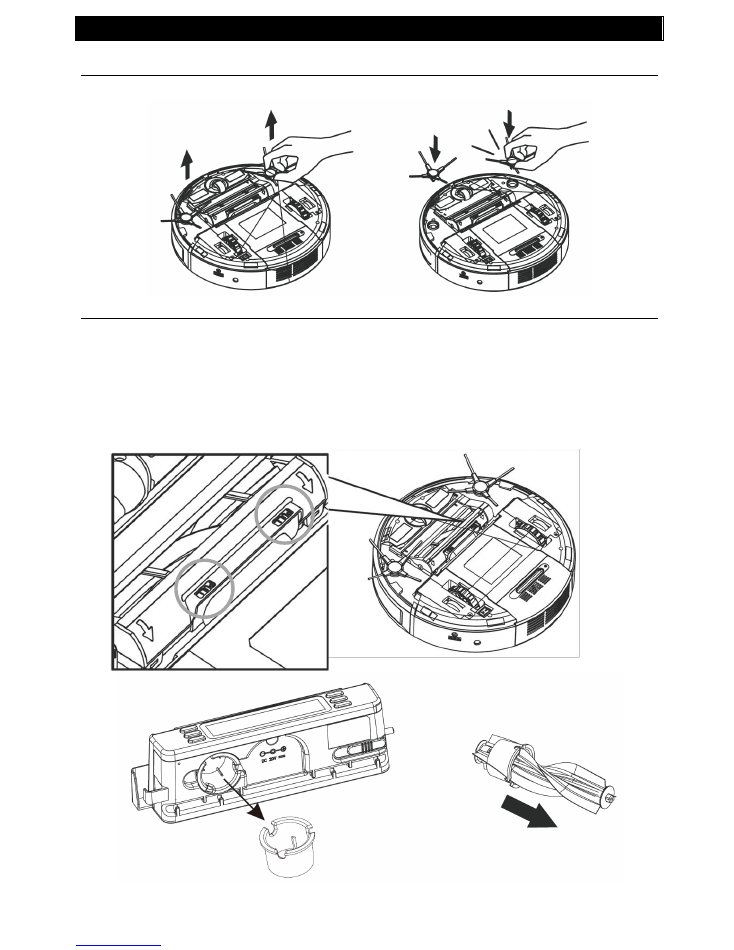
Battery installation
Battery is may be installed in robot when purchased
PRODUCT SETUP
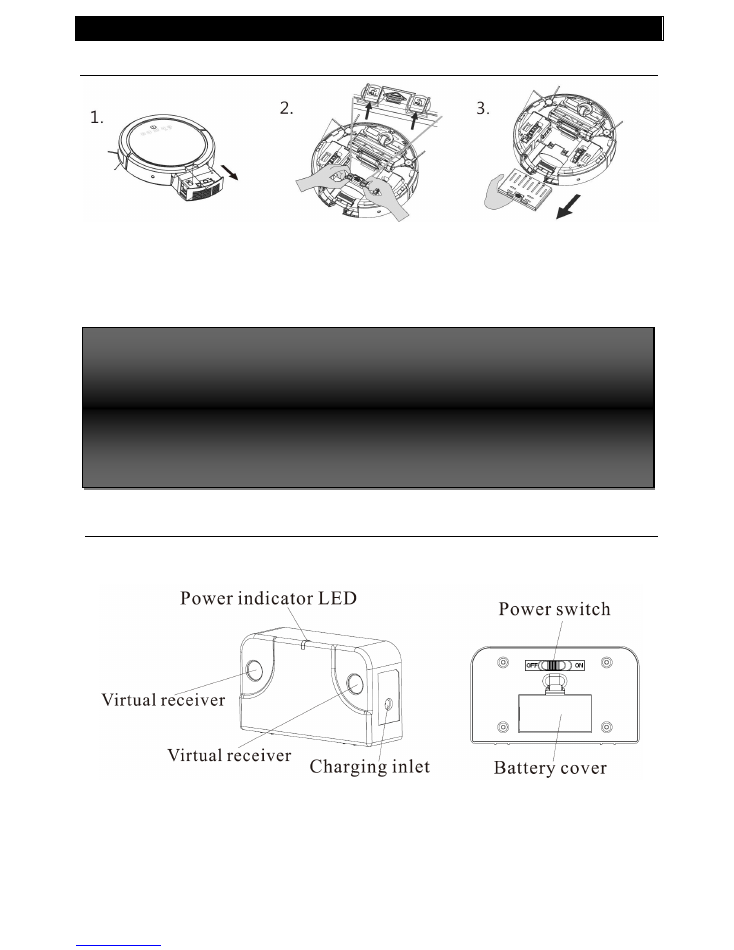
8
Battery removal
Pull out dust bin by
pressing dust bin release
button
Push battery hook buttons
simultaneously
Remove battery
Virtual Wall
The Virtual Wall create an invisible barrier that the robot will not cross
Insert the 2 AA rechargeable batteries provided. Make sure batteries in
correct polarity
Turn on Virtual Wall by sliding the power switch
Battery Care
Recharge battery as soon as the robot is used
Keep the robot charged when not in use
If the robot will not be used for a longer period of time, remove
the battery from the robot and store in a cool and dry place
PRODUCT SETUP
9
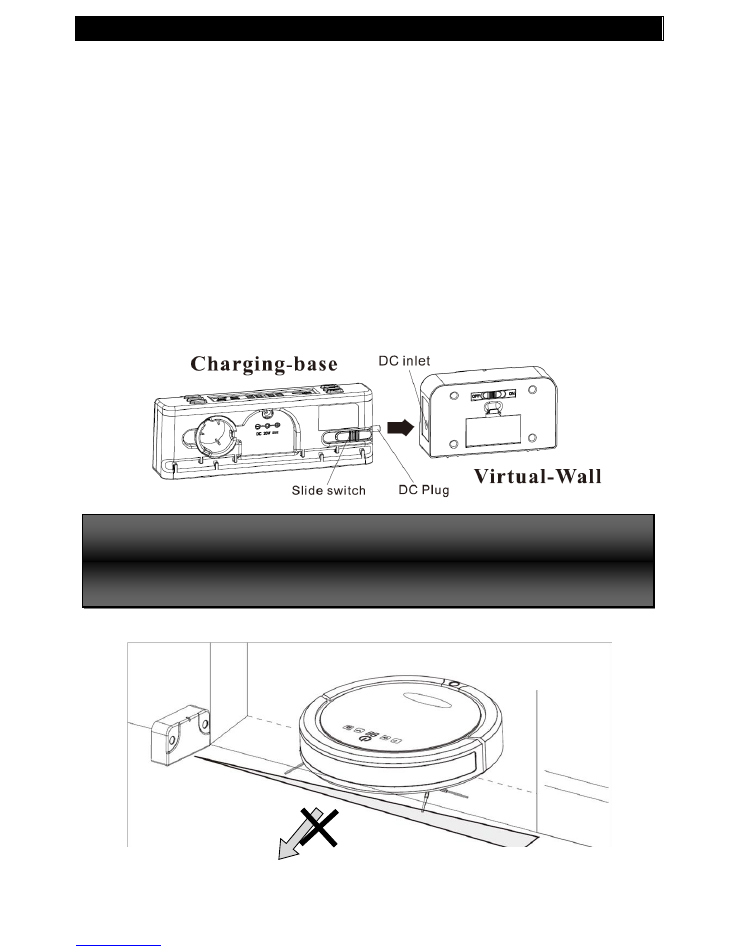
When turned on, the blue LED will light up for 70 seconds, then the Virtual
Wall turns into waiting mode. When the robot is working, the Virtual Wall
will turn on and show blue LED light.
The LED light will blink when the Virtual Wall battery is running low. The
Virtual Wall can be charged by the robot charging base as below
o
Press the slide out the DC plug from charging base (make sure
charging base is se
t to “ON”)
o
Plug in Virtual Wall DC inlet to the DC plug
o
When charging is complete, LED will glow continuously
When robot is cleaning, position the Virtual Wall at least 3 ft away
from Charging Base, and avoid facing Charging Base directly
The effective distance of Virtual Wall barrier is 10 ft
BASIC OPERATOIN
10
Basic Operation
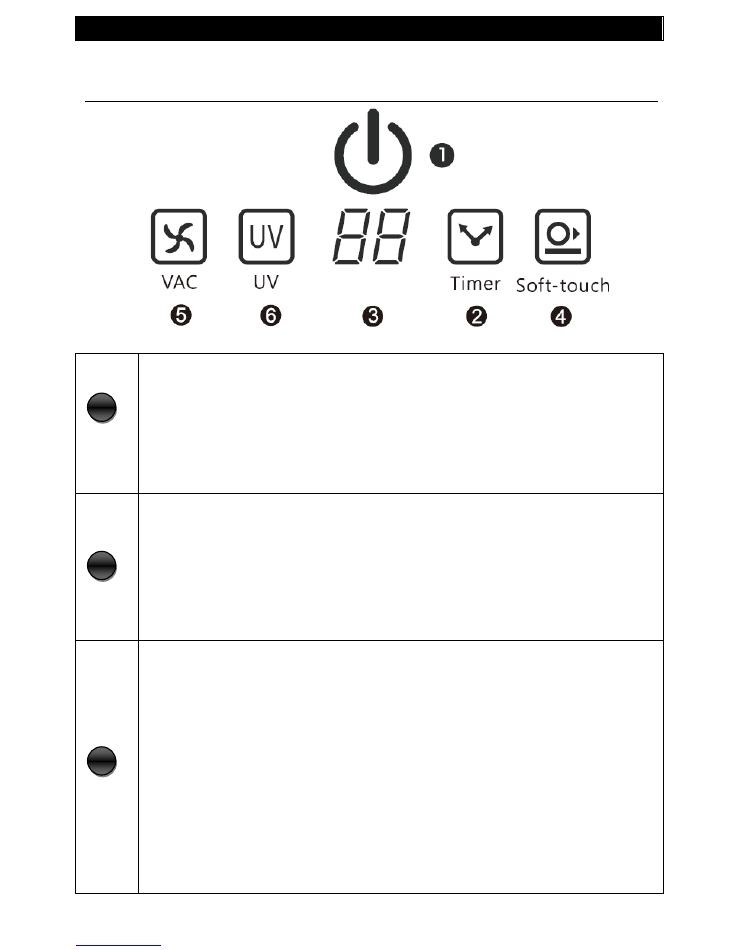
Robot Panel
Start/Stop Button:
Press to start or stop a work cycle
Solid Blue
–
working or fully charged when at Charging Base
Blue Pulse
–
Charging
Red Pulse
–
Low Battery
Cleaning Timer
8 different cleaning time options are available. Users may also use their
Remote to enter select desired cleaning time (1=10, 2=20
… 12=120
mins). Selected during will be shown on the display.
When robot is activated, the default cleaning time will be the time
selected in previous job
Display (Timer, Cleaning Mode, Error Message)
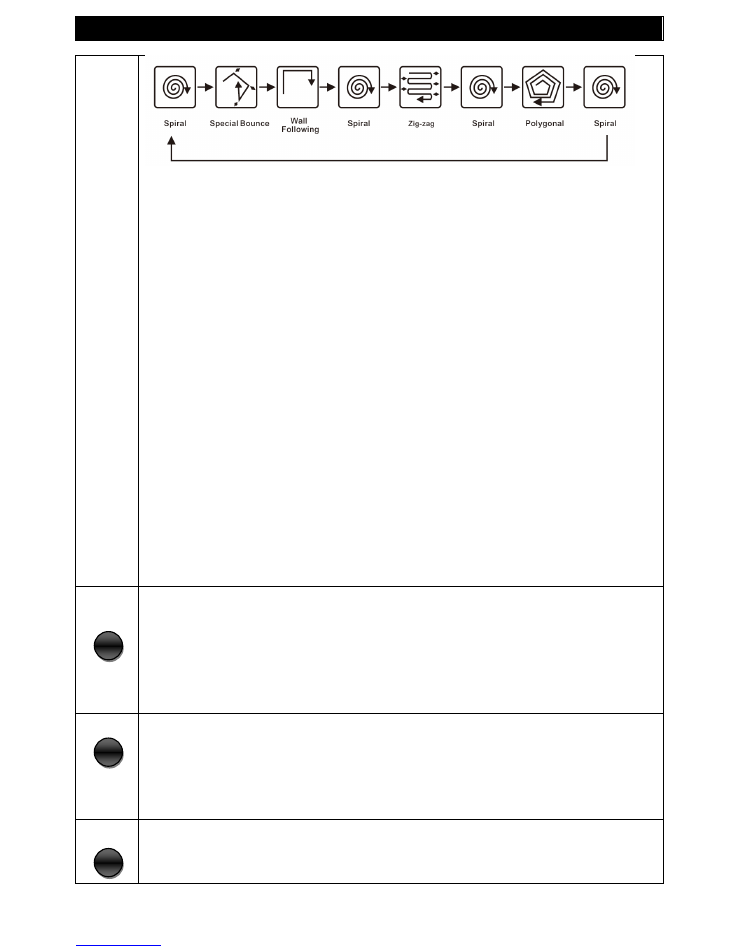
There are 6 cleaning patterns the robot uses in cleaning process. User
may use Remote to select desired pattern
1.
Special Bounce
2.
Spot Spiral
3.
Wall Following
4.
Zig-Zag
5.
Polygonal Spiral
A.
Auto (special sequence of patterns as below)
H
. Returning to Charging Base (Home)
When “A” is selected below cleaning pattern will be performed
1
2
3
BASIC OPERATOIN
11
Error Messages
Robot may show below error messages when sensed problem
0 0
–
Dust-Bin Full Reminder
–
Clean Up dust bin
E 1
–
Front Cliff Sensor Over Time
–
Robot may be trapped in stair
case or floor edge
E 2
–
Recharging Error
–
Check battery, try remove and install battery
E 3
–
Front Bumper Over Time
–
Front Bumper may be stuck
E 4
–
Battery Over Heating
–
Stop the robot for min. 60 mins and
restart.
E 5
–
Left Wheel Overloaded
–
Check left wheel, remove any objects
stuck in it
E 6
–
Right Wheel Overloaded
–
Check right wheel, remove any
object stuck in it
E 7
–
Side Brush Overloaded
–
Check both side brushes and remove
any jammed objects
E 8
–
Rolling Brush Overloaded
–
Check the rolling brush and
remove any jammed objects.
E 9
–
Vacuum Motor Overloaded
–
Stop using the robot for min. 60
mins and restart.
Soft-Touch
When activated, the robot will slow down its speed in order not to collide
with any objects when cleaning
When deactivated, the robot will sense object with its bumper sensor
Vacuum Motor
Turn vacuum motor ON or OFF
(user may want to turn OFF vacuum when performing damp mopping)
UV light
Turn UV light sanitization On or OFF
4
5
6
BASIC OPERATOIN
12
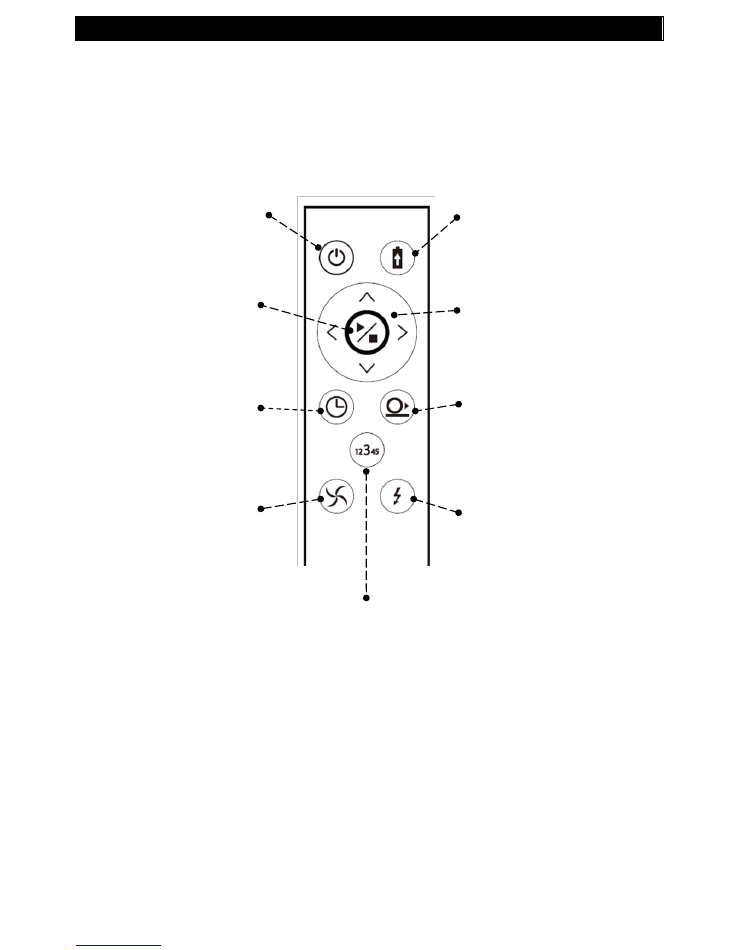
Remote Control
Please remove the plastic insulation tag at the battery cover before using remote
control
Power
– Press to
activate or shut down
robot
Home/Charge
– Press
to order robot to return
Home Charging Base
and abort cleaning
Start/Stop
– Press to
start or stop cleaning
process
Direction
– Press to
manually control robot
movement
Timer
– Press to
select desired
cleaning time
Vacuum Motor
–
Press to activate or
stop vacuum motor
Soft Touch
– Press to
select between bumper
sensing and soft touch
sensing
UV light
– Press to turn
UV sanitizing ON or
OFF
Cleaning Mode -
Press to select cleaning mode
between
1
Special Bounce
2
Spot Spiral
3
Wall Following
4
Zig-zag
5
Polygonal Spiral
A
Auto (pre-set sequence of pattern 1 to 5)
SCHEDULING
13
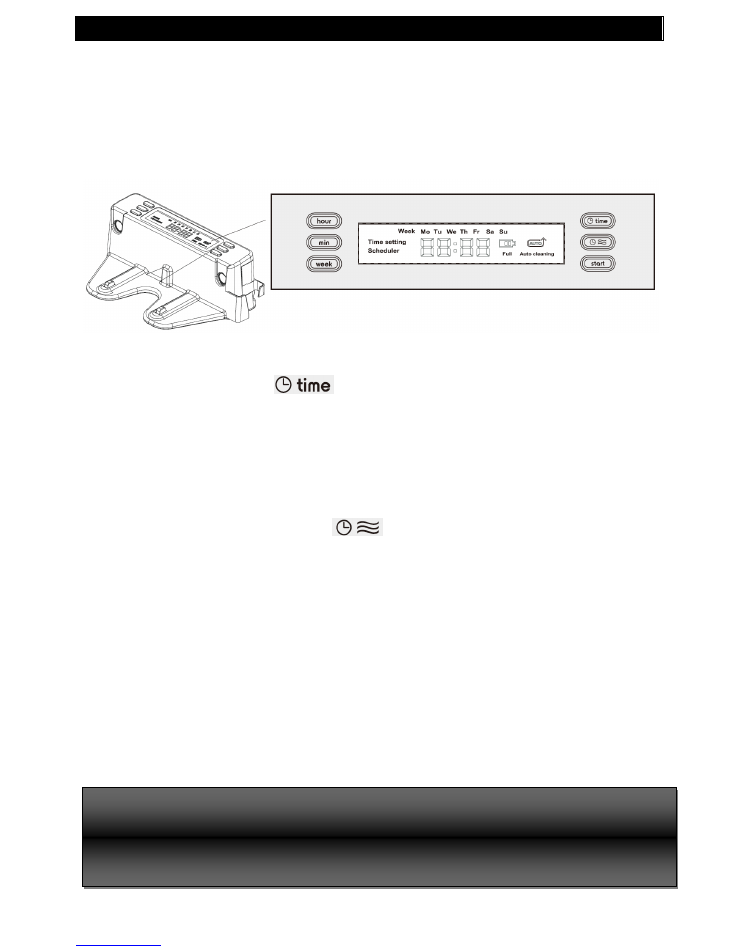
Schedule Setting
Users can set schedule for robot cleaning process. This scheduling function is on
Recharging Home Base.
Make sure the Recharging Home Base is powered all times.
Set Local Weekday and Time
1.
Press "
TIME
" button (
). The LCD display will show "Time Setting".
2.
Press "
WEEK
" button to choose the correct weekday. Then press "Time" button to
confirm
3.
Press "
HOUR
" button to choose the hour. Then press "
TIME
" button to confirmed
4.
Press "
MIN
" button to choose the minute. Then press "
TIME
" button to confirmed
Scheduling the Robot
1.
Press the "
SCHEDULE
" button (
) to start. The LCD display will show
“
Scheduler".
2.
Press the "
WEEK
" button. The LCD display will show "Mo" (Monday) blinking.
3.
If Monday is the chosen day,
press the "WEEK" button to CONFIRM
. Otherwise,
waiting for 8 seconds to skip
Monday
4.
Repeat step 3 and 4 to finished all cleaning day settings
5.
Press the "
HOUR
" button to select Auto Start time. Press "
Schedule
" button to
confirm
6.
Press the "
MIN
" button to select Auto start time. Press "
Schedule
" button to confirm
7.
When schedule setting is finished, scheduled time will be displayed for 10 seconds
and then it will shows local time (scheduled days is shown with local time)
8.
Press the "
START
" button to set the robot on cleaning schedule. The LCD display will
show "AUTO".
(If Robot is not fully charged, it will skip Auto-Start)
The schedule setting process will be aborted if no input for more than 60 seconds.
To check the programmed cleaning time, press and hold the "Schedule" button
To changing schedule, repeat the previous setting process
To Start cleaning process manually, press
START
button on remote or press and hold
START
on home base for 3 seconds

MAINTENANCE
14
Maintenance
In order to keep the robot in its best condition and for the best cleaning
performance, it is suggested to perform the following maintenance.
Dust Bin and Filter Basic Cleaning
1.
Press the Dust Bin Release Button to remove the dust-bin.
2.
Press the side button to open dust compartment.
3.
Remove the debris filter.
4.
Empty all dust and shake off all debris.
5.
Remove the dust HEPA filter.
6.
Use the included brush (in robot) to wipe out the dust filter and debris filter
Deep Cleaning
1.
Carefully separate the debris holder part from dust compartment
2.
Gently wash the debris holder and debris filter.
3.
Dry them thoroughly with a cloth
MAINTENANCE
15
Side Brushes
Side Brushes can be removal or installed by pulling or pushed vertically to the slot
Rolling Brush
Take out rolling brush
by pressing
the “PULL” button on rolling brush, then
pull out the rolling brush directly
Take out cleaning tool located on the rear side of the Charging Home Base.
Slide the cleaning tool through the Rolling Brush.
Install rolling brush by Inserting
the rolling brush, then press the “PUSH”
button and close the cover
AIR PURIFIER (For V01K Model Only)
16
Air Purifier Module
Control Panel
Air Quality Indication displays
(Poor, Average, Good)
Ionizer enabled
Air Purifier fan speed displays
(Slow, Medium, Fast)
Start/Stop
When using with Cleaning Robot, touch the key to activate/deactivate both
Vacuum Cleaning Robot and Air Purifier Module.
When using purifier alone
*
, touch the key to turn on or off the Air Purifier
.
Timer
When using with Cleaning Robot, during Idle Mode, touch the key to set the
working time from 10 to 120 minutes, as “1” to “12”.
When using purifier alone *, touch the key to set the
working time: “
- -
“ as
ON
,“
1
” to
“
8
” as 1 to 8 hours.
Filter
Icon glows to indicate replacement of filter is needed. After replacing the
filter, hold the key for 3 seconds until the light goes off.
Purifier Fan Speed
Touch the key to set the speed from SLOW, MEDIUM, and FAST.
*
Requires separate power adapter, sold separately
Refer to Robot Control Panel for other buttons functions
Features
Top
Bottom
7
6
5
4
3
2
1
1
2
3
4
5
6
7
Customers purchased Vacuum robot (SKU# V01) can purchase the
module separately (SKU# V01A)
AIR PURIFIER (For V01K Model Only)
17
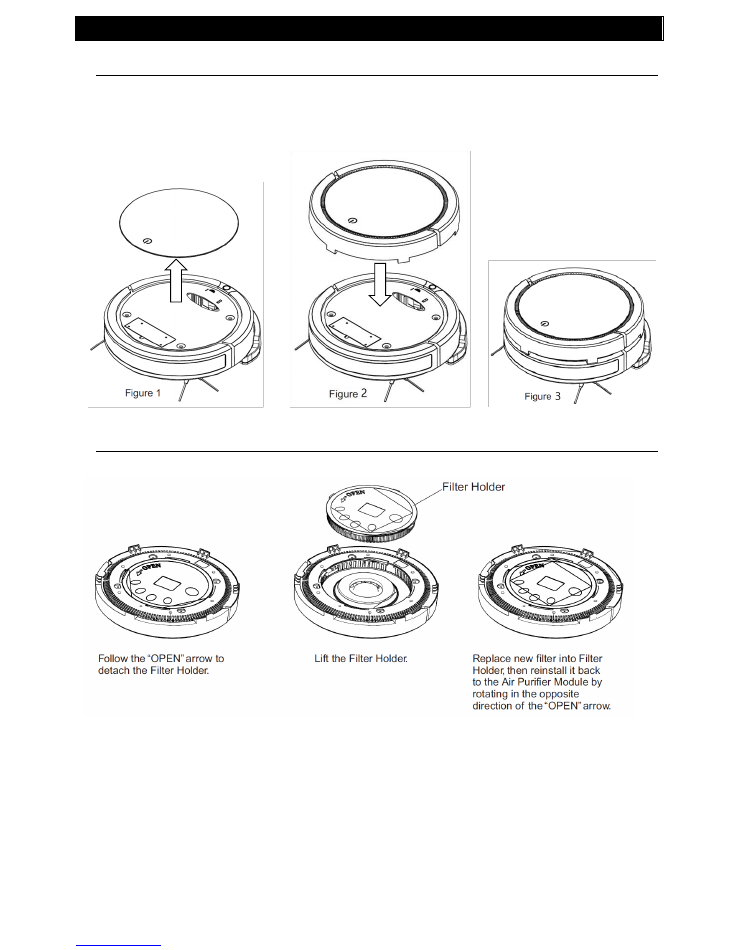
Installing Purifier to Cleaning Robot
Remove Vacuum Cleaning Robot's cover. (Figure 1)
Install the Air Purifier Module onto Vacuum Cleaning Robot. (Figure 2)
Air Purifier Module and Vacuum Cleaning Robot properly installed. (Figure 3)
Purifier Filter Replacement
ADDITIONAL INFORMATION
18
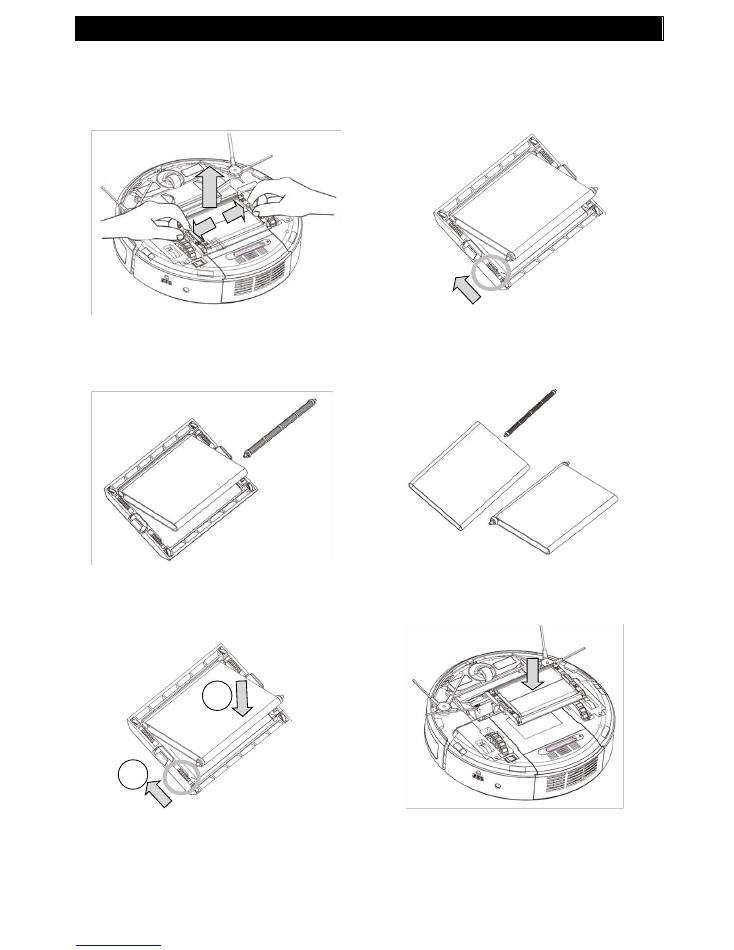
Mopping Module Replacement
DO NOT install mopping module for carpet flooring
1
1. Push both sides of the mopping module
at the position with “arrow” marks, and
lift the module at the same time
New
Old
2. Push the springs on both sides to take
out cloth and roller.
3. Take out both rollers
4. Insert both rollers to new mopping cloth
and insert
5. Insert new mopping cloth and rollers to
module by pushing springs on both
sides
1
2
6. Align hooks (mop set) and slot (robot)
and push down Mopping Module
ADDITIONAL INFORMATION
19
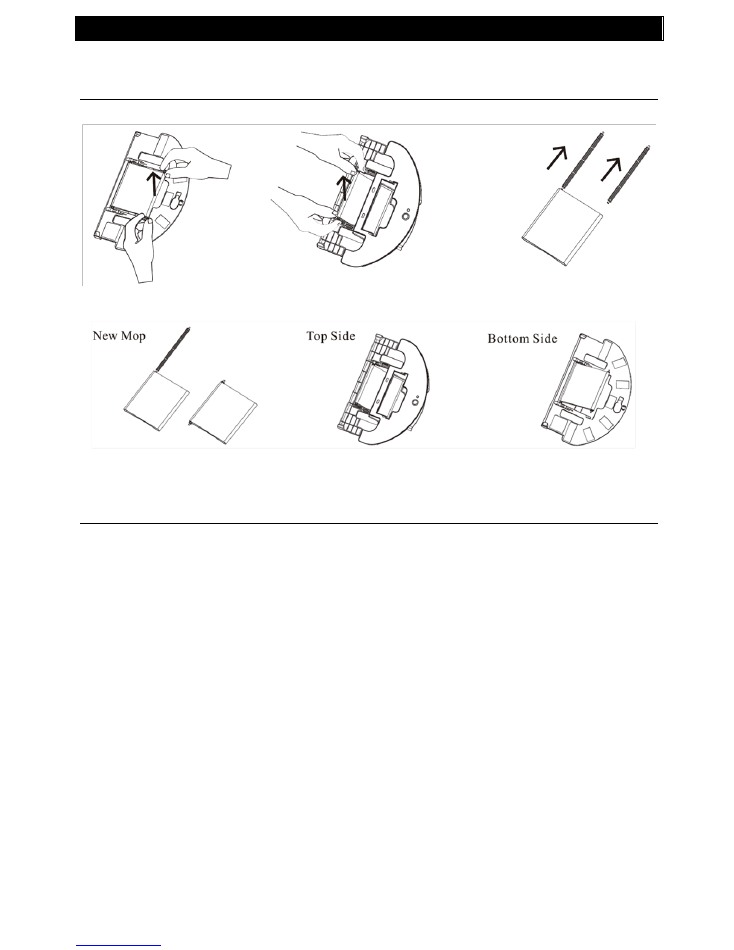
Damp Mop Module
Install Mopping Cloth on Damp Mop Module
DO NOT install mopping module for carpet flooring
Install Damp Mop Base on Robot
1. Flip the module and remove
second roller
Old
2. Insert rollers to new
mopping cloth
3. Place mopping cloth through the
bottom of the module and insert
roller to the slots on module top
4. Insert second roller to
slots on the module
bottom
5. Remove first roller
6. Take out both rollers
Bottom
Top
ADDITIONAL INFORMATION
20
Useful Tips
Tips #1
Remove large debris , loose cables, and wires from cleaning area that can be easily
tangles with brush or knocked over
Tips #2
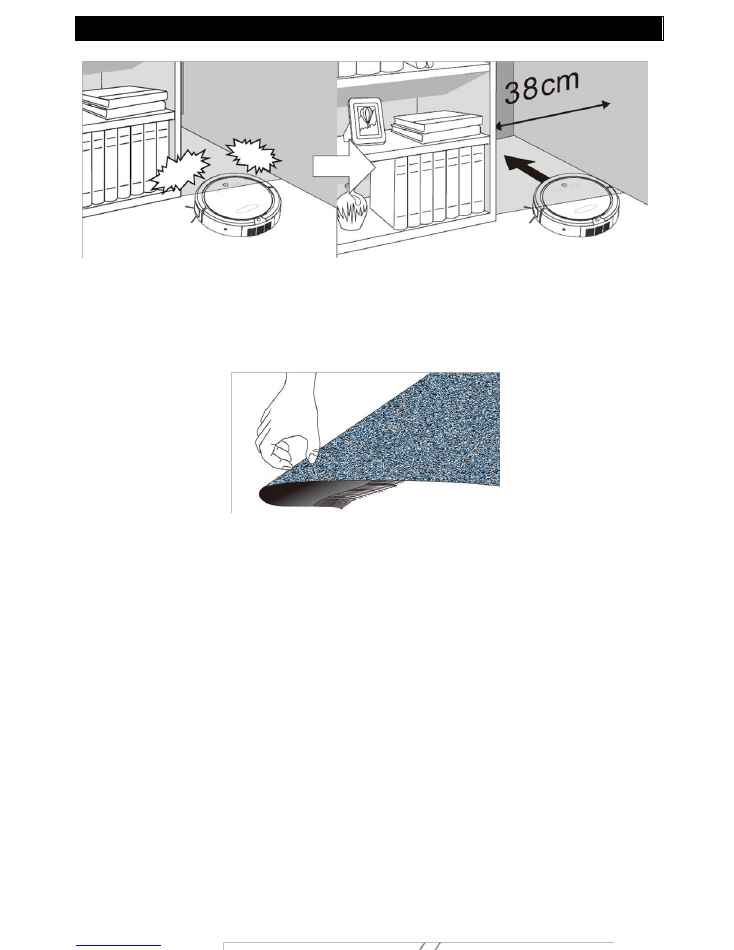
Leave enough clearance space (
15-inch
or more) for the robot to operate
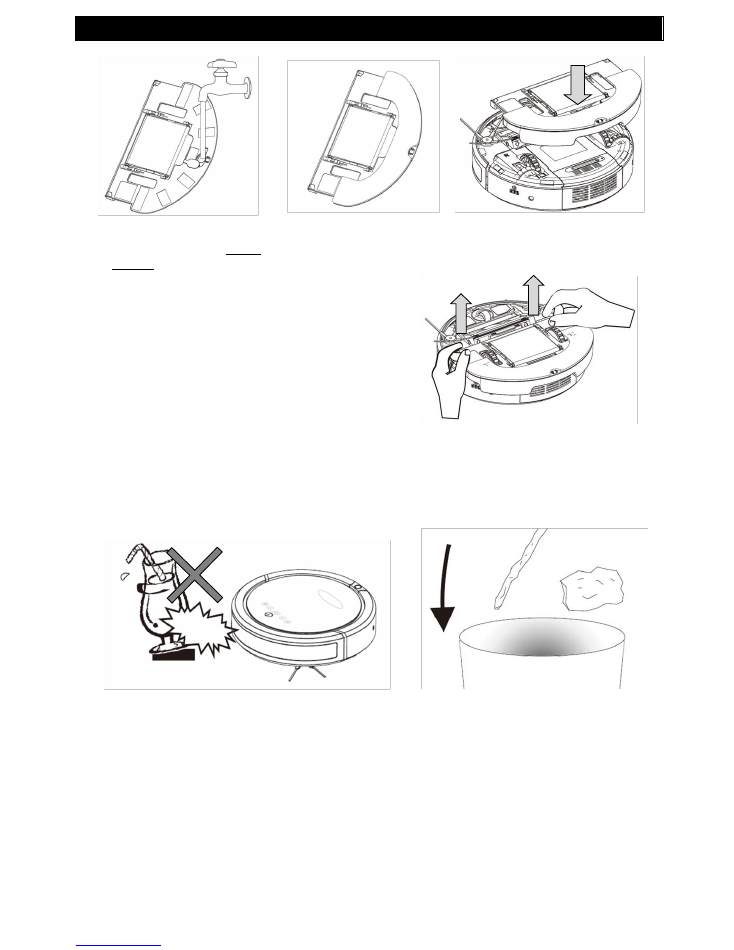
1. Open the cap on the base
bottom, fill in water. Small
amount of cleaning solution
could be added for better
cleaning performance.
Close the cap
2. Place round mop cloth
along the Velcro on
bottom of module
3. Make sure there is no leaking.
Then align module and robot
and push down module
To remove Damp Mop Base, Pull the
base at the position marked “PULL”
ADDITIONAL INFORMATION
21
Tips #3
Do not let loose edges of rugs, drapes, table cloths etc, to get caught by robot
’s
brushes. Roll the loose edges of rugs underneath.
ADDITIONAL INFORMATION
22
Tips #4
If some objects jammed the roller brush or side brush, turn the robot power off
immediately. Remove the objects before using the robot on again
Tips #5
Block off certain areas, like a room, with Sonic Virtual Wall (or other objects) to get
efficient cleaning result and prevent robot from losing its way back Charging
Home Base
Beep
Beep
Beep
Robot will beep when jammed.
Power off the robot at once
Remove objects jammed in
brushes or roller
Clean roller and vacuum
entrance area
ADDITIONAL INFORMATION
23
Troubleshooting
Symptom
Cause
Solutions
Error Message
Sensor malfunction or system
jammed
Check the error message section
(panel display) for correct actions
Robot cannot power
on
The battery may not be installed
probably or robot is not switched
ON
Check if battery is in good
condition and installed probably
Make sure ON-OFF switch on the
bottom of robot is turned ON
Remote control
malfunction
The battery insulation tag is not
taken off, OR
The battery is not installed
probably or running low
Take out insulation tag
Change battery
The robot cannot be
recharged
AC power is not plugged in to
Home base, or
The robot is not correctly docked
at the Home Base, or
The battery is over-heated
Check Home Base AC power
When robot docked on Home
Base, make sure the charge pad
is in proper position
Wait for 60 mins until battery
cooled down
Rolling brush or side
brush do not work
Brushes get stuck by debris or
hair
Clean brushes completely
The Robot does not
start cleaning after it
is fully recharged
The “Auto Start” function is not set
The battery is over-heated
On Home Base, check the
schedule setting and press “Auto”
button
Do not use the battery for at least
60 mins until it is completely
cooled down
The Robot keeps
moving backward or
turning around
Cliff sensors are blocked or
covered by dust
Wipe all sensors with dry, clean
cloth
Specification
Battery
Rechargeable Li-ion 3,350 mAh
Recharging Time
< 3 hours
Power Consumption
24W
Dimensions
13” diameter x 1.3” height (robot),
13” diameter x 1.8” height (purifier module)
Weight
11 lbs

WARRANTY STATEMENT
24
Warranty Statement
One Year Limited Product Warranty:
Cover International Inc. warrants to the original purchaser of this PRODUCT that the PRODUCT is free from defect
in original materials and workmanship for a period of up to one (1) year from the date of initial purchase. Your
sales receipt showing the date of purchase is the proof of purchase. this warranty is not transferable. The limited
warranty does not apply to products purchased from unauthorized COVER reseller.
During the warranty period, COVER will repair or replace a defective unit or part with or at COVER's option, a
refurbished unit or part that is equivalent to any new parts in performance. All exchanged units or parts replaced
under this warranty will become the property of COVER.
The limited warranty excluded all products that have been damaged or rendered defective as a result of:
Accident, misuse, or abuse
Operation outside the usage parameters stated in the products users guide
By the use of parts not manufactured or sold by COVER
By alteration of the product
Service by anyone other than an authorized service provider
COVER retains the right to assess all warranty claims to determine if damages are covered by the warranty. in case
of claim that is not covered by the warranty, customers will be contacted to determine whether such damages
should be repaired for a fee.
Obtaining Service
You may choose to bring or ship your product for service to an authorized service provider. To find your nearest
service provider, please contact your reseller or COVER by phone number below. You are responsible for all
shipping charges, risk of loss during shipment, any duties and/or taxes, or any other charges associated with
transporting the product to and from the service provider
Limitations of Remedy
COVER is not liable for any damages caused by the product or the failure of the product to perform, including any
lost profits, lost savings, incidental damages, or consequential damages. COVER is not liable for any claim made by
a third party or made by you for a thrid party.
The limitation applies whether damages are sought, or a claim made, under this warranty or as loss claim (including
negligence and strict product liability), a contract claim or any other claim.
This limitation of liability will be effective even if COVER or an authorized representative of COVER has been
advised by you of the possibility of any such damages. The limitation of liability, however, will not apply to claims
for personal death or injury.
Except as expressly set forth in this warranty, COVER makes no other warranties, expressed or implied, including
any imposed warranties of merchantability and fitness or particular purpose. COVER expressly disclaims all
warranties not satisfied in this limited warranty. Any implied warranties that may be imposed by law are limited to
the terms of this limited warranty
COVER INTERNATIONAL INC.,
15358 E. Valley Blvd.
City of industry, CA 91746
www.COVERproducts.com