Full Text Searchable PDF User Manual
MANUAL
HANDLEIDING
MODE D’EMPLOI
ANLEITUNG
EV1450
EV2150
EV2310
EV2320
EV2650
EV3020
EV3330
EV3610
EV3620
February 2015

Index
General informations.....................................................................................1
Very important.............................................................................................2
Procedure...................................................................................................3
Setup........................................................................................................3
Language..................................................................................................................... 3
Contrast...................................................................................................................... 3
Date/Time................................................................................................................... 4
Password..................................................................................................................... 4
Detection..................................................................................................................... 5
Data........................................................................................................................... 5
Info............................................................................................................................ 5
Method programming.....................................................................................6
Manual programming.....................................................................................8
Running condition.........................................................................................9
Display........................................................................................................................ 9
Buttons....................................................................................................................... 9
Adjusting parameters......................................................................................................9
End of procedure..........................................................................................................10
Alarm messages............................................................................................................10
USB Digital Port..........................................................................................10
Frequently Asked Questions............................................................................11
Warranty..................................................................................................13
CE Declaration...........................................................................................14

Manual Power Supplies
General informations
Introduction
This instrument is manufactured with the latest technology and needs no particular maintenance.
Consort
certifies that this instrument was thoroughly inspected and tested at the factory prior to
shipment and found to meet all requirements defined by contract under which it is furnished. However,
dimensions and other physical characteristics may differ.
The normal operating temperature should be between 0° and 40°C. Never use the instrument in a room
with high humidity (>95 %) or at very low temperatures (condensation water!).
Manufacturer
Consort bvba
Parklaan 36
Tel (+32)(14)41 12 79
B2300 Turnhout
Fax (+32)(14)42 91 79
Belgium
E-mail: info@consort.be
Warranty
This instrument (excluding all accessories) is warranted against defective material and workmanship for
a period of thirty-six (36) months from the date of shipment ex factory.
Consort
will repair all defective
equipment returned to it during the warranty period without charge, provided the equipment has been
used under normal laboratory conditions and in accordance with the operating limitations and
maintenance procedures in this instruction manual and when not having been subject to accident,
alteration, misuse or abuse. A return authorisation must be obtained from
Consort
before returning any
product for warranty repair on a freight prepaid basis!
Consort
is not liable for consequential damages arising out of the use or handling of its products.
Servicing
In the event of this instrument being returned for servicing, the owner is requested
NOT
to send the
following items unless they are suspect:
Manual
Cables
Accessories
If serious malfunctioning occurs, stop using the unit immediately and consult your local
Consort
dealer.
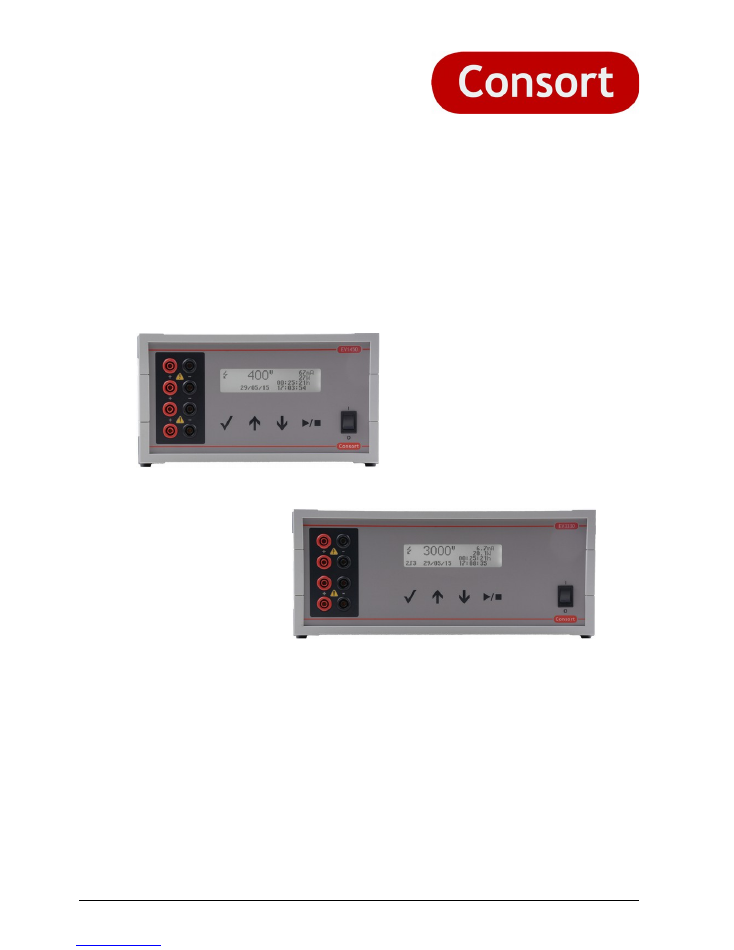
Keyboard
During
SETUP
or programming a procedure:
éê
= Buttons for entering a value or for selecting a function.
= Button for programming and confirming the desired parameters.
Hold this button pressed to return to the main menu!
/
= Button to
•
start the procedure (MANUAL or METHOD),
•
cancel while entering a parameter (SETUP),
•
return to the previous menu (SETUP).
During a
PROCEDURE:
éê
= Buttons for selecting a display configuration.
= Button to modify the parameters.
/
= Button to stop or to pause the experiment.
Rev. 1605
1

Manual Power Supplies
Very important
This electrophoresis power supply is a high technology instrument available in several versions. As it is
capable of giving dangerous voltage levels by which high power is involved, we suggest that you take a
few moments to read this manual thoroughly. Although this instrument is equipped with all necessary
safety features against abuse and other accidental failures, caution should be exercised when working
with high voltage equipment.
1.
A
void to touch the outlets with any conducting object
and make sure there is a second person
present for your safety in case of any severe electric shock.
2.
Never touch any part of the assembly (power supply, leads or tank) before having switched off.
3.
Never manipulate with wet hands.
4.
Do not ground any of the outputs or the buffer in the tank.
5.
Connect the outlets only to an insulated electrophoresis tank with safety cover.
6.
Never make any other connections, such as e.g. putting several power supplies in series or in
parallel.
7.
In order to prevent electric shock, never open the back plate nor remove the cover.
8.
Do not expose the unit to rain or any other liquid.
9. Do not spill liquid or insert metal objects inside the unit.
Take care so that the power supply is
not dropped to avoid damaging the cabinet which defeats safeguards or injuring yourself.
10.
If the unit has been dropped or the cabinet has been damaged, unplug it and have it checked by
an authorised service technician to restore the safeguards.
11.
The fact that the unit operates satisfactorily does not imply that the unit is properly earthed or
that it is completely safe. If in any doubt about the effective earthing of the unit, contact a
qualified electrician.
12. Never block the ventilation holes
or place the unit in any enclosure unless proper ventilation is
provided.
13.
Never place
the
unit near or over a radiator, heat register or stove.
14.
Avoid locations where the instrument is exposed directly to the sun light.
Rev. 1605
2
Manual Power Supplies
Procedure?
This is the main menu that is shown after powering the device and has 3 options:
PROCEDURE?
MANUAL
METHOD
SETUP
1. MANUAL
To start a regular procedure with fixed parameter limits for Voltage, Current, Power and
Timer. See
Manual Programming
.
2. METHOD
To start a procedure with multiple steps to vary the parameter limits automatically while
running. This method also allows Voltage Gradient settings. See
Method Programming
.
3. SETUP
To modify the settings of the
system
,
detections
and
data-logging
.
Setup
Use this menu to preset the system settings of the power supply for language, display contrast, real
time clock, password, detections, data recording.
System: Language
The power supply has several languages built-in for the communication with the user.
1.
Follow these steps to select
LANGUAGE
and press
:
PROCEDURE?
MANUAL
METHOD
SETUP
SYSTEM
DETECTION
DATA
INFO
LANGUAGE
CONTRAST
DATE/TIME
PASSWORD
2.
Select the desired language and press
.
System: Contrast
According to the location where the device is installed, it might be required to adjust the display
contrast.
1.
Follow these steps to select
CONTRAST
and press
:
PROCEDURE?
MANUAL
METHOD
SETUP
SYSTEM
DETECTION
DATA
INFO
LANGUAGE
CONTRAST
DATE/TIME
PASSWORD
2.
Adjust the contrast setting and press
to confirm.
Rev. 1605
3

Manual Power Supplies
System: Date/Time
This device has a precise real time clock built in. The real time clock is used for GLP reports and data
recording purposes. The date and the time can be adjusted.
1.
Follow these steps to select
DATE/TIME
and press
:
PROCEDURE?
MANUAL
METHOD
SETUP
SYSTEM
DETECTION
DATA
INFO
LANGUAGE
CONTRAST
DATE/TIME
PASSWORD
DATE/TIME
MODIFY
07/12/2015
13:08:47
2.
Set consecutively the date, month
,
year, hour, minute and seconds.
Confirm each with
or stop entering the other values by pressing
/
.
DATE/TIME
MODIFY
07
/12/2015
13:08:47
System: Password
When desired, a password can be set which will be requested when trying to modify the setup or the
parameters of a procedure. The user can then only run or stop the experiment.
1.
Follow these steps to select
PASSWORD
and press
:
PROCEDURE?
MANUAL
METHOD
SETUP
SYSTEM
DETECTION
DATA
INFO
LANGUAGE
CONTRAST
DATE/TIME
PASSWORD
2.
A question to activate the password will appear.
Choose YES and confirm to enable a password, set to NO to disable the password.
3.
When enabled, the device will request twice the same combination of five keystrokes. This
combination will be required to modify any setting.
PASSWORD
Enter the new
password:
[-----]
CONFIRMATION!
Enter the new
password:
[-----]
Rev. 1605
4

Manual Power Supplies
Detection
Choose
DETECTION
to alter the actions when a low current or a power failure is detected.
•
Low Current
When a very low current is detected as soon as the Voltage limit has been reached, the power will
shut down the procedure. An
audible error message
will be given.
•
Power Failure
When the detection of a power failure is enabled, the power supply will continue to proceed the
procedure if the timer was still running at the moment that the power failure occurred. After
powering it again, the power supply will automatically proceed with the experiment for the
remaining time.
1.
Follow these steps to select
LOW CURRENT
and press
:
PROCEDURE?
MANUAL
METHOD
SETUP
SYSTEM
DETECTION
DATA
INFO
DETECTION
LOW CURRENT
POWER FAIL
2.
Decide whether or not the output voltage should shut down at a too low output current and
press
.
3.
Select
POWER FAIL
and press
.
4.
Decide whether or not the instrument should proceed with the experiment for the remaining
time after a power failure and press
.
Data
To be added, check our website (
www.consort.be/wiki
) for firmware updates of the instrument.
This feature will allow to log all information about the executed procedures.
Info
Choose
INFO
to find specific information about the device, the parameter limits, the firmware version
and more:
PROCEDURE?
MANUAL
METHOD
SETUP
SYSTEM
DETECTION
DATA
INFO
Rev. 1605
5
Manual Power Supplies
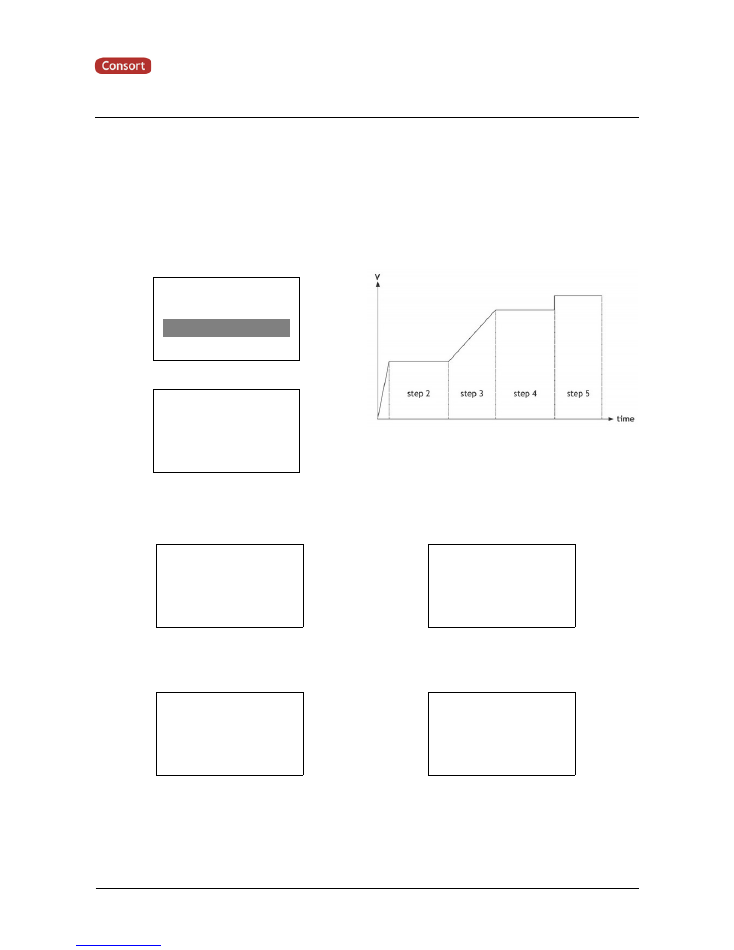
Method programming
Method programming permits to store up to 9 different methods, each with 9 steps, of frequently used
parameters in the non-volatile memory for future recall. Each step is able to recall a next one, provi-
ding a flexible multiple step function for special techniques. The method mode also permits to program
a linear voltage gradient for any step provided the limiting current or power is not attained. Parameters
can be changed temporarily without interrupting the run.
1.
Verify if the instrument is switched off.
2.
Connect the electrophoresis tank to the instrument.
3.
Switch the instrument on.
4.
Select
METHOD
and press
:
PROCEDURE?
MANUAL
METHOD
SETUP
5.
Select the desired method and press
:
CHOOSE
METHOD
1
6.
When previously multiple steps have been
programmed, select the desired step and
press
:
METHOD 1|1
STEP
1
7.
Decide whether or not a linear voltage
gradient has to be performed
and press
:
METHOD 1|1
GRADIENT
NO
8.
Enter the desired voltage limit
and press
:
METHOD 1|1
VOLTAGE
300
V
When performing a voltage gradient,
enter the desired end Voltage. The start
Voltage is the end point of the previous
step.
9.
Enter the desired current limit
and press
:
METHOD 1|1
CURRENT
500
mA
This limit is automatically set to
maximum and cannot be changed in case
of a voltage gradient step.
Rev. 1605
6
Method/steps

Manual Power Supplies
10.
Enter the desired power limit
and press
:
METHOD 1|1
POWER
150
W
This limit is automatically set to
maximum and cannot be changed in case
of a voltage gradient step:
11.
Enter the desired timer unit (h or kVh)
and press
:
METHOD 1|1
TIMER UNIT
h
12.
Enter the desired timer value
and press
:
METHOD 1|1
TIMER
00:30
h
The value format is 'hh:mm' when
entering a value in hours, a value with 2
decimals when entering kiloVolthours.
13.
Decide if the experiment should
automatically proceed with a next step,
press
:
METHOD 1|1
END METHOD
NO
Choose NO to resume at point
6
with the
next step,
choose YES to stop after this
step.
14.
Press
/
to start the experiment.
•
At any time, you can return to the main menu by holding
pressed.
•
At any time, you can avoid programming unnecessary parameters. To do so, simply press
/
instead of
after entering the last relevant value and the instrument will immediately start the experiment keeping the
other parameters to their previous values.
•
To ensure that the desired parameter is kept constant, we suggest to pre-set all other parameters to its
maximum.
•
A blinking unit of the controlling parameter appears when the regulation is complete.
•
The timer will always count down except when no timer value has been entered.
Rev. 1605
7
Manual Power Supplies
Manual programming
Manual programming permits to set voltage, current, power and time limits for a simple routine
electrophoresis run. Parameters can be changed temporarily without interrupting the run.
1.
Verify if the instrument is switched off.
2.
Connect the electrophoresis tank to the instrument.
3.
Switch the instrument on.
4.
Select
MANUAL
and press
:
PROCEDURE?
MANUAL
METHOD
SETUP
5.
Enter the desired voltage limit and press
:
MANUAL
VOLTAGE
300
V
6.
Enter the desired current
limit
and press
:
MANUAL
CURRENT
500
mA
7.
Enter the desired power
limit
and press
:
MANUAL
POWER
150
w
8.
Enter the desired timer unit (h or kVh)
and press
:
MANUAL
TIMER UNIT
h
9.
Enter the desired timer value
and press
:
MANUAL
TIMER
00:30
h
The value format is 'hh:mm' when entering a
value in hours. The format is a value with 2
decimals when entering kiloVolthours. Set to
zero when required to continue until
/
is
pressed or the power is switched off.
10.
Press
/
to start the experiment. See
Running Condition
.
•
At any time, you can return to the main menu by holding
pressed.
•
At any time, you can avoid programming unnecessary parameters. To do so, simply press
/
instead of
after entering the last relevant value and the instrument will immediately start the experiment keeping the
other parameters to their previous values.
•
To ensure that the desired parameter is kept constant, we suggest to pre-set all other parameters to its
maximum.
•
A blinking unit of the controlling parameter appears when the regulation is complete.
•
The timer will always count down except when no timer value has been entered.
Rev. 1605
8
Manual Power Supplies
Running condition
Display
600
v
85 mA
51 W
00:29:33 h
1|2 17/12/15 10:36:18
When running an experiment, the display allows to see the actual parameters. It is divided into three
fields:
•
The
upper left
field shows :
◦
a blinking
symbol to indicate there is a possible dangerous condition on the output sockets.
Avoid to contact the outlet sockets and cables!
◦
the selected measured parameter. Use the
éê
keys to switch the parameter in this field.
•
The
upper right
field shows the other 3 parameters.
•
The
bottom
field shows date + time at the right and the actual method/step combination at the
left when such a procedure is running, no indication when running a manual procedure. The
bottom field line is also used for system messages when required.
The unit of the
parameter
that is being kept constant is given with blinking
bold
characters.
Buttons
The keys be used as follows:
•
éê
Buttons for selecting another parameter in the upper left corner of the display .
•
Button to modify the parameters.
•
/
Button to stop or to pause the procedure.
Adjusting parameters
It is possible to modify the parameters while running. These modifications are temporarily and are not
stored in the non volatile memory. It is not possible to modify the settings of a voltage gradient step.
•
Press
:
600
v
1000 mA
150 W
00:29:33 h
éê
=ADJUST,
=NEXT
•
The display shows the preset values for V, mA and W. The timer remains counting down when a
timer value has been set.
•
Choose the limit to adjust with the
button.
•
Adjust the value with the
éê
buttons.
•
The display will return automatically to the normal run mode when no button is pressed for 5
seconds.
Rev. 1605
9

Manual Power Supplies
End of procedure
•
The procedure will stop automatically when the timer has reached its end value. A signal will
sound during 10 seconds. The sound signal can be ended by pressing a button.
•
The procedure can also be stopped by pressing
/
.
The power supply will then be in a paused
condition. It allows to modify the run parameters and/or to view the gel. When pressing
/
again, the power supply will continue the procedure where paused. To stop the procedure
completely, hold
pressed until the main menu appears.
•
The power supply will remain showing the display of the running condition until the voltage has
lowered to a safety value.
•
When the procedure has finished, a report will be shown on the display. Scroll the display lines
with the
éê
buttons to see it completely. Press
or
/
to return to the main menu.
Alarm messages
In case a problem or a hazardous situation is detected, the power supply will intterupt the experiment
with one of the following errors. A sound will also be produced that can be stopped by pressing any key.
The hazardous situations require that the power supply needs to be switched off before starting the
experiment again.
•
GROUND LEAKAGE
A dangerous ground leakage is present (check thoroughly the complete assembly). Your power
supply is
NOT
defective! See
Frequently Asked Questions
at the end of this manual.
•
SHORT-CIRCUIT
Connected tank is short-circuited or has a very low resistance (check thoroughly the complete
assembly). Your power supply is
NOT
defective! See
Frequently Asked Questions
at the end of
this manual.
•
OVERLOAD
Connected tank has a too low resistance (check specifications). Your power supply is
NOT
defective! See
Frequently Asked Questions
at the end of this manual.
•
LOW CURRENT
The output current is very low (switch the alarm off in the
SETUP
menu). Your power supply is
NOT
defective! See
Frequently Asked Questions
at the end of this manual.
•
TECHNICAL PROBLEM
Failure in the electronics. See
Support
on
www.consort.be
. You could also try a general RESET:
switch the instrument on while holding
pressed. Attention! All stored programs and data will
be erased!
USB Digital Port
This power supply has a digital USB port allowing to interface with a computer. Programs can read and
control the power supply completely. More information can be found on our support website.
Driver
The driver can be downloaded using the link for the USB drivers on our website:
http://www.consort.be/downloads/software/
.
Rev. 1605
10

Manual Power Supplies
Frequently Asked Questions
What are the relations between Voltage, Current, Power and Resistance?
Power (W) = Voltage (V) x Current (A)
Resistance (
W
) = Voltage (V) / Current (A)
How does a power supply react after pressing RUN?
The internal generator will start building up the high voltage at the output terminals while voltage and
current are constantly measured and power calculated. When one of the pre-set parameters is
exceeded, the generator stops and will keep that parameter constant.
How important is the resistance of an electrophoresis unit?
The resistance of an electrophoresis unit depends on its size, gel thickness, amount of buffer, buffer
conductivity and temperature. This resistance will normally decrease in time due to a slowly increasing
temperature. Electrophoresis units which have a resistance below the minimum load resistance of a
power supply will trigger an alarm! Read the output voltage and current during a run to measure the
resistance and use above formula to calculate the value.
How to keep a constant voltage during a run?
Program the desired voltage and a higher current and power then the maximum expected values:
Current > Voltage / Resistance
Power > Voltage x Current
How to keep a constant current during a run?
Program the desired current and a higher voltage and power then the maximum expected values:
Voltage > Current x Resistance
Power > Voltage x Current
How to keep a constant power during a run?
Program the desired power and a higher voltage and current then the maximum expected values:
Voltage > Current x Resistance
Current > Voltage / Resistance
Why are my output values different from those of a similar experiment?
Either your programmed parameters are not equal to those described or the resistance of your
electrophoresis unit is different (see above). It cannot be due to e.g. an other model of power supply as
the relations between Voltage, Current, Power and Resistance are monitored in the same way by any
instrument (the electrical laws cannot be disregarded!).
What about connecting more than one unit to the same power supply?
The outlets being in parallel each electrophoresis unit will be supplied with exactly the same voltage.
However, current and power may differ due to differences between them even when exactly the same
model, gel, buffers, etc... are used. Therefore, it is recommended to run several electrophoresis units
only in the constant voltage mode on the same power supply.
Mind also that adding tanks will increase the current and the power. These parameters may be limited
by the power supply and cause it to switch over to constant current or constant power.
Rev. 1605
11
Manual Power Supplies
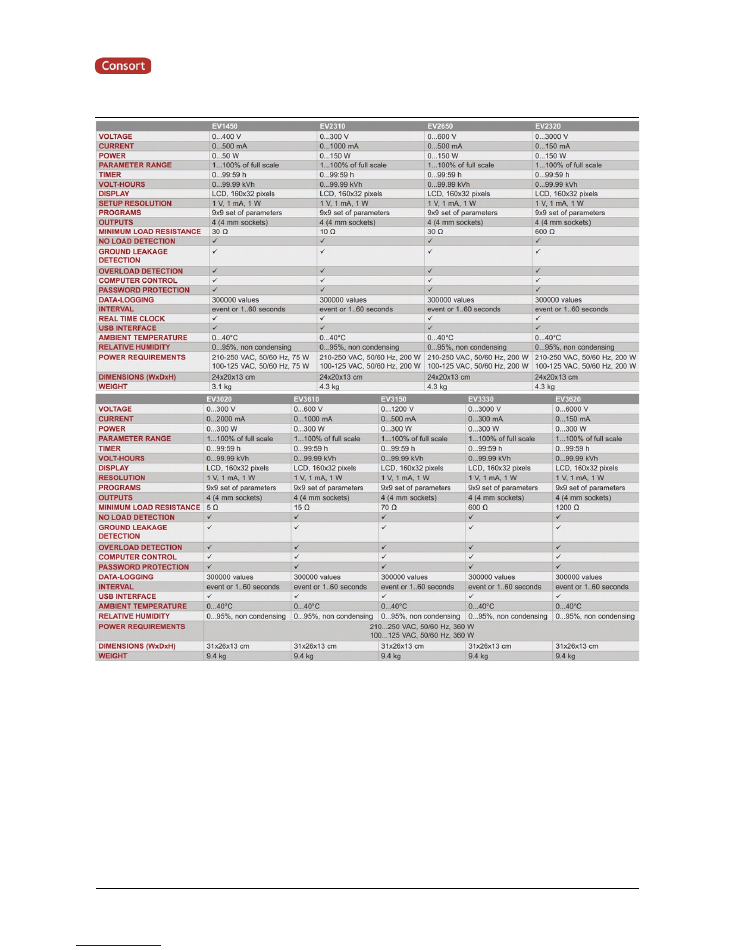
Specifications
Rev. 1605
12

Manual Power Supplies
WARRANTY CERTIFICATE
This instrument (excluding all accessories) is warranted against defective material
and workmanship for a period of thirty-six (36) months from the date of shipment
ex factory.
Accessories and breakable items such as electrodes are not warranted unless
proven to be defective before shipment.
The original purchase order numbers, Consort invoice numbers and serial numbers
of the products must be provided.
CONSORT
will repair all defective equipment returned to it during the warranty
period without charge (CIF Turnhout prepaid by sender), provided the equipment
has been used under normal laboratory conditions and in accordance with the
operating limitations and maintenance procedures described in the instruction
manual and when not having been subject to accident, alteration, misuse or abuse.
If the products have been used with or have come into contact with fluids, an MSDS
(material safety data sheet) must be supplied prior to issuing a return
authorisation.
A return authorisation must be obtained from
CONSORT
before returning any
product for warranty repair on a freight prepaid basis!
Rev. 1605
13

Manual Power Supplies
DECLARATION OF CONFORMITY
We declare under our sole responsibility that the product
Electrophoresis Power Supplies
content of the type numbers
EV1450 EV2150 EV2310
EV2320 EV2650 EV3020
EV3330 EV3610 EV3620
to which this declaration relates is in conformity
with the following standards of the European Directives
LOW VOLTAGE DIRECTIVE 2006/95/EC
EN61010-1
EMC DIRECTIVE 2004/108/EC
EN61326-1
ROHS DIRECTIVE 2011/65/EU
EN50581: 2012
Consort bvba
Parklaan 36, B-2300 Turnhout, Belgium
Tel: (+32) (0)14 41 12 79
Fax: (+32) (0)14 42 91 79
Name
Jan De Ceuster
Signature
Title
Director
Date
21 November 2015
The electro-magnetic susceptibility has been chosen at a level that gains proper operation in residential areas, on
business and light industrial premises and on small-scale enterprises, inside as well as outside of buildings. All
places of operation are characterised by their connection to the public low voltage power supply system.
Rev. 1605
14