Full Text Searchable PDF User Manual
©2006 CONLUX
Part # 5W1110410
Printed in the USA
Rev5 12/06
8
CCM5, CCM5G Series
Multi Drop Bus 5 Tube Coin Changer
INSTALLATION GUIDE
Handling Instructions
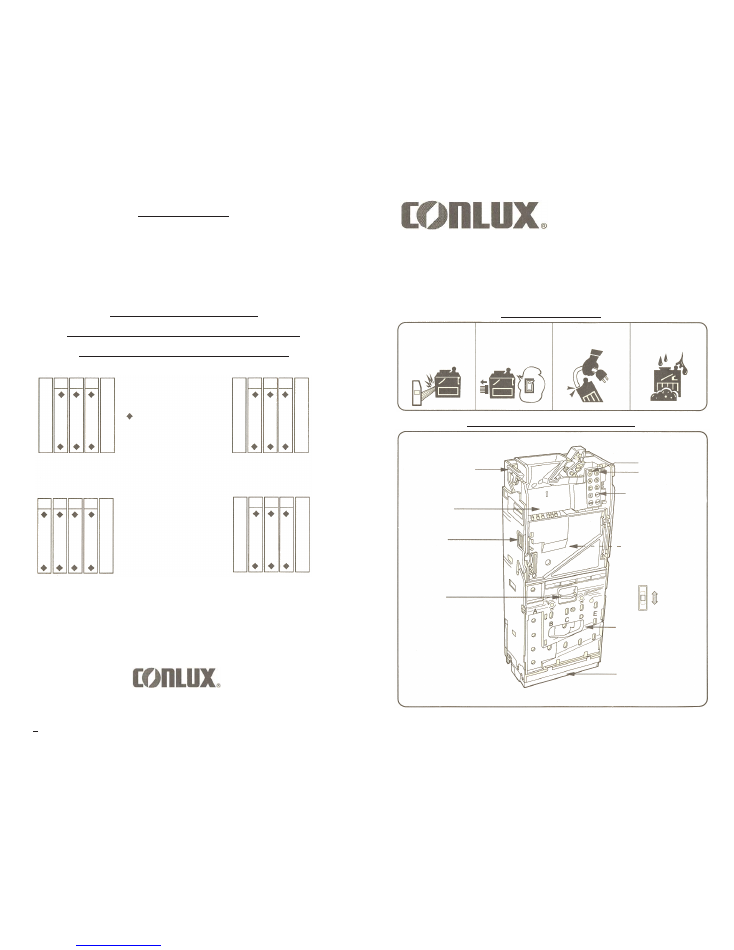
Identification of Parts and Locations
The discriminator is connected
to the coin changer via a
dedicated connector and
should not be disassembled
except for special cases such
as cleaning.
In case the discriminator is to
be disassembled, be sure to
turn off the power of the coin
changer before disassembling.
Do not carry the coin changer
by the harness.
Store the coin changer in a
clean, dry place.
Discriminator Latch
Discriminator
This is an electronic discriminator
which discriminates US and
Canadian Coins
Drain Spout
Liquid poured in by vandals or by
accident is discharged here.
Tube Latch
Push down to remove the cassette
tube assembly
Diagnostic L.E.D.
Discriminator
Coin Changer
Inventory Switch
Switches are used to remove
coins from the change tubes.
Currency Selection Switch
Switches are used to remove
coins from the change tubes.
Switch Selectable
U.S. and/or Canadian Currency
Cassette Tube Assembly
Bottom Base
ATTENTION
TO FULLY BENEFIT FROM
THIS FIVE TUBE CHANGER
CONLUX RECOMMENDS:
COMPLETELY FILL
ALL FIVE TUBES OR AT LEAST
FILL THE PRIMARY TUBES!
A B C D E
A B C D E
A B C D E
A B C D E
Indicates primary tubes
25
¢
5
¢
25
¢
10
¢
25
¢
US-1 CASSETTE (3Q,1D,1N)
Part Number 278002
10
¢
5
¢
25
¢
10
¢
5
¢
US-2 CASSETTE (1Q,2D,2N)
Part Number 278023
$1
5
¢
25
¢
10
¢
25
¢
US-4 CASSETTE (1$,2Q,1D,1N)
Part Number 278003
10
¢
10
¢
5
¢
10
¢
5
¢
US-5 CASSETTE (3D,2N)
Part Number 278007
WHEN CALLING FOR SERVICE, PLEASE PROVIDE THE FOLLOWING INFORMATION:
MODEL NUMBER: _______________________________
SERIAL NUMBER: _______________________________
VENDNET
™
(A WITTERN GROUP COMPANY)
165 NORTH 10TH STREET
WAUKEE, IA 50263
Tel. 1-888-VENDNET(836-3638)
7
2
Limited Warranty Statement
For Units Shipped After 12/01/06
Vendnet
™
, a Wittern Group Company, warrants all new Conlux coin changers
and bill validators sold by it to be free from defective material and
workmanship. Vendnet
™
will repair or replace (at its option) any part of the
coin changer or bill validator, which proves to be defective in materials or
workmanship. Vendnet
™
will repair coin changers and bill validators damaged
by vandalism in the normal course of operation, including parts and the labor
to replace the parts up to a cumulative total of 50% of the original purchase
price of the unit. The period of this limited warranty shall be twenty-four (24)
months from the date of original sale by Vendnet
™
.
Other conditions applying to this limited warranty are as follows:
(A) This limited warranty does not apply to any coin changer or bill validator
that only requires normal and customary cleaning to obtain serviceability.
(B) This limited warranty does not apply to any coin changer or bill validator,
which has been, in
Vendnet
™
opinion, subject to: accident, abuse, misuse,
neglect, improper installation, missing parts, improper maintenance, repair by
unauthorized service personnel; or is found to include parts other than genuine
Vendnet
™
/Conlux supplied parts or options.
(C)
Vendnet
™
will not be responsible for any expense incurred by the
purchaser incidental to the repair or replacement of equipment covered by this
warranty.
(D) THIS LIMITED WARRANTY IS IN LIEU OF ALL OTHER
WARRANTIES ORAL OR WRITTEN, EXPRESSED OR IMPLIED,
INCLUDING WITHOUT LIMITATION, WARRANTIES OF
MERCHANTABILITY, WARRANTIES OF FITNESS OF PURPOSE, AND
ALL OTHER OBLIGATIONS OR LIABILITIES OF
VENDNET
™
/
CONLUX.
VENDNET
™
NOR CONLUX ASSUMES NOR AUTHORIZES ANY
PERSON TO ASSUME FOR IT, ANY OTHER OBLIGATION OR
LIABILITY IN CONNECTION WITH THIS WARRANTY POLICY.
(E) LIABILITY TO
VENDNET
™
AND ITS APPOINTED FACTORY
AUTHORIZED SERVICE CENTERS IS LIMITED TO THE REPAIR OR
REPLACEMENT, AT THEIR OPTION, OF DEFECTIVE PARTS WITHIN
THE CONLUX PRODUCT(S) AND DOES NOT INCLUDE INCIDENTAL
AND CONSEQUENTIAL DAMAGES.
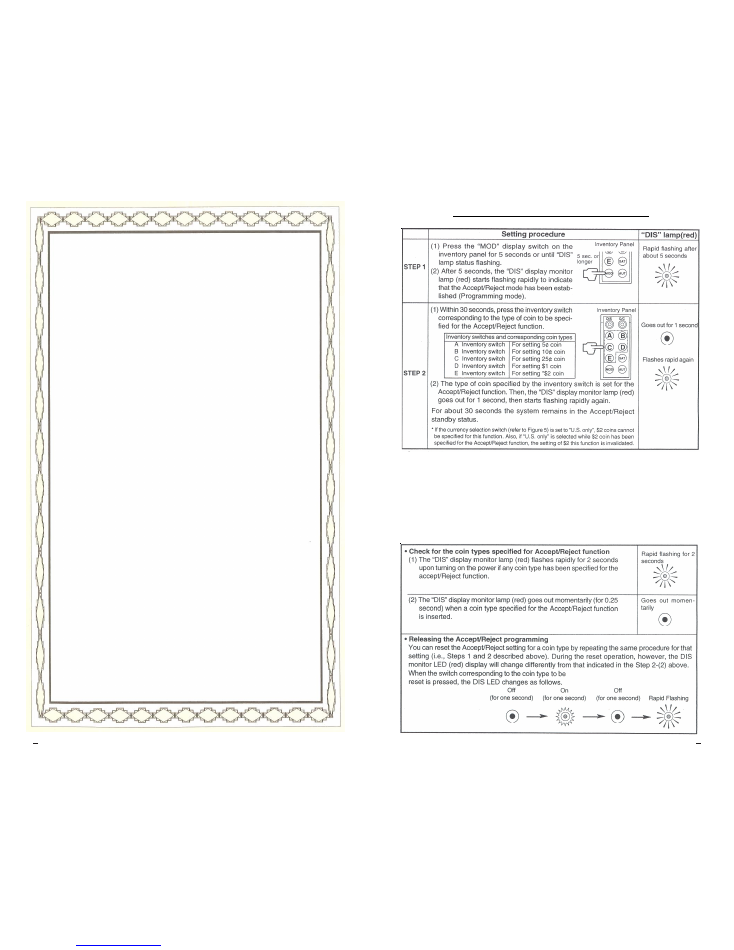
Coin Accept/Reject Programming Function
Coin Accept/Reject procedure
Operating the return lever or pressing the “MOD” switch for 5 seconds or longer cancels the
Accept/Reject mode and enters standby mode.
Notes: Other than the step above, the Accept/Reject mode ends under any of the following
conditions:
(1) No switch is pressed for more than 30 ~econds since the Accept/Reject mode was
established.
(2) A coin or coins are inserted.
(3) Abnormal condition occurs.
(4) The main controller transmits a command to prohibit acceptance of all types of coins.
3
6
♦
Insert at least 20 coins per tube for best performance.
♦
If a coin drops in and stands on end, correct it.
♦
Be careful not to load bent coins.
♦
Be certain to load the correct coin in each tube.
♦
After loading tubes manually, payout at least one coin from each tube to assure
proper operation! Use inventory buttons A-E for payout.
OPERATING THE AUTOMATIC CHANGE ADJUSTING
FUNCTION (FLOAT)
This function allows the coin changer to return the tube levels to a controlled level.
1.
Set the base quantities (the number of coins to be loaded initially).
2.
Reinstall the cassette tube assembly into the changer.
3.
Mark each tube with the base quantity (to make it easier to recognize a shortfall).
The coin changer judges each set quantity as zero regardless of the actual count.
4.
By pressing the “AUT” for a least one second the coin changer will return the
tube levels to the base start level.
5.
When the coins in the cassette become fewer than the base quantity and the shortfall
is replenished. If the coin amount in all tubes are less than preset level and the “AUT”
switch is pressed, this becomes the new preset level.
The coin changer’s memory will be affected when:
1. The cassette assembly is removed.
2. The coins are inserted directly into the tubes (manually).
3. Communication with the vending machine controller is interrupted.
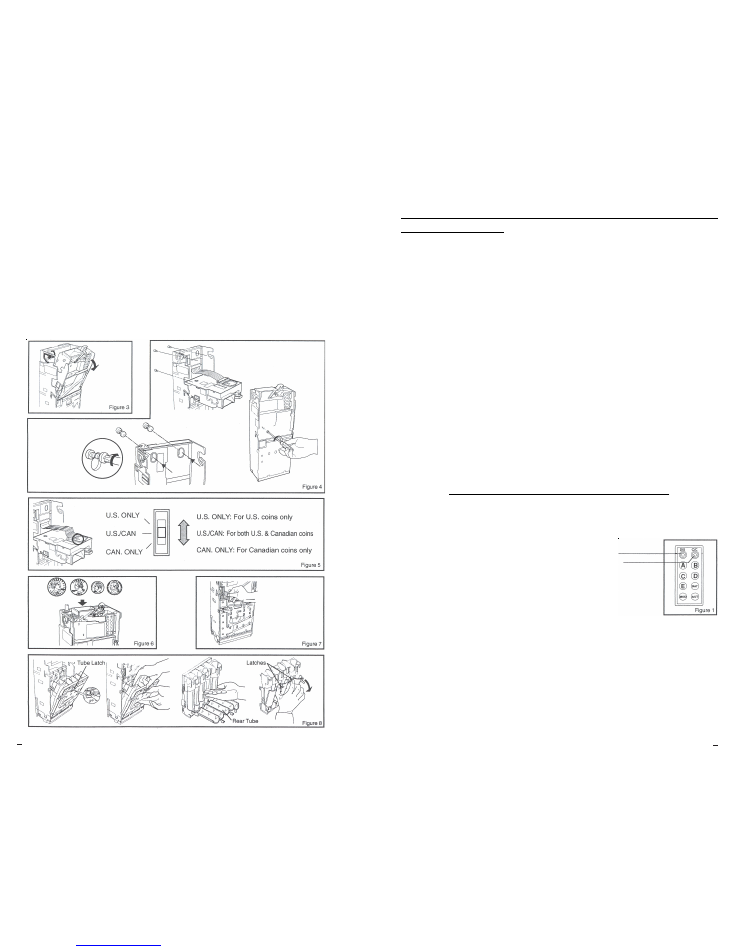
DIAGNOSTIC AND CONTROL FUNCTIONS
1. Two L.E.D.’s are provided indicate a coin changer or discriminator malfunction. (Please see
Figure I) If a failure is detected, the appropriate L.E.D. will blink. In the normal operating state
both L.E.D.’s are on!
L.E.D. “DIS” (Red) indicates a discriminator malfunction.
L.E.D. “C/C” (Yellow) indicates a coin changer malfunction.
2. Switches A-E are used to inventory coins from the appropriate tubes.
3. Switch “SAT” is used to inventory coins from the optional satellite tubes.
4. Switch “MOD” is used to Accept/Inhibit a certain coin. Please contact the
factory, if you would like to utilize this feature.
5. Switch “AUT” is used when operating the Automatic Change Adjusting Function (Float).
6. Switch “AUT” is also used to Delete Memory Backup:
1. Remove the cassette assembly from the coin changer.
2. Press and hold down the “AUT” button for about 5 seconds.
3. The two L.E.D.’s will flash rapidly for about I second indicating the memory has
been cleared.
4. Reinstall the cassette.
5
4
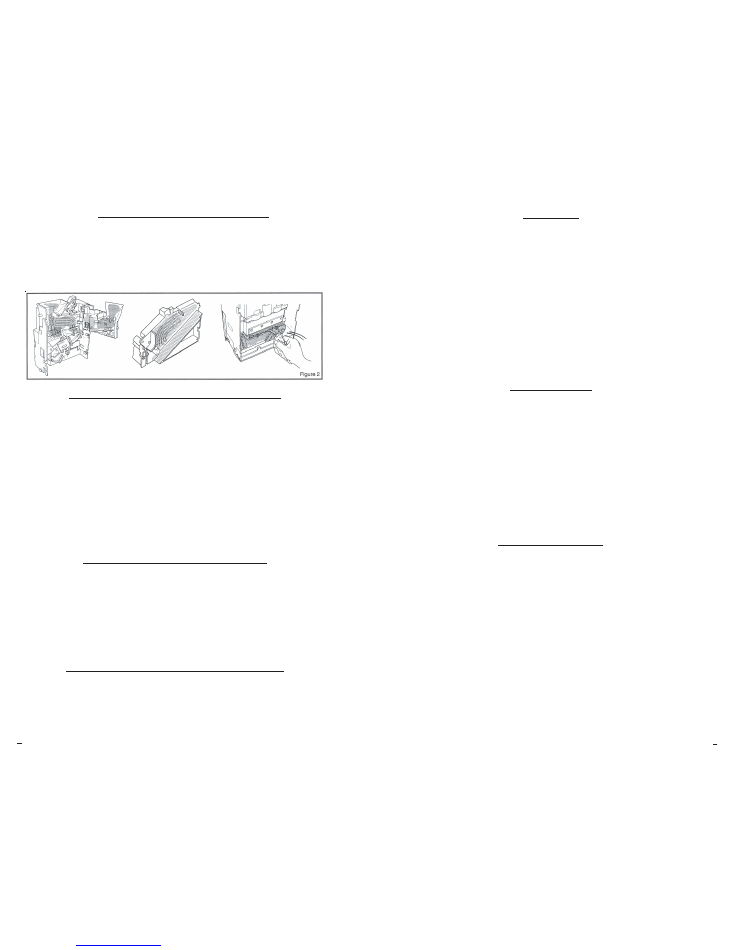
PREVENTATIVE MAINTENANCE
The leading causes for coin changers malfunctions are:
1.
Dirty coin path, which slows coin speed down.
2.
Defective (bent) coins.
3.
Salt water damage.
Periodically clean all shaded surfaces with a damp cloth using a mild detergent. DO NOT USE
SOLVENTS OR OTHER INDUSTRIAL CLEANERS! (Please see Figure 2)
CCM5, CCM5G SERIES SPECIFICATIONS
Interface
Multi-Drop-Bus (M.D.B.)
Operating Voltage
34 Volt D.C.
Power Consumption
Standby 0.10A
Operating State
Motor Operation 0.66A
Peak Max. 5 second 0.92A
Operation Temperature Range
5°F (-15°C) to 140°F (+60°C)
Insulation Resistance
20 Mega-Ohms or more
Weight
4.2lbs. (1.9 kg)
Dimensions
(H x W x D) 14.83" x 5.43" x 3.23"
(376mm x 138mm x 82mm)
Number of Motors
1 Motor - 15 Volt D.C.
Number of Solenoids
5 for Coin Selection (15 Volt D.C.)
Coin Acceptance
5
¢, 10¢,
25
¢,
$1,
and $2
U.S. only, Canadian only or U.S. & Canadian
OPTIONAL CASSETTES AVAILABLE
1.
US-1 Cassette - 3Q. 1D, 1N
2.
US-2 Cassette - 1Q. 2D, 2N
3.
US-4 Cassette - 1$, 2Q, 1D, 1N
4.
US-5 Cassette - 3D, 2N
Add on satellite tube (maximum two tubes any combination)
A.
Satellite Tube ST5 - 5
¢
tube - 110 coins each
B.
Satellite Tube ST25 - 25
¢
tube - 130 coins each
FEATURES
•
FEATURES OF THE CCM5, CCM5G-SERIES COIN CHANGER:
•
FIVE TUBE CASSETTE
•
AUTOMATIC CASSETTE SENSING FUNCTION
(NO PROGRAMMING NEEDED)
.
•
SIMULTANEOUS PAYOUT OF UP TO 3 COINS (WITH LEVEL 3 CONTROLLER) .
•
SALT WATER DRAINS
•
AUTO RECOVERY FUNCTION (IN CASE OF MOTOR LOCK)
•
MEMORY BACKUP FUNCTION (IN CASE OF POWER FAILURE)
•
L.E.D. DIAGNOSTIC
•
M.D.B. INTERFACE
•
AUTOMATIC CHANGE ADJUSTING FUNCTION (FLOAT)
•
COIN ACCEPT/INHIBIT FUNCTION
•
OPTIONAL SATELLITE TUBES
•
CURRENCY SELECTION (U.S. ONLY, CANADIAN ONLY, OR U.S. & CANADIAN).
•
DATA STORED FUNCTION
INSTALLATION
1. Turn power off from vendor before installing the coin changer.
2. Remove the discriminator, push up on the discriminator latch and tilt the discriminator forward.
(Please see Figure 3)
3. Align the coin changer key holes over the studs or screws in the vendor and tighten. (DO NOT
OVER TIGHTEN!)
4. Set Currency Selection Switch on rear of discriminator to desired and reinstall in changer housing.
(Please see Figure 5)
5. Connect the coin changer to the vendor and turn on the power.
6. Operate the reject lever to ensure proper alignment.
SETUP PROCEDURE
LOADING THE COIN CASSETTE (there are several options):
1. Through the Discriminator (Please see Figure 6): place the vendor controller into the "Tube
Filling Mode". Inserted coins will be routed to the primary tubes and the coin count will be updated.
When the upper tube sensor level is reached, the inserted coins will be routed to the cash box. NOTE:
Depending on which cassette is used you may have to load one or two tubes manually. Before you
remove the cassette to load these tubes, turn power "OFF" to the changer. Failure to follow these
procedures will affect the coin count.
2. Manually From the Front (Please see Figure 7)' we recommend that you fill each tube to the
upper tube sensor or at least fill the primary tubes.
3. Manually by Removing the Cassette (Please see Figure 8)' press down on the tube latch and
remove the cassette assembly towards you. Squeeze the upper two levers to release the rear tube cover.
Replenish as many individual coins into the respective tubes as required. Close the rear tube cover and
reinstall the cassette assembly into place. We recommend you fill each tube to the upper tube sensor or
at least fill the primary tubes.
NOTE: When you hand load tubes, the count reported to the controller is not exact, but will
offer the maximum change available.