Full Text Searchable PDF User Manual
Vid
eo
-D
oo
rP
ho
ne
CD
V-3
5A
M
AN
UA
L
01
COMMAX
CONTENTS
1 Before you use
02
Safety Warning & Caution
04
Part names and functions
05
Wiring
2 How to use this product
07
Interphone
08
Monitoring
08
Calling sound adjustment
08
Image set
3 Installation
11
How to install the monitor
11
How to install the camera
4
Parts list
5
Specifications
•
Thank you for purchasing COMMAX products.
•
Please carefully read this User
’
s Guide (in particular, precautions for safety) before using a product and
follow instructions to use a product exactly.
•
The company is not responsible for any safety accidents caused by abnormal operation of the product.
Before you use
Vid
eo
-D
oo
rP
ho
ne
CD
V-3
5A
M
AN
UA
L
1
Safety Warning & Caution
02
COMMAX
Vid
eo
-D
oo
rP
ho
ne
CD
V-3
5A
M
AN
UA
L
03
COMMAX
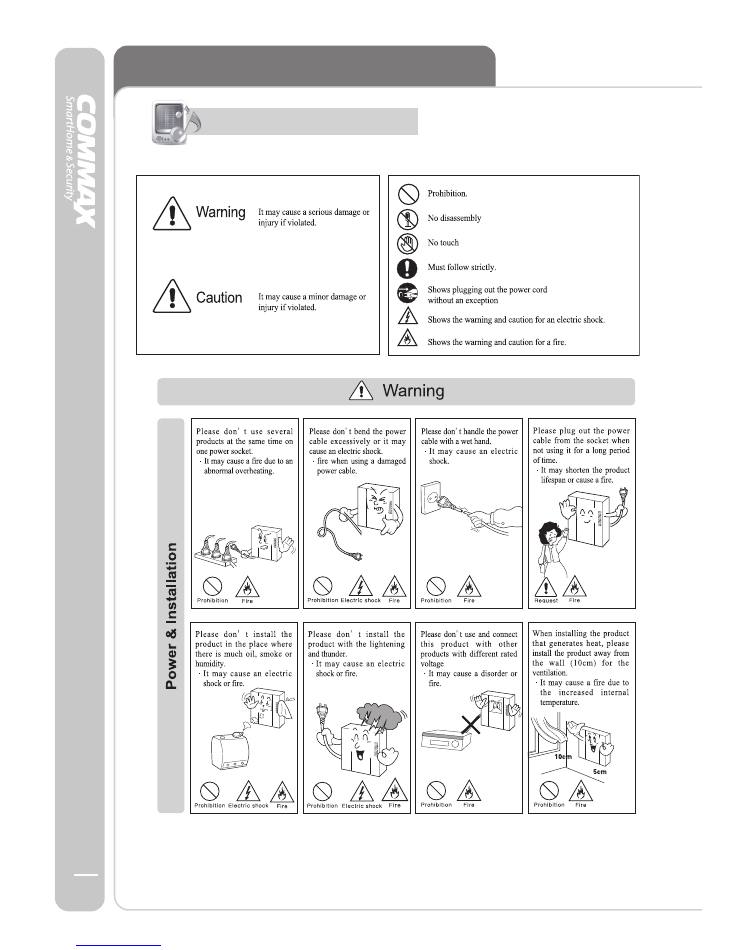
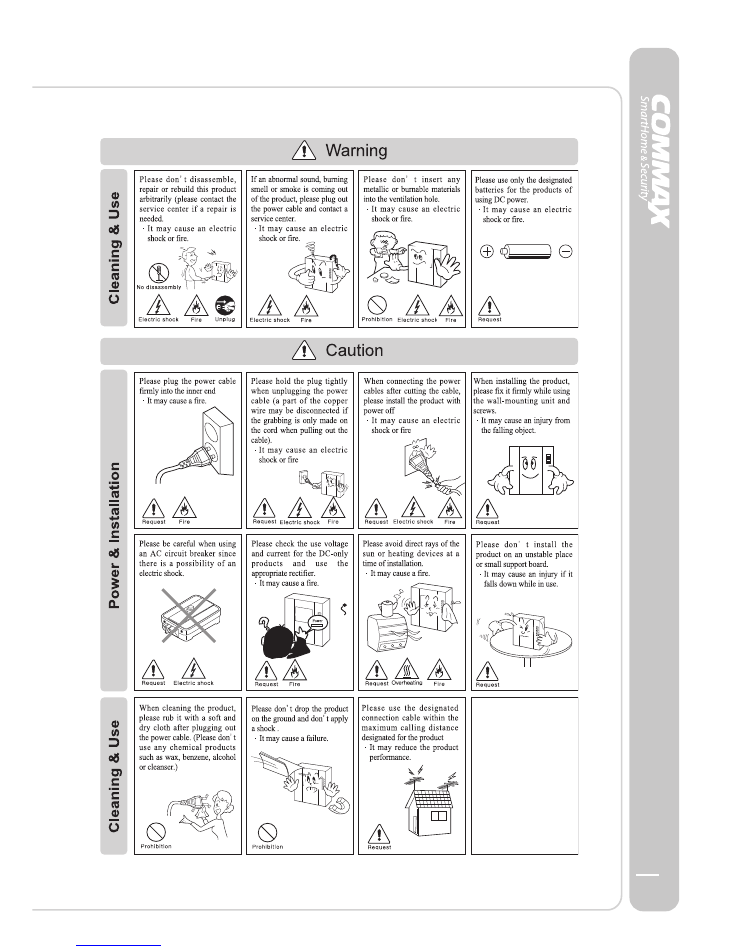
Please follow the things described below in order to prevent any danger or property damage.
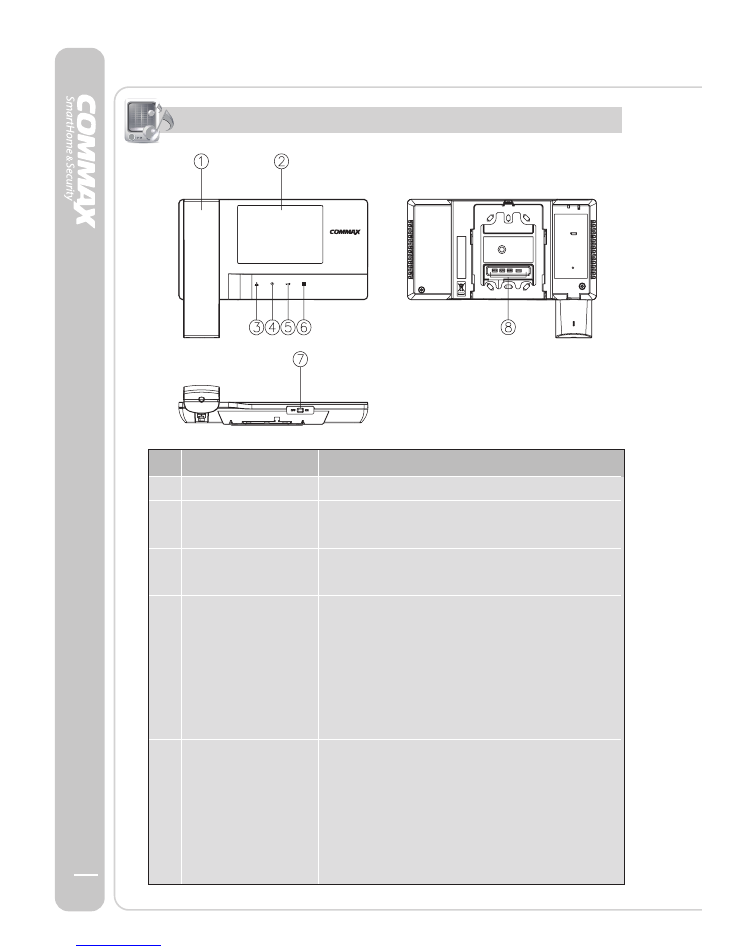
No.
1 Handset
Handset receiver
Image from door camera is shown through this
screen.
Press this button to see the image from door
camera.
①
To call interphone by picking up the handset
/ DOWN button and pressing this button.
4 Interphone button
②
To adjust BRIGHT / CONT / COLOR of image.
(When the screen is on.)
③
To adjust the volume of calling sound. (Standby
status)
①
To release the door, while talking with door
camera.
5
②
To adjusting BRIGHT / CONT / COLOR of
image. (When the screen is on)
③
To adjust the volume of calling sound. (Standby
status)
Vid
eo
-D
oo
rP
ho
ne
CD
V-3
5A
M
AN
UA
L
Part names and functions
04
COMMAX
Part name
Description
Door release button
/ UP button
LCD Screen
2
3
Monitor button
Vid
eo
-D
oo
rP
ho
ne
CD
V-3
5A
M
AN
UA
L
05
COMMAX
Wiring
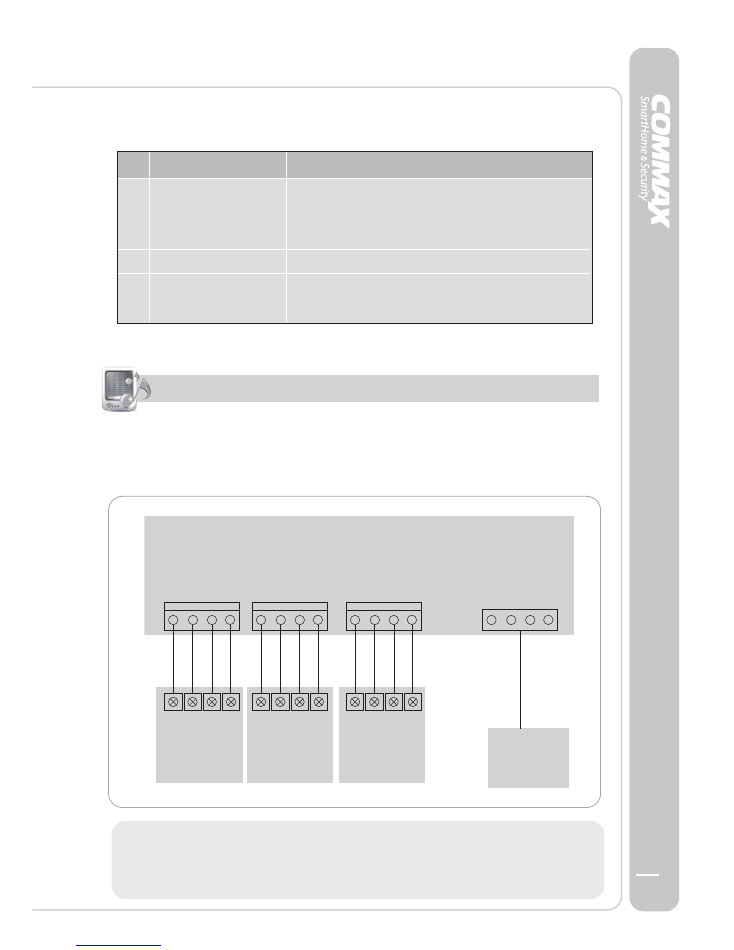
Wiring for this equipment is as follows
CAMERA CONNECTOR POLARITY
1.
RED : VOICE
2.
BLUE : GND
3.
YELLOW : POWER(+12V)
4.
WHITE : VIDEO
8
No.
Use this in order to change the setting value.
6 Menu button
①
Calling sound adjustment
②
Change of image setting
7 Power switch
ON/OFF switch
Terminals for exterior Camera / Interphone connection and program
equipment and Program. update terminal
Part name
Description
MONITOR
1 2 3 4
1 2 3 4
CAMERA1
1 2 3 4
1 2 3 4
CAMERA2
1 2 3 4
1 2 3 4
INTERPHONE
1 2 3 4
PROGRAM
☞
When adding a second monitor, visual and audio quality of video may
deteriorate
☞
When using UTP CABLE[CAT.5] for better image quality, connect the
rest 4 lines to GND after connecting 4 lines with monitor and camera.
8
Vid
eo
-D
oo
rP
ho
ne
CD
V-3
5A
M
AN
UA
L
06
COMMAX
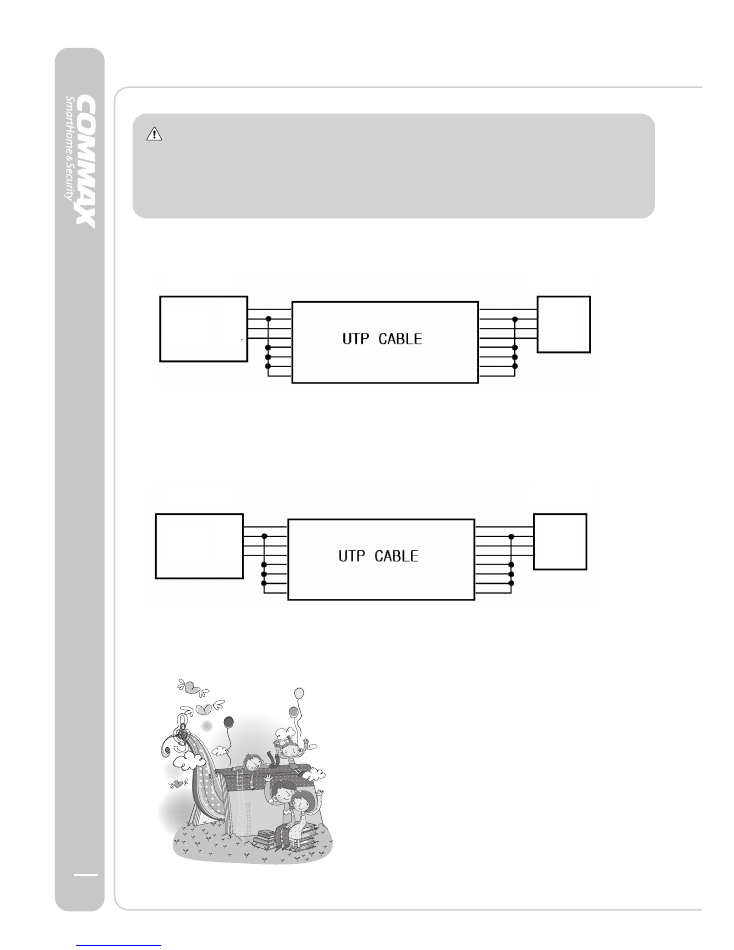
Wiring precautions
☞
Each device should be connected by separated cables.
To use CAMERA 1, CAMERA 2 and interphone using UTP
CABLE[CAT.5], 3 lines of UTP cable are required.
DOOR Camera Wiring
☞
When using UTP CABLE[CAT.5] for better image quality, connect the rest 4
lines to GND after connecting 4 lines with monitor and camera.
IN
G
B+
VD
CAM1
CAM2
MONIR
CAMERA
IN
G
B+
VD
INTERPHONE Wiring
☞
When using UTP CABLE[CAT.5] for better image quality, connect the rest 4
lines to GND after connecting 4 lines with monitor and interphone.
IN
G
+
CALL
INTER
PHONE
MONITOR
INTERPHONE
IN
G
+
CALL

Vid
eo
- D
oo
r P
ho
ne
C
DV
-35
A
M
AN
UA
L
07
COMMAX
How to use this product
2
Call from the visitor
①
When the visitor calls from the entrance(door camera), the calling sound rings
and the image of the visitor is shown on LCD screen.
②
By picking up the handset, you can talk with door camera. By pressing the
door release button, door will be released. (Door release works only while talk-
ing. Please note that this function is possible only when the door camera is
interlocked with door release function.)
③
3-way communication is possible when another user picks up the handset of
extended interphone , when you are talking with door camera on video door
phone.
(Entrance-Household -Interphone simultaneous communication mode)
④
By putting down the handset, talking is finished and video door phone turns to
stand-by mode.
(You can install additional camera. In case of receiving call from camera 1,
blue LED blinks. In case of receiving call from camera 2, purple LED blinks.)
Interphone
Talk with door camera
①
When the visitor calls from the door camera, calling sound rings on interphone
and video door phone.
②
By picking up the handset of interphone, you can talk with door camera. By
pressing the door release button, door will be released.
③
3-way communication is possible when another user picks up the handset of
video door phone, when you are talking with door camera on interphone.
Talk between interphone and video door phone(household).
(1) In case of calling video door phone from interphone
①
In order to call the household from interphone, pick up the interphone handset
and press call button. Then, video phone will be ringing.
②
You can talk with interphone by picking up handset of the household.
③
3-way communication is possible between household, interphone and door
camera when visitor calls from door camera, while household is talking with
interphone. Image from door camera is displayed on LCD of household with
calling sound and 3-way communication gets available.
(2) In case of calling interphone from household
①
After picking up the handset of household, press the interphone button to call
the interphone.
(Interphone is called only while the interphone button on household is being
pressed.)

Vid
eo
- D
oo
r P
ho
ne
C
DV
-35
A
M
AN
UA
L
08
COMMAX
Monitoring
: Function to see the image of door camera.
Operation on the Stand-by status
Monitoring works as following sequence by pressing the monitor button.
Camera1 (Camera2) OFF Camera1 ............
Operation while talking
Monitoring works as following sequence by pressing the monitor button.
Camera1 ( Camera2 ) Camera1 ( Camera2 ) ............
Calling sound adjustment (3 steps)
Image set (BRIGHT / CONT / COLOR adjustment)
①
The image setting mode will be sequentially operated when user press the
menu button as follows.(In the state of the image on)
②
BRIGHT CONTRAST COLOR EXIT ............
③
Image setting is possible only when the screen is on.
BRIGHT : Brightness adjustment
①
Calling sound volume on interphone is interlocked with the calling sound on
the household.
②
Enter the calling sound adjust mode by pressing the menu button once in the
stand-by mode. (Press menu button more than 1 second to enter volume set-
ting.) (LED lamp will be changed to red from blue.)
Caution
Product rings automatically when you press the relevant button(UP button /
DOWN button) to set calling sound volume. So, please put down the handset
when you need to adjust calling sound volume.
③
Press the UP(Door release) / DOWN(Interphone) button in front of the product
in order to adjust the volume of calling sound.
④
After completing the adjustment, save the revised setting value by pressing
the menu button again and enter stand-by mode.
(LED lamp will be changed to blue from red.)

Vid
eo
- D
oo
r P
ho
ne
C
DV
-35
A
M
AN
UA
L
09
COMMAX
①
Press the menu button once when the image is on.
(LED lamp will be changed from blue to red.)
Red LED blinks fastly. [
●◦●◦●◦●◦
]
②
You are in brightness adjustment mode.
③
Press the UP(Door release) / DOWN(Interphone) button in front of the product
in order to adjust the brightness.
④
After completing the set, save the revised setting value by pressing the menu
button.
(LED lamp will be changed from red to blue.)
CONTRAST : Contrast adjustment
①
Press the menu button twice when the image is on.
(LED lamp will be changed from blue to red.)
Red LED blinks slowly. [
●●◦◦●●◦◦●●◦◦●●◦◦
]
②
You are in CONTRAST adjustment mode.
③
Press the UP(Door release) / DOWN(Interphone) button in front of the product
in order to adjust the CONTRAST.
④
After completing the set, save the revised setting value by pressing the menu
button.
(LED lamp will be changed from red to blue.)
COLOR : Color adjustment
①
Press the menu button in the state of the image on.
(LED lamp will be changed from blue to red.)
Red LED blinks very slowly.
[
●●●◦◦◦●●●◦◦◦●●●◦◦◦●●●◦◦◦
]
②
You are in COLOR adjustment mode.
③
Press the UP(Door release button) / DOWN(Interphone button) button in front
of the product in order to adjust the condition of the COLOR.
④
After completing the set, save the revised setting value by pressing the menu
button.
(LED lamp will be changed from red to blue.)

Vid
eo
- D
oo
r P
ho
ne
C
DV
-35
A
M
AN
UA
L
10
COMMAX
RESET (Initialization)
Press the interphone button and door release button at the same time for
about 3 seconds.
(Image setting value and calling sound volume will be initialized.)
Caution
Please note that all screen adjustment and all information are initialized by
resetting.
Installation
3
Vid
eo
- D
oo
r P
ho
ne
C
DV
-35
A
M
AN
UA
L
11
COMMAX
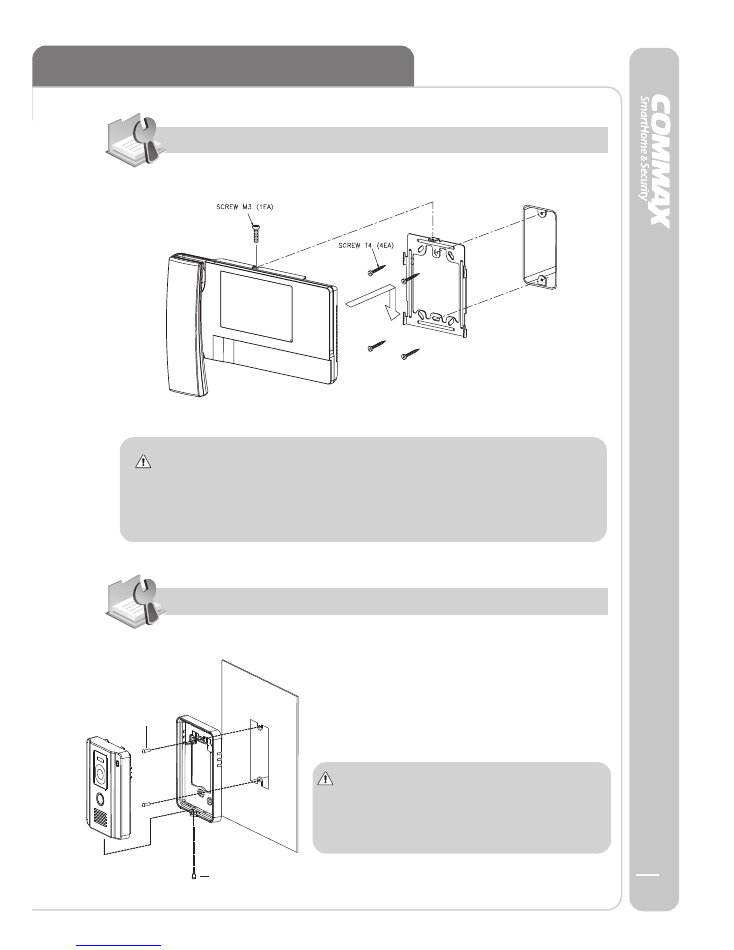
How to install the monitor
How to install the camera
Screw T4(2EA)
Screw M3
Cautions
①
Avoid the direct sunlight.
②
Recommended height is around 1450~1500mm
③
Avoid the installation near magnetic activity, humid temperature and gas.
Cautions
①
Do not install the camera where it is
exposed to direct sunlight and backlight.
②
Keep the lens clean for good image quality.
Parts list
4
Vid
eo
- D
oo
r P
ho
ne
C
DV
-35
A
M
AN
UA
L
12
COMMAX
⇧
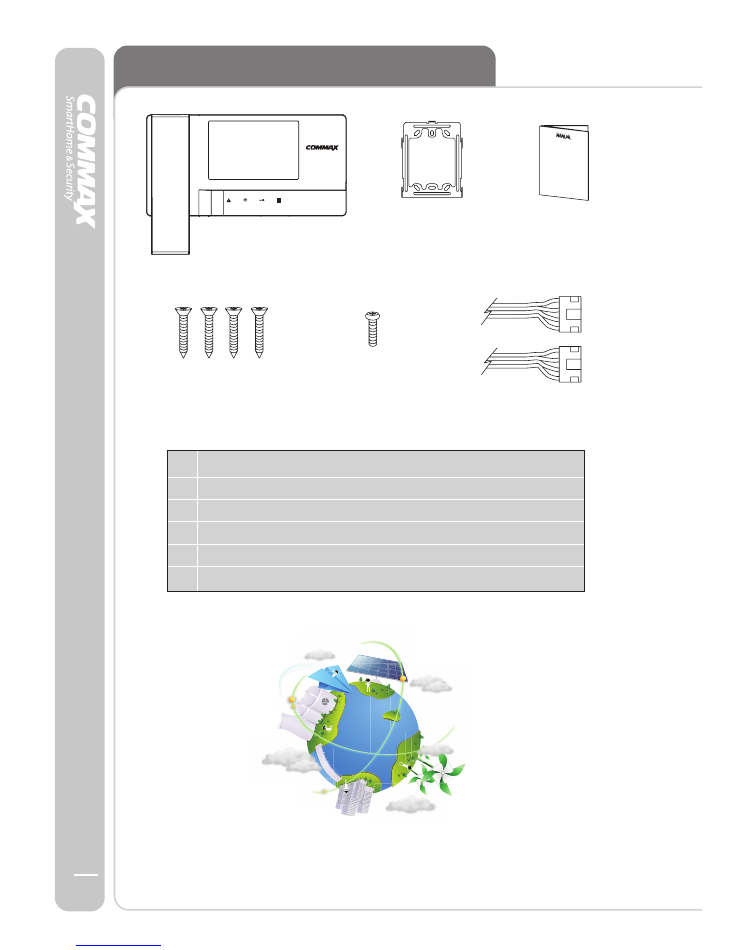
①
Body of CDV-35A
⇧
④
T4 X 18(4EA)
Screw for wall mount
⇧
⑤
M3 x 6(1EA)
Screw for body
⇧
⑥
4P Connector(2EA)
⇧
②
Bracket for wall mount
⇧
③
Manual
1 Main
Body(CDV-35A)
2 Bracket for wall surface mounting
3 User
Manual
4 Screw for wall bracket (SCREW GH1T 4X18 ZnY) – 4EA
5 Screw for body (SCREW PHM 3X6 ZnY) – 1EA
6 Camera connector (CONN. 4PX300) – 2EA

Vid
eo
- D
oo
r P
ho
ne
C
DV
-35
A
M
AN
UA
L

PM0735A00010
Printed In Korea/ 2013.05.106
COMMAX CO.,Ltd.
513-11, Sangdaewon-dong, Jungwon-gu, Seongnam-si, Gyeonggi-do, Korea
Int’l Business Dept. Tel. : +82-31-7393-540~550 Fax. : +82-31-745-2133
Web site : www.commax.com
저희 코맥스 제품을 애용해 주셔서 감사합니다.
이 사용설명서는 잘 보관하여 주십시오. 사용 중에 모르는 사항이나 기능이 제대로 동작하지
않을 때 도움이 될 것입니다.
본 제품은 ISO 9001품질보증 시스템에서 철저한 품질검사를 거쳐 만들어진 제품입니다.
보 상 기 준
소 비 자 피 해
보 상 안 내
품 질 보 증 기 간
품명 및 형식명
제 품 구 입
정
보
수 리 용 부 품 보 유 기 간
제품 수리, 교환, 환불에 대한 보상기준은 재정 경제부 고시 제 2006-36호 규정에 의거합니다.
• 상기 품질보증기간 동안에 소비자의 정상적인 사용상태에서 고장이 발생하였을 경우 구입하신 대리
점이나 본사 서비스 센타에서 무상수리를 하여 드립니다.
• 품질보증기간이 경과한 경우와 보증기간 이내라 하더라도 아래 사항에 대하여는 실비의 수리비와
부품대를 청구합니다. (출장을 요한 경우는 출장비 포함)
- 고객의 고의 또는 과실에 의한 고장의 경우
- 당사의 대리점이나 서비스 기사가 아닌 사람이 수리하여 고장이 났을 경우
- 기타 천재지변에 의한 제품고장 또는 손상이 발생한 경우 등
구입일로부터 1년
전
원
최대 소비 전력
구 입 일
구입점(상호)
년
월
일
제품단종 후 5년
❖ 품질보증기간은 고객께서 구입한 일로부터 산정되므로 본 제품 보증서에 구입일자를 기재받으시어 잘 보관하시기 바랍니다.
대표전화(고객접수 및 재설치문의)
1599-8866
COMMAX 서비스센터
전국 대리점 안내
서울(02)
코 맥 스 디 에 스 씨
코맥스주금성전기(송파)
㈜ 신 성 씨 큐 월 드
대 양 오 토 시 스 템
정암정보통신(관악)
코맥스전자통신(서초)
중앙전자통신(신촌)
중앙통신(예지동)
코 맥 스 텔 콤
중앙전자(영등포)
중앙전자공업(합정동)
코맥스B&I코리아
중앙텔콤㈜(청량리)
월 드 시 스 템
삼 영 코 맥 스
동 백 전 기 ㈜
코 맥 스 엠 에 이 치
코 맥 스 ( 서 울 )
중 앙 정 보 통 신
702-0258
414-2677
571-1948
522-8654
871-9999
3465-2419
703-1123
2265-6101
2268-3787
2678-1224
323-0490
466-5588
966-2797
2604-4062
2242-6849
2268-2156
974-5222
2267-6706
2275-3311
광주(062)
( 광 주 ) 코 맥 스
제 일 전 기
송 원 물 산
223-3006
371-9442
523-3375
전북(063)
( 전 주 ) 코 맥 스 I T
241-9893
전남(061)
( 순 천 ) 중 앙 통 신
724-9377
충북(043)
(청주)코맥스 ENCO
274-0011
충남(041)
천 안 코 맥 스
558-7870
강원(033)
조 은 전 기 조 명
735-5444
제주(064)
중 앙 전 자
722-5960
경남(055)
코맥스통신(김해)
324-7556
부산(051)
키 넷
코 맥 스 시 스 템
(주)지와이코맥스
526-1313
852-7688
865-1441
울산(052)
코 맥 스 ( 울 산 )
223-5982
대전(042)
대 흥 전 자
코 맥 스 통 신
세 아 통 상
중 앙 코 맥 스
256-0642
634-9898
484-9808
584-8331
대구(053)
중 앙 전 자 통 신
남 영 전 기 통 신
중 앙 인 터 폰 사
관 포 산 업
604-2677
423-1005
424-7433
604-4822
경기(031)
(부천)중앙전자통신
신 우 전 자
(주)코맥스티엔씨(분당)
(안산)중앙정보통신
(수원)중앙전자통신
(안양)중앙전자통신
(수원) 코 맥 스
㈜ 레 이 텍
(능곡)중앙전자통신
(용인)코맥스전기통신
(김포)코맥스 씨엔에스
새 재 시 스 템 즈
( 주 ) 다 운 2 1 E L C
코 맥 스 ( 일 산 점 )
032)664-0001
706-0993
701-7447
491-0059
233-7200
448-0404
238-0058
852-8484
972-5550
335-7720
982-0441
02)473-2628
528-6869
897-9902
903-8008
(남양주)일신종합전선
573-8500
인천(032)
중 앙 전 자
866-2941
경북(054)
중앙전자통신(포항)
정 우 전 기 조 명
611-4600
814-1199
본 사 및 공 장
: 경기도 성남시 중원구 상대원동 513-11
|
TEL : (031)731-8791~6, FAX : (031)731-8797
부 산 영 업 소
: 부산시 광역시 동구 범일2동 830-216 호림빌딩 501호
|
TEL : (051)864-7983~4
HOME PAGE
: http://www.commax.com
아우라시스
Video - Door Phone
CDV-35A
User Manual
COMMAX CO.,Ltd.
•
Thank you for purchasing COMMAX products.
•
Please carefully read this User
’
s Guide (in particular, precautions for safety) before using a product
and follow instructions to use a product exactly.
•
The company is not responsible for any safety accidents caused by abnormal operation of the product.


Specifications
5
Vid
eo
- D
oo
r P
ho
ne
C
DV
-35
A
M
AN
UA
L
13
COMMAX
Rating Voltage 100-240V~, 50/60Hz (FREE VOLTAGE)
Consumption
Operation : 10W(MAX)
Wiring method Dooe camera : 4 wires polarity
Interphone : 4 wires polarity
Monitor
8.89cm(3.5") TFT-DIGITAL LCD
Communication Full
duplex(Handset)
Calling sound
Entrance : Electronic chime
Interphone: Electronic buzzer
Monitor Display 60 ±10sec (During conversation)
30 ±10sec (During monitoring)
Distance
(Cable thickness)
Working
temperature
Dimension
249(W)X158.5(H)X47.6(D) Based on Max height of handset
CDV-35A
Model
Spec
28m(
Ø
0.5) / 50m(
Ø
0.65) / 70m(
Ø
0.8)
0 ~ +40
℃
(32
℉
~ 104
℉
)