Full Text Searchable PDF User Manual
IMPORTANT:
RETAIN FOR FUTURE REFERENCE,
READ CAREFULLY
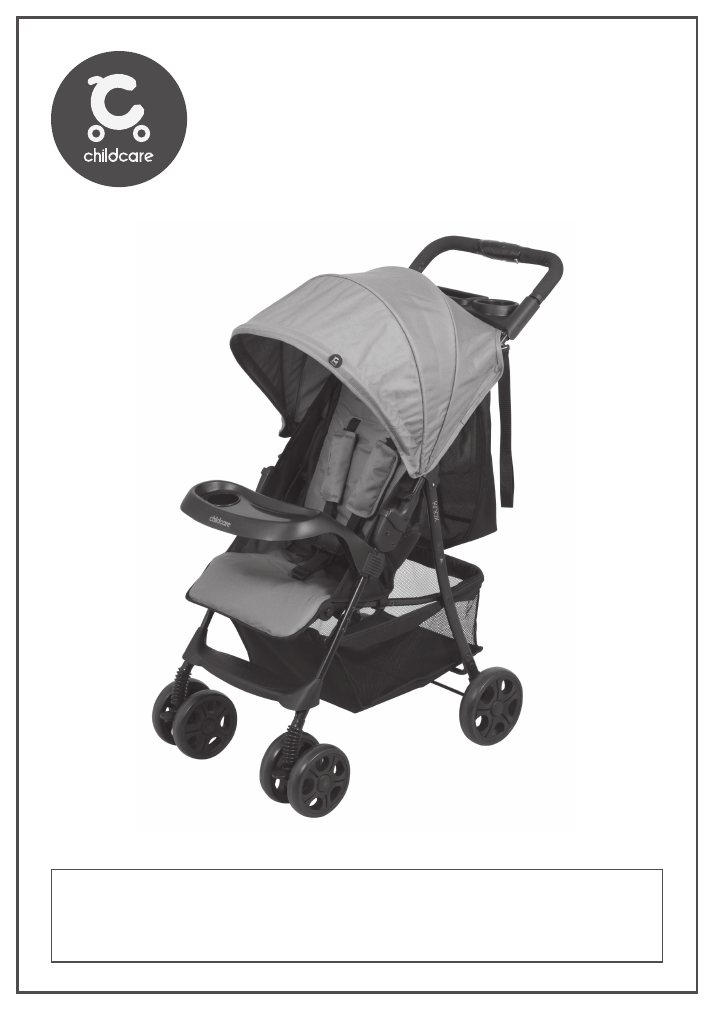
Knox
Stroller “Black”
Model
# 015259-041
2
Fingers or parts of the body could be injured when the stroller is being folded or unfolded. Please use caution
when folding or unfolding the stroller.
Always
check that safety locks are engaged before placing a child in the stroller.
Ensure
your child is secured with a correctly adjusted safety harness.
Do not
allow children to stand on the seat.
Do not
hang bags or goods from the handle as this could cause the stroller to tip over.
Do not
place more than
5kgs
in the basket.
Do not
place more than
1kg
on the removable front tray.
Do not
place more than
1kg
on the removable top parent tray.
The weight of the child using the product should not exceed
17kgs
.
The height of the child using the product should not exceed
96cm
.
It is unsafe to use parts other than those approved by the manufacturer.
Never
ride with more than one child in the stroller.
Regularly inspect all parts and locking devices, promptly replace worn out or broken parts.
Remove the child from the stroller before going up or down stairs and escalators.
To prevent the risk of the stroller catching fire, do not park it near an open fire, heater or barbecue.
Do not
make any changes, repairs or alterations to this product, unless through an approved service agent.
To avoid the risk of suffocation, keep all plastic packaging materials out of reach of children.
Never
leave safety harness connected when not fitted to a child in the stroller as this may create loops that
could cause a strangulation hazard.
The vehicle is designed for use on flat or gently sloping surfaces and may be unstable on higher sloping and
uneven surfaces; and users should be made aware of the possibility of the vehicle tipping over.
Ensure the storage latch is fully engaged when lifting or carrying the stroller.
Read all instructions before assembly and use of the stroller. Keep
instructions for future use.
TO AVOID INJURY OR DEATH:
ALWAYS APPLY THE BRAKES WHENEVER THE STROLLER IS STATIONARY.
DO NOT LEAVE CHILD UNATTENDED.
SECURE THE CHILD IN THE HARNESS AT ALL TIMES.
DO NOT CARRY EXTRA CHILDREN OR BAGS ON THIS STROLLER.
MAKE SURE CHILDREN ARE CLEAR OF ANY MOVING PARTS IF YOU ADJUST THE STROLLER.
TO AVOID INJURY ENSURE THAT YOUR CHILD IS KEPT AWAY WHEN FOLDING AND UNFOLDING THE
STROLLER.
ENSURE THAT ALL LOCKING DEVICES ARE ENGAGED BEFORE USE.
SAFETY PRECAUTIONS
WARNING

3
Due to variations in the style and design of our products, the photographs and illustrations shown in this
instruction manual are generic, therefore product fabrics, colour and design may vary from images shown.
CNP Brands reserves the right to alter product specifications without notice as a result of our ongoing
policy of product improvement.
Contents
Assembly contents list
Assembly / Operating instructions
How to care for your
Childcare Knox Stroller
Congratulations
on your purchase of the
Childcare
Knox Stroller “Black”.
This product has been designed and developed with safety,
comfort and functionality in mind. Please take the time to read
this manual carefully before using this product and keep it in a
safe place for future reference.
CONGRATULATIONS
4
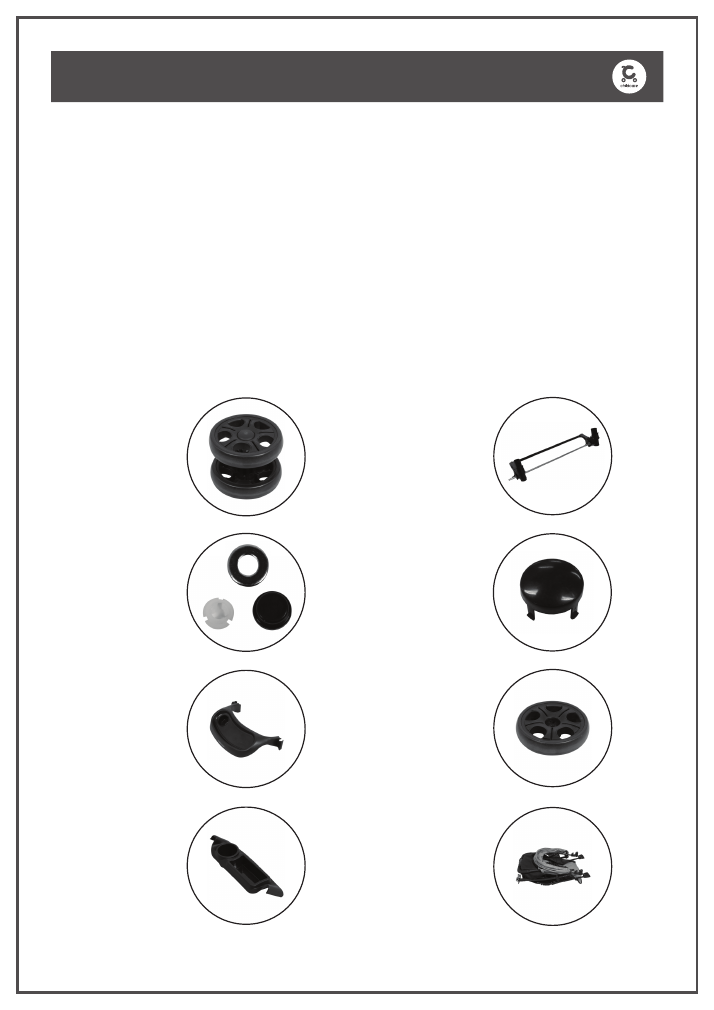
ASSEMBLY CONTENTS
Check what you have received...
You have received
1 box
. Please check the contents of the
box against the list below. If anything is missing, please contact
Customer Service.
In Australia, contact
CNP Brands on 1300 667 137
, in New Zealand
contact
Wainhouse Distribution on 0800 567 5000
.
Supplied loose in box:
Dual front swivel
wheels
x 2
x 2
x 2
x 1
x 1
x 2
x 1
x 2
Front tray
Rear tray
Rear wheels
Rear axle
Wheel hub cap
(for rear wheels)
Washer
Collet & collet
cover
There are no accessories recommended for use with this Childcare Stroller.
Stroller frame, with the
following components
pre-assembled on frame:
• Canopy
• Five point safety
harness
• Basket
• Seat lining
x 1
5
ASSEMBLY / OPERATING INSTRUCTIONS
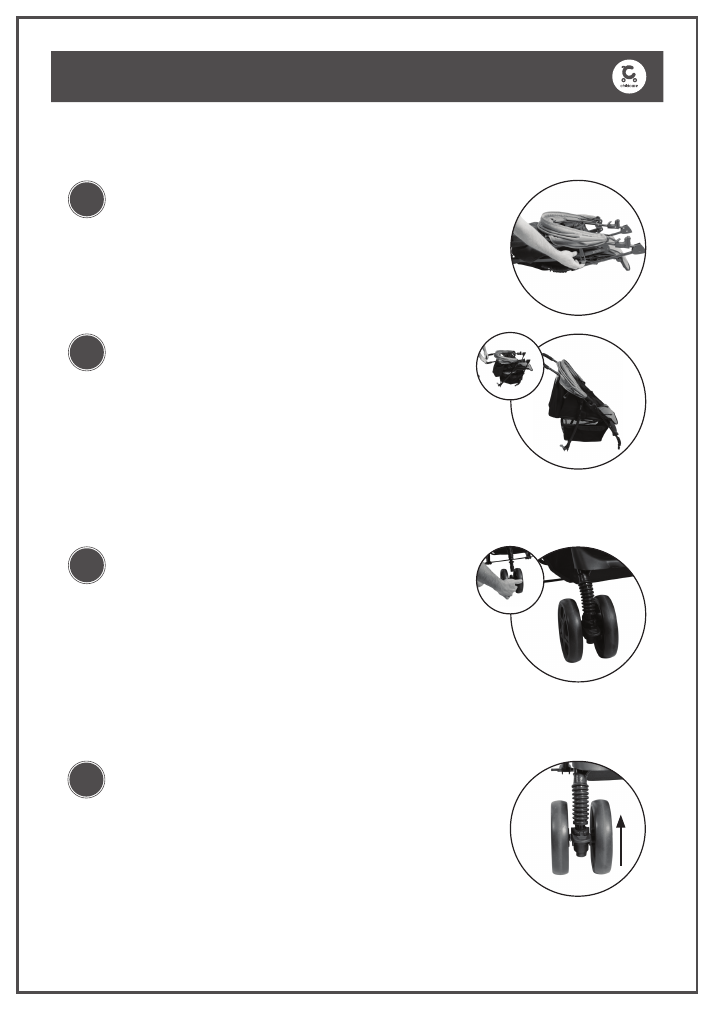
Unfolding the stroller...
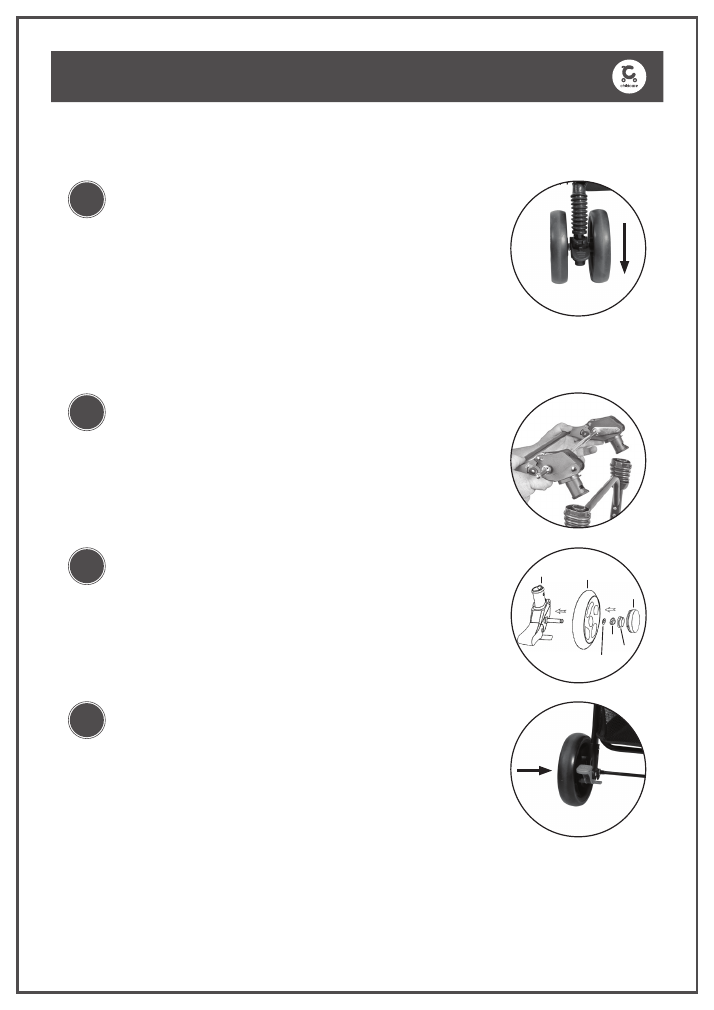
To assemble Dual Front Swivel wheels...
1
2
1
Position the stroller frame on a stable floor.
Lift the stroller up-lock by unhooking it from the latch.
(highlighted in the image)
Lift the stroller handle to unfold the stroller.
The stroller should then lock into position.
This can be determined by a clicking sound
once unfolded.
Push the front wheel onto the stroller front leg
until it “clicks” into position.
Ensure the wheel is securely attached to the
stroller front leg by pulling it downwards before
use.
Repeat for other front wheel.
1a.
1b.
1a.
2a.
2b.
2c.
1a.
1b.
1c.
To operate Swivel Function...
1
To lock swivel wheels, push lever up.
1a.
6
ASSEMBLY / OPERATING INSTRUCTIONS
To operate Swivel Function continued...
To assemble Rear Axle and Wheels...
2
1
2
3
To unlock swivel wheels, push lever down.
Push the wheel hub cap onto the wheel hub.
Turn stroller over.
To assemble the rear axle onto the stroller frame
gently push the frame down until the real brakes
“click”.
This locks them both into position on both rear legs.
Insert the rear wheel after the pre-assembled washer.
Place another washer after the rear wheel.
Fit a collet after the washer.
Ensure that the key in the slot of the collet is correctly
located in the axle’s groove.
Fit the collet cover to the collet by firmly pressing the
collet cover into place.
2a.
2a.
2b.
2c.
2d.
2e.
1a.
1b.
1c.
3a.
Rear brake
assembly
Rear wheel
Wheel
hub cap
Washer
Collet
Collet
cover
7
ASSEMBLY / OPERATING INSTRUCTIONS
To operate Rear Brakes...
1
1a.
1b.
CAUTION:
Always apply the brakes when parking stroller.
To attach the Front Tray...
1
Align the tray to the stroller frame.
Ensure that the tray is positioned below the folding
joint as shown.
1a.
1b.
2
To lock the tray in place, push the tab inwards
until it clicks into position.
To remove the tray, simply undo the tabs by
lifting them outwards.
2a.
2b.
To lock the brakes, push down on the red left and
right brake levers.
To release brakes, lift up on each brake lever.
4
Repeat for other wheel.
4a.
To assemble Rear Axle and Wheels continued...
NOTE:
If you are having trouble pushing the axle into the locked position,
consider depressing the locking pin before sliding the axle into position.
8
ASSEMBLY / OPERATING INSTRUCTIONS
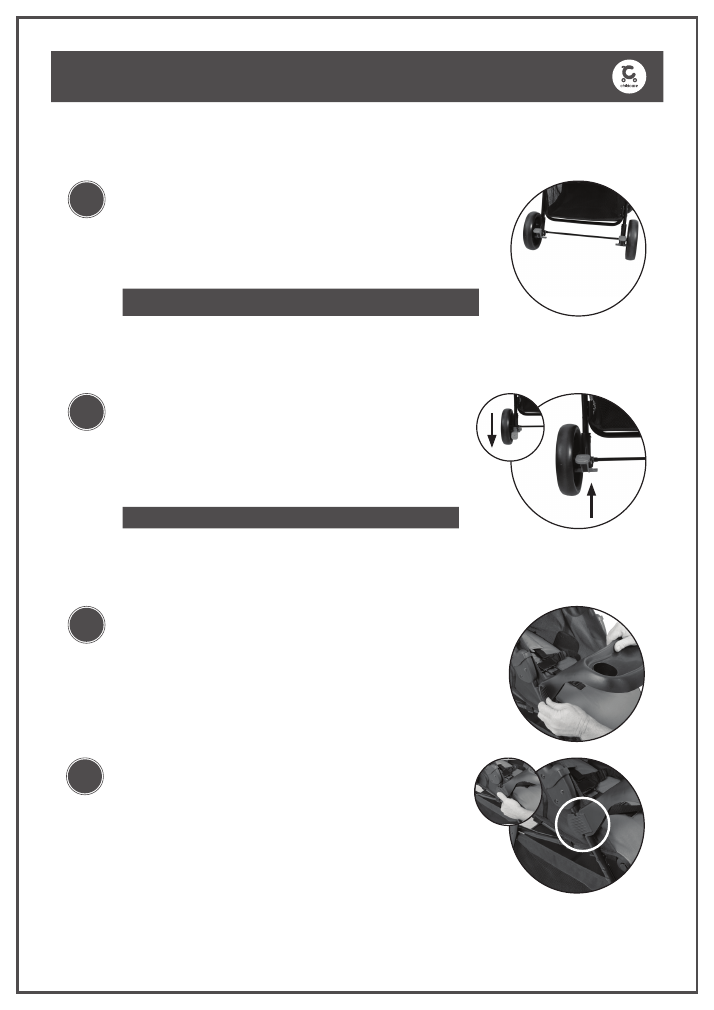
To adjust the Leg Extension...
1
Raise or lower the leg extension by pressing
both buttons and lift up or down.
Release both buttons to lock into place.
1a.
1b.
The stroller is now ready for use.
Adjusting the Backrest...
This stroller has a multiple position adjustable backrest. The upright position on the backrest is not suitable for use with
children less than six months old.
For use with a newborn (0 - 6mths), the seat should be fully reclined. The backrest should only be adjusted to a more
upright position as the child grows older and is able to support their head without assistance.
1
To Raise
Push in and hold back rest adjustment button.
Pull adjustment straps alternatively to adjust
backrest to desired height.
Release backrest adjustment button to secure.
1a.
1b.
1c.
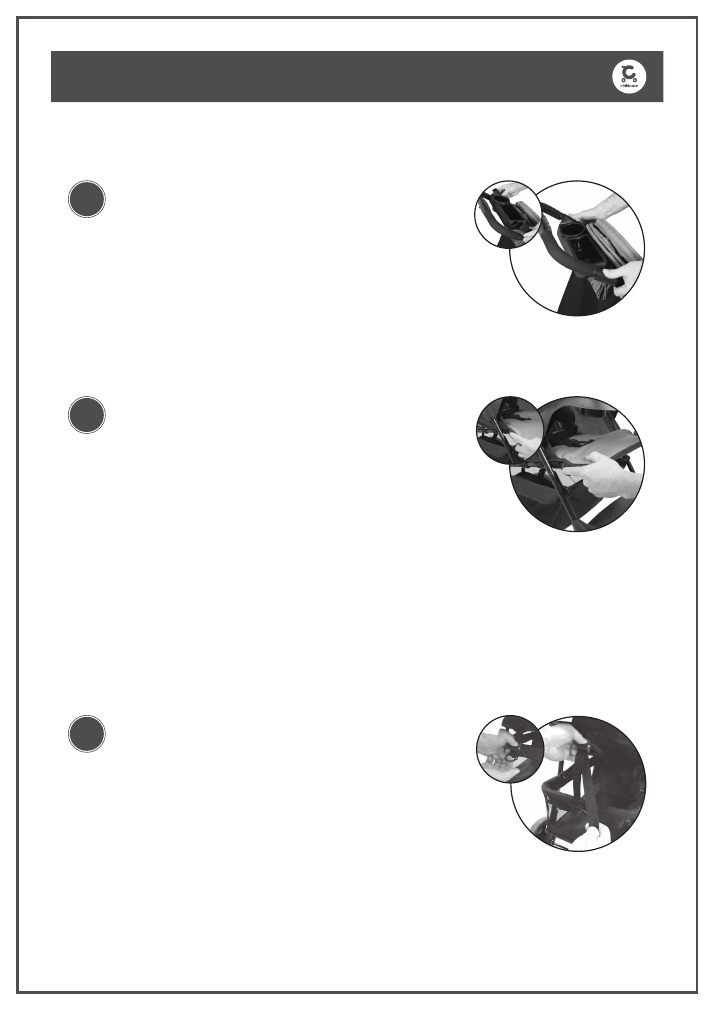
To attach the Rear Tray...
1
Fit the rear tray in the space between the
handle and the hood.
Rest the tray over the side handle bars and
ensure mounting lugs are secure in the tray
holes.
1a.
1b.
9
ASSEMBLY / OPERATING INSTRUCTIONS
CAUTION:
The canopy must be fully closed before folding the stroller.
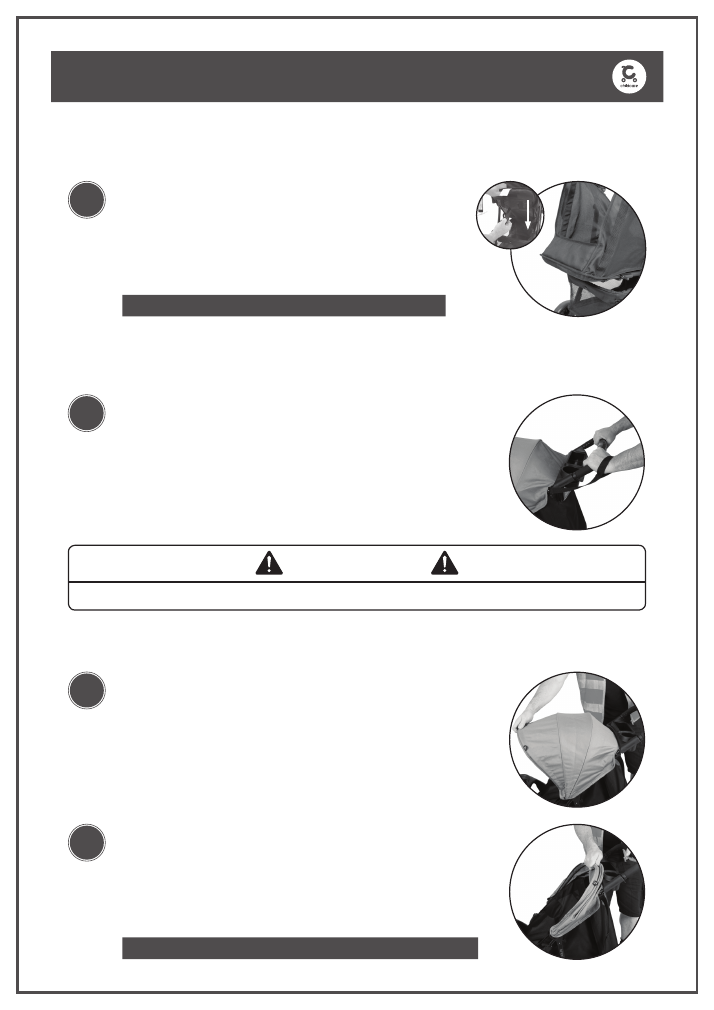
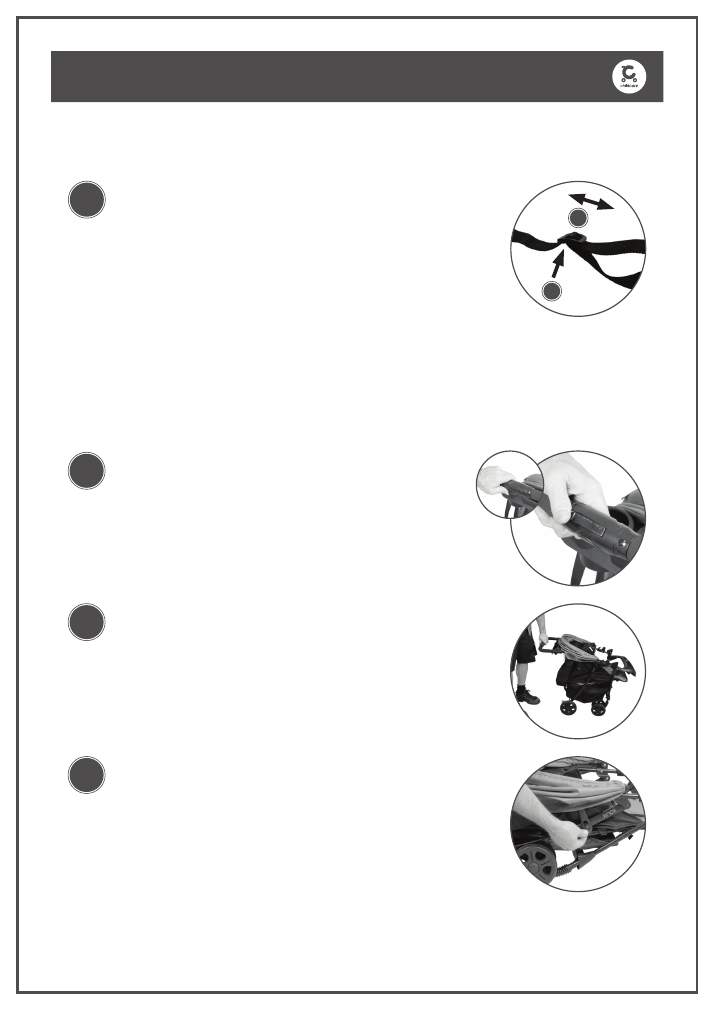
Using the Tether Strap...
To adjust Canopy...
1
1
2
Ensure tether strap is used at all times.
Make sure your hand is fed through the loop as
shown in the diagram.
To open the canopy, pull forward.
To close the canopy, pull back.
1a.
1b.
1a.
2a.
USE THIS STRAP TO STOP THE STROLLER ROLLING AWAY
WARNING
2
To Lower
Push in and hold back rest adjustment button.
Slide backrest adjuster down to desired height.
Release backrest adjustment button to secure.
2a.
2b.
2c.
CAUTION:
Do not adjust the backrest while child is in the stroller.
Adjusting the Backrest continued...
10
ASSEMBLY / OPERATING INSTRUCTIONS
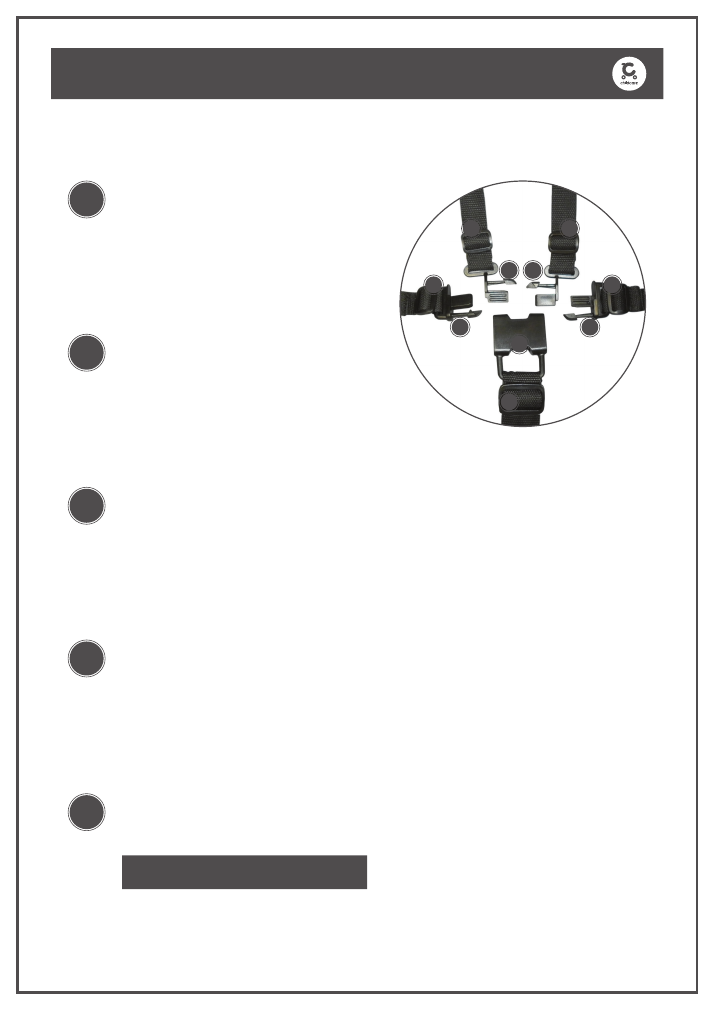
Restraints - Harness...
1
2
3
4
5
To secure the child in the harness, place
left hand buckle prong (b) on top of (a).
Hold both left hand buckle prongs (a)
and (b) together and insert it into buckle
housing (e) until it snaps into position.
Repeat previous steps for right hand
buckle prongs (c) and (d).
Once all attached, carefully adjust the
harness straps by pulling each slider (f)
until the desired fit is achieved in the lap,
shoulder and crotch straps.
To release the buckles, squeeze the top
and bottom prongs (a) and (b), (c) and
(d) together until harness disengages.
(a), (b): Left hand buckle prongs
(c), (d): Right hand buckle prongs
(e): Buckle housing
(f): Strap adjustment sliders
CAUTION:
Always adjust the harness when
changing the seating position of the child.
a
f
f
f
f
f
c
e
b
d
11
ASSEMBLY / OPERATING INSTRUCTIONS
To fold Stroller...
1
2
3
Before folding the stroller, close the hood.
Slide the lock lever to the right and twist centre
handle forward.
Push down on handle to commence folding the
unit.
Once the stroller is in the folded position, re-hook the
stroller up-lock to ensure the stroller stays folded.
1a.
1b.
2a.
3a.
To adjust Harness Straps...
1
To adjust straps, hold the strap with one hand and
slide the adjuster up or down the strap.
Sliding the adjuster down will loosen the strap, while
sliding the adjuster up will tighten the strap.
1a.
1b.
(a): Slide up or down
(b): Adjuster
a
b

12
HOW TO CARE FOR YOUR CHILDCARE STROLLER
Cleaning
Maintenance
To ensure the long-lasting use of your stroller, dry it with a soft absorbent
cloth after use in rainy weather. Use a damp cloth to clean the frame. Do not
use abrasive cleaners. After using your stroller on the beach, clean the frame
and wheels thoroughly with water to remove the sand and salt. Allow it to
dry thoroughly. Removable and non-removable fabric covers and trims may
be cleaned using a damp cloth with soap or mild detergent. Allow it to dry
completely before folding or storing it away. Do not dry clean, or use bleach
on fabrics or trims. Do not machine wash, tumble or spin dry, unless the care
labelling on the product permits these methods.
Check stroller regularly to ensure that locking devices and components
are secure and working properly. Always check parts regularly for tightness
of screws, nuts and other fasteners – tighten or replace if required. To
maintain the safety of your stroller, seek prompt repairs for bent, torn, worn
or broken parts. Use only those parts and accessories approved by CNP
Brands. If the wheels squeak, use silicone based spray or light oil ensuring
it penetrates the wheel and axle assembly. To prevent mould or mildew, do
not fold or store the product if it is damp or wet. Allow it to dry thoroughly.
Always store the product in a well ventilated area and away from direct
sunlight.
If you have any difficulties in assembling the stroller, please contact our
Service Department. In Australia, contact
CNP Brands
on
1300 667 137,
in
New Zealand
contact
Wainhouse Distribution
on
0800 567 5000.

13
ABOUT US
About CNP Brands
Currently,
CNP Brands
boasts one of the most diverse brand portfolios
with a combination of company owned brands and distribution
agreements. These include distribution lines for
Brica, Cybex, Evenflo,
Good Baby, Lascal, Maclaren, Munchkin, Project Nursery, Summer
Infant and Yookidoo.
Our own brands, including
Childcare
, have gone from strength to
strength in recent years.
Childcare
, and our premium brand
bebe
care
, demonstrate our commitment to quality and continuing
investment in product development.

14
NOTES

15
NOTES

16
Distributed in Australia by CNP Brands
20 Calarco Drive,
Derrimut, VIC, 3030
Customer Service 1300 667 137
W: www.cnpbrands.com.au
E: info@cnpbrands.com.au
F: www.facebook.com/CNPBrands
I: @cnp_baby
Distributed in New Zealand by Wainhouse
Distribution
2-6 Argyle St, Morningside,
PO Box 41-014,
St Lukes, Auckland, New Zealand
Customer Service: 0800 567 5000
E: helpline@wainhousedist.co.nz