Full Text Searchable PDF User Manual
1
K4 DASHBOARD
CAMERA
USER MANUAL

2
CONTENTS AND FEATURES
WDR
……….P. 17
Wide Dynamic Range
Emergency Recording
……….P.12
Locked videos will be saved in the EVENT folder. Locking a video will prevent it from being
overwritten. A maximum of 50 videos can be locked. If you continue to lock videos, new locked
videos will overwrite the oldest locked video
Loop Recording
……….
P.15
Records video clips of 1, 3 or 5 minutes in lengths. The standard loop recording technology
prevents storage overload by erasing the oldest previously recorded file and replacing it with the
new one.
G-Sensor
……….P.15
If the G-sensor picks up high amount of lateral G in any direction the camera will automatically lock
the video files associated with this movement.
Data is stored as an ‘EVENT’ file.
Picture mode
……….P.10
Still images can be taken.
Preview mode
……….P.12
Video footage and pictures can be viewed on the 2.7” LCD display
Parking Monitor
……….
.
P.10
Can be considered as perfect police eyes, recording everything that happens around your car
when you leave
.
GPS Player Software
……….
.
P.19
This intelligent software shows your location, speed, G-reading and direction of travel.
LDWS
……….
.
P.18
Lane Departure Warning system.
Speed Camera Alert
……….
.
P.14
Will Alert you of speed cameras. Database covers most cities in the UK.
LED indicator
Indicator
Meaning
Blue light
On
Charging when K4 is
turned off.
Off
Finish charging
Red light
On
Not recording.
Charging battery.
Flashing
Recording.
3
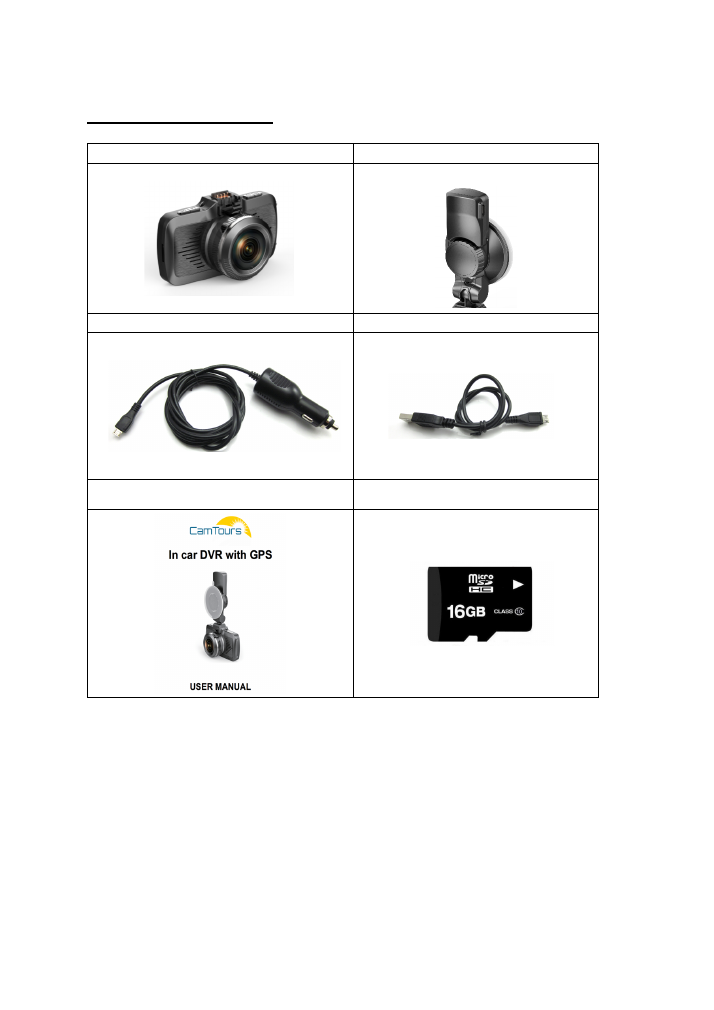
FEATURED ACCESSORIES
Camera Body
Suction Cup/GPS Module
In Car Charger
USB Data Cable
Manual
16GB (Class 10) Micro SD Card
4
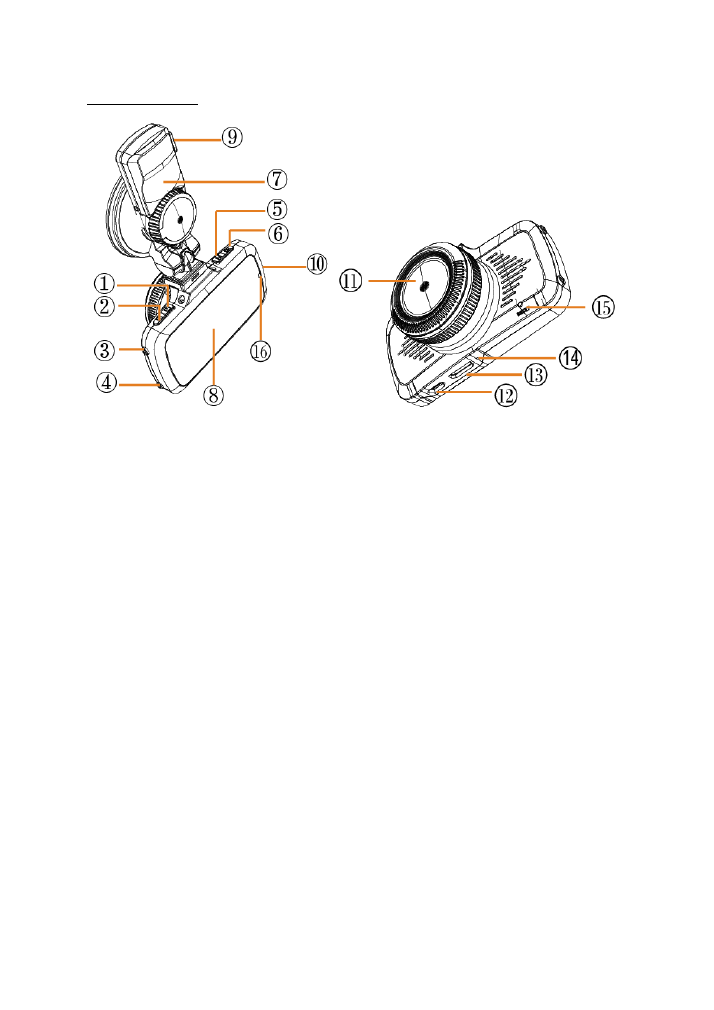
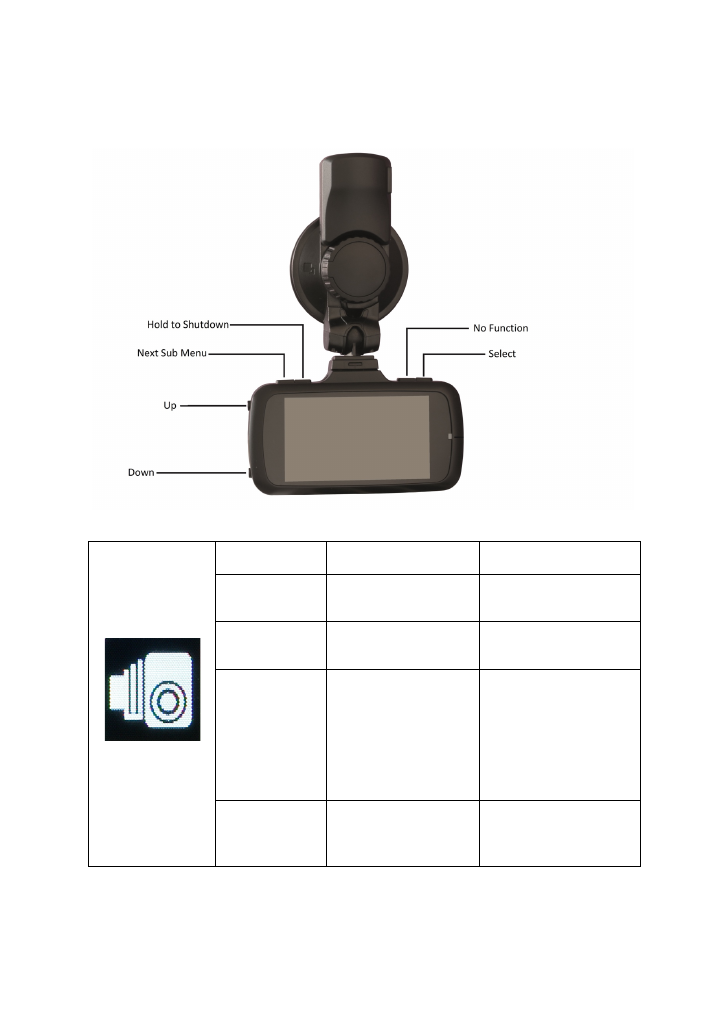
K4 STRUCTURE
1. Power Button
9. Power port
2. MENU Button
10. SD Card port
3. UP button
11. Camera Lens
4. Down button
12. USB port
5. MODE Button
13. HDMI
6. Record/OK
14. MIC
7. Suction Cup/GPS Module
15. Reset
8. Display
16. LED indicator
5
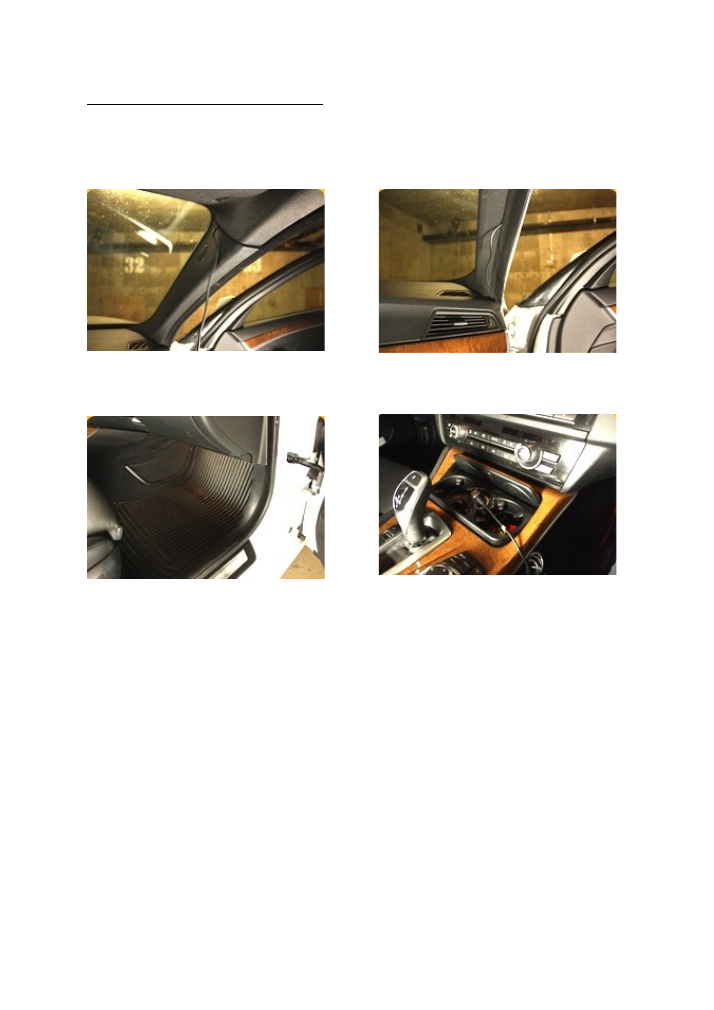
SETTING UP YOUR K4 DASH CAM
Routing the power cable:
Please note, routing of the power cable may require professional assistance.
1. Use the supplied in-car Charger
Cable.
2. Hide the cable along the headliner and
down the A pillar.
3. Continue to route the rest of the cable
underneath the carpet.
4. Plug into the cigarette power port.
6
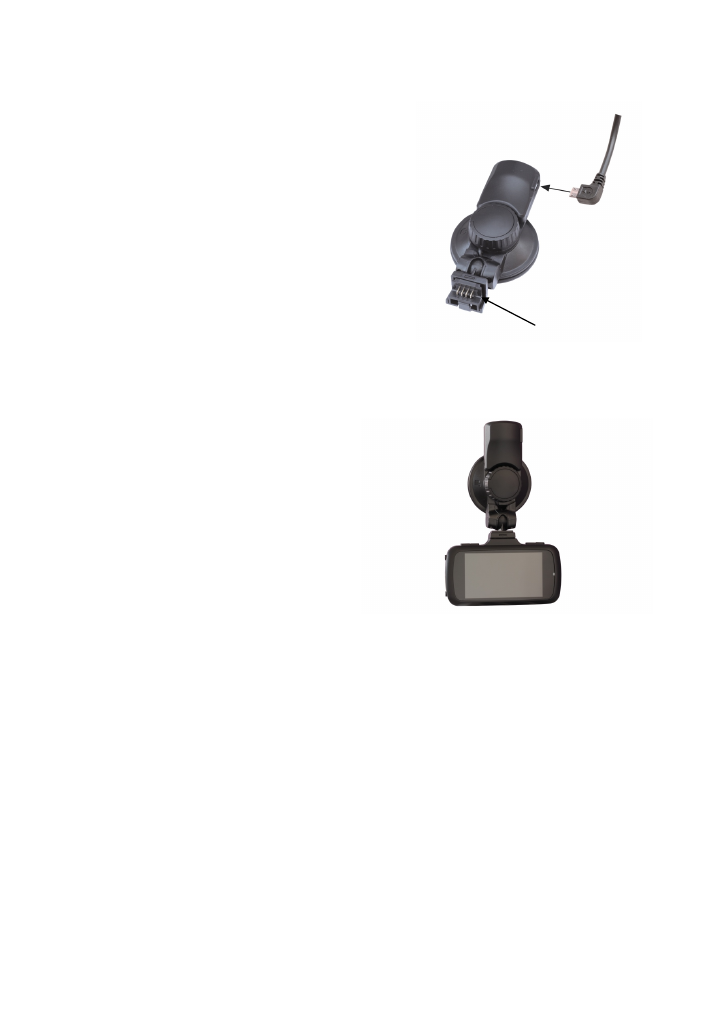
ATTACHING THE SUCTION MOUNT AND DASH CAM
-
When the power cable has been routed place the
suction cup behind the rear view mirror.
-
Before placing the suction mount onto the
windscreen make sure the bracket is at 90 degrees.
When it locks out and becomes straight (As seen in
picture) it will create a strong suction hold.
-
The power cable must be plugged into the top of the
mount. This will power the GPS module which is
integrated into the suction mount.
-
Clip the Dash Cam body into the bottom of the suction
mount.
-
To unclip the Dash Cam body from the suction mount,
push the small tab up. The body then can be pulled
free from the mount.
-
Check if the lens of the Dash cam is centred. Rotate
the body to adjust shooting angle to give a good view
of the road.
TAB TO RELEASE
DASH CAM BODY
7
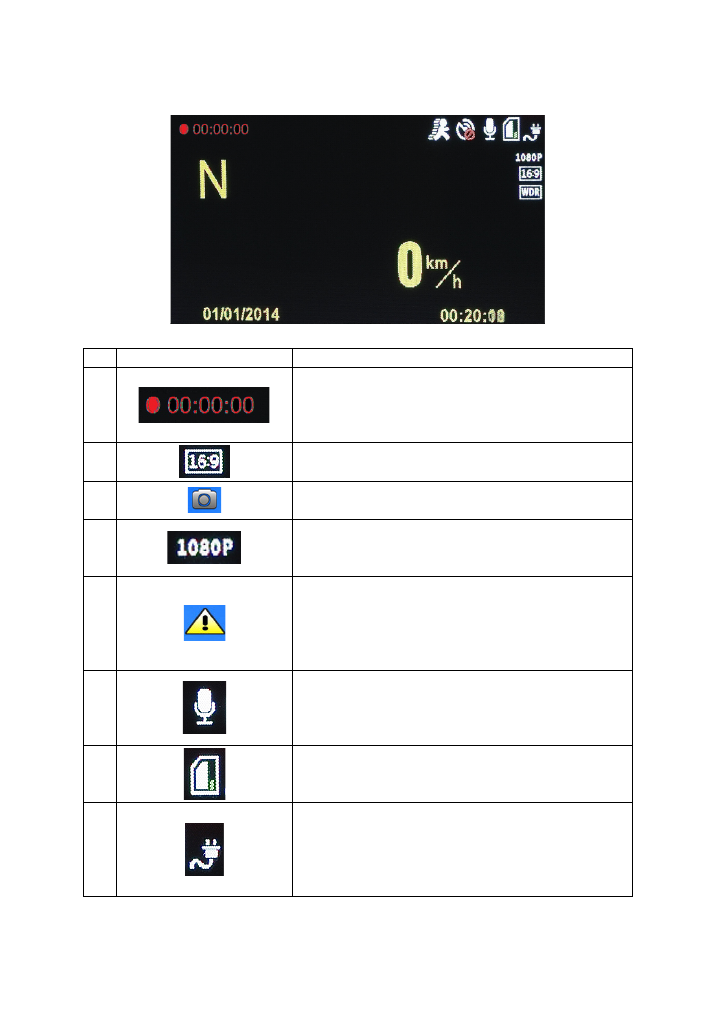
MAIN INTERFACE FUNCTION:
Icon
Function instruction
1.
When the Red dot is flashing
Recording
is in progress.
The time will not reset with loop recording and will only
reset when the journey has come to an end or if no motion
has been detected.
2.
The default video proportion is 16:9, if set at 2560x1080
30P, then the proportion will be 21:9.
3.
This will display in the top left hand corner when you are in
Picture mode
.
4.
Current record
Resolution
.
There is 4 resolution options: 2304x1296 30fps, 256x1080
30fps, 1280x720 30fps, 1280x720 60fps.
5.
This explanation mark will appear in the centre of the
screen when the
Emergency Recording
is activated.
If the G sensor picks up vibrations it will automatically start
the
Emergency Recording
. Pressing the ▲ button during
recording will also activate the
Emergency recording
.
6.
This symbol means the
MIC
is active and is recording
sound. By pressing the ▼button during recording it will
turn off the
MIC
and stop recording sound. The symbol will
have a line through it when
MIC
is deactivated.
7.
Displays the Remaining/Used
Memory
on the SD card.
8.
Charging
indicator light. When the K4 is not plugged in it
will display a
Battery
indicator.
The
Battery
is for backup purposes. If the K4 suddenly
looses power it will save the last file before shutting down
correctly.
8
9.
N meaning North. This symbolizes your
Direction of
Travel.
GPS must be turned on for this feature to work.
10.
This symbol means
GPS Disabled.
When the GPS is
enabled the red cross will disappear.
The K4 can take up to a few minutes to successfully
obtain a
GPS
signal. An audible notification will be heard
when it has successfully connected to
GPS
.
11.
This icon means the
Wide Dynamic Range
function is on.
More about WDR on page 17.
12.
This icon means that
Motion detection
is activated.
This is a great way to make sure you always capture all
movement in front of your dash cam.
13.
Speed rating.
When GPS is enabled this will give you an
accurate reading of your current speed.
The Speed rating can be changed to KPH with a Firmware
update.
More about
Firmware updates
on page 20.
14.
Time
. This will be stamped onto the video. The
Time
can
be adjusted in the menu.
15.
Date
. This will be stamped on the video. The
Date
can be
adjusted in the menu.
9
INSTRUCTIONS
The K4 will turn on automatically when it receives power.
When the SD is located it will automatically start recording. Turning
Motion detection
on will start
the recording when ever the camera picks up motion.
When the K4 is Not Recording the Mode button (M) can be used. This will toggle through the three
different modes on the Camera -
Recording mode, Picture mode
and
Preview mode.
More about
Picture mode
and
Preview mode
on page 11, 12 and 13.
Increasing and Decreasing
EV
will adjust the
ISO
or the brightness level.
Below are the button functions for when the dash cam is
Not Recording
.
10
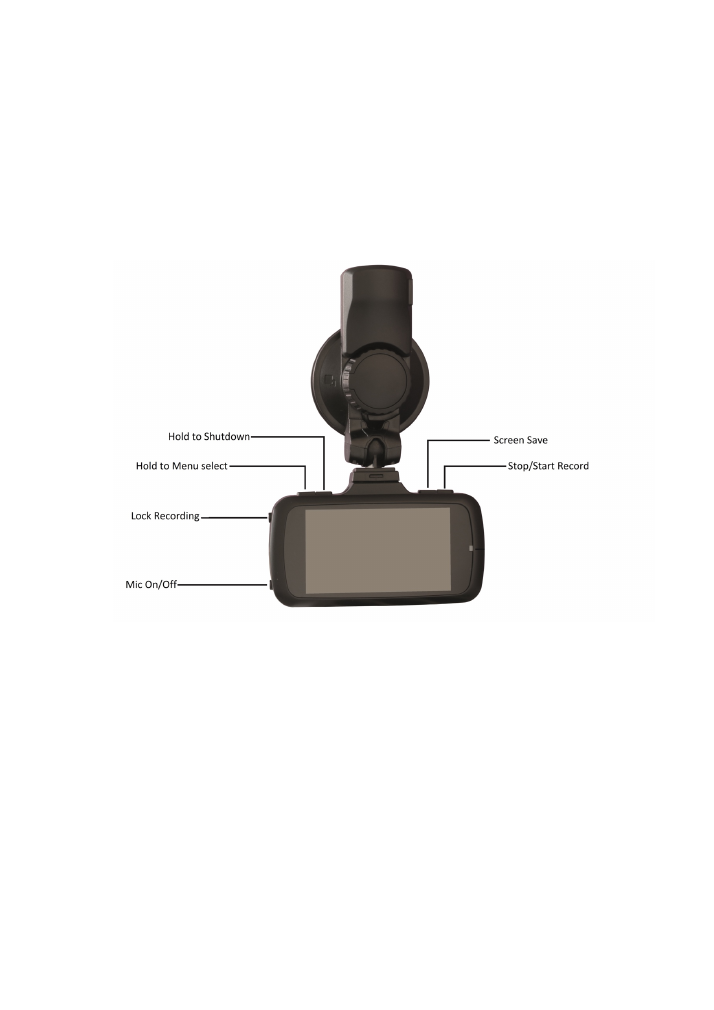
RECORDING MODE
The
Screen Save
button will turn off the screen. This will continue to record footage and can also
be set in the menu.
The
Lock Recording
button will save video footage in the ‘Event” folder. More on Emergency
recording on page 2.
The
MIC on/off
button will toggle sound
from being recorded.
Below are the button functions for when the K4 is
Recording
.
PARKING MONITOR
To use your K4 as a
Parking Monitor, Motion Detection
must be active. The
Parking monitor
will also use the G-sensor to provide a watchful eye over your vehicle when you are not there.
To start the parking monitor simply press the screen save button. This will then put the K4 on idle
and use very little power.
If motion is detected or the G-sensor picks up a sudden movement the K4 will automatically start
recording.
The K4 must have a power supply for this feature to work.
If your cigarette lighter does not supply constant power, then hard wire kits are available from our
website.
11
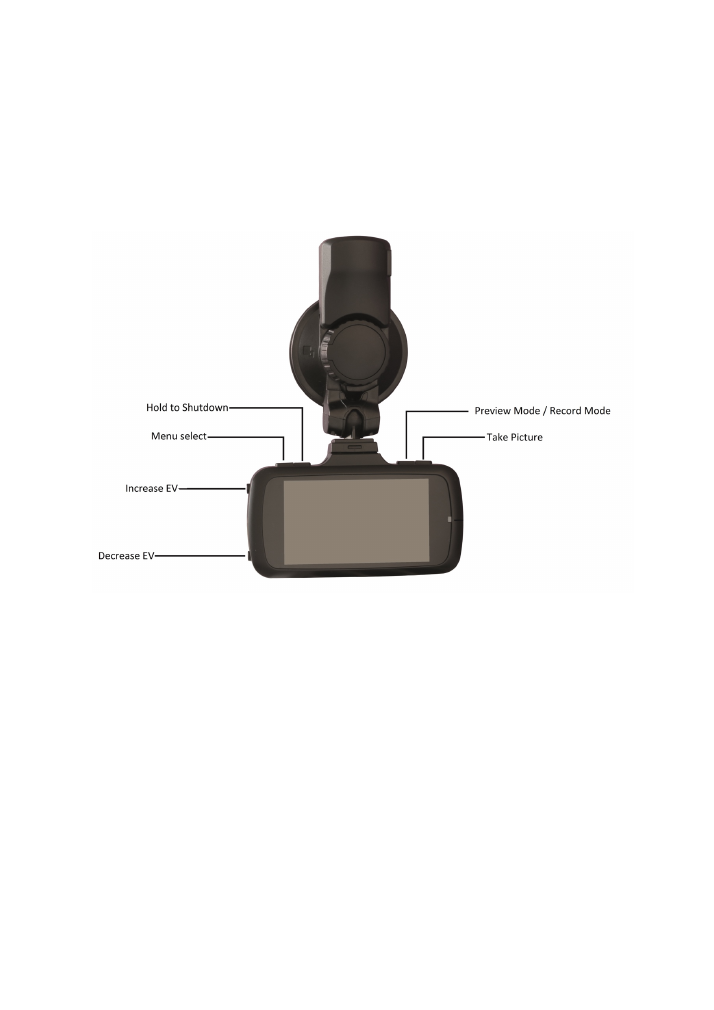
PICTURE MODE
In
Picture mode
still images can be taken.
Increasing and Decreasing
EV
will adjust the screens brightness level
Below are the button functions for when in
Picture mode
.
12
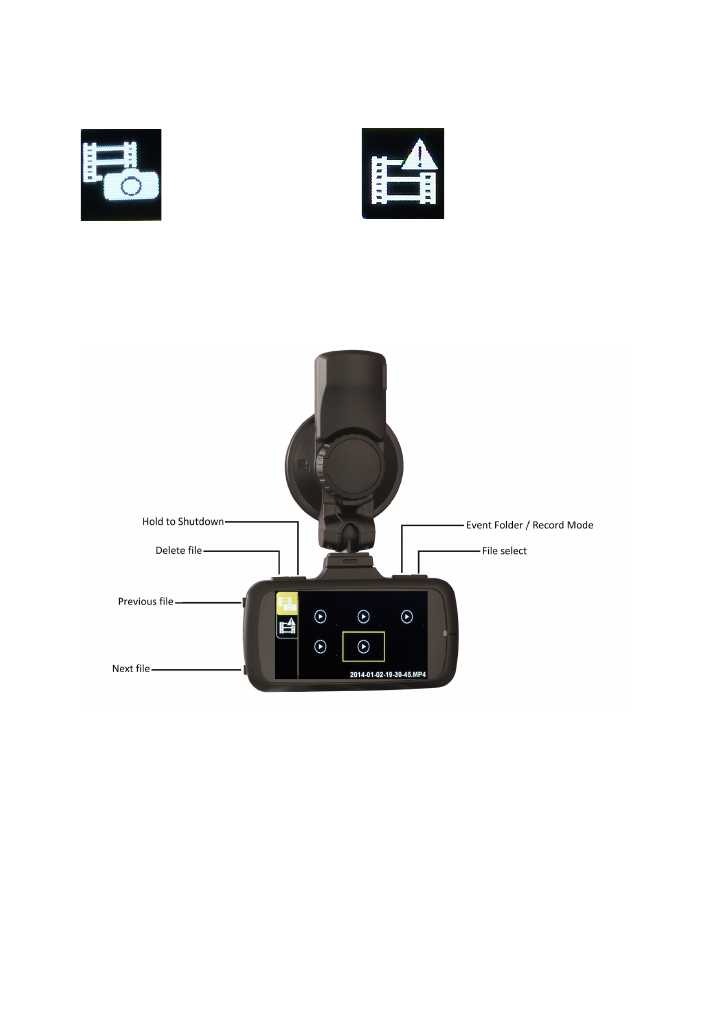
PREVIEW MODE
Pressing the (M) button will navigate through the ‘normal’ & ‘event’ folders when in
Preview mode
.
By clicking the
File select
button this will play your footage back on the screen.
Below are the button functions for when in preview mode.
Normal Folder
The files in this folder will
automatically be overwritten
when the the SD card is full.
Event Folder
The files in this folder will be locked.
Locking a video will prevent it from
being overwritten.
13
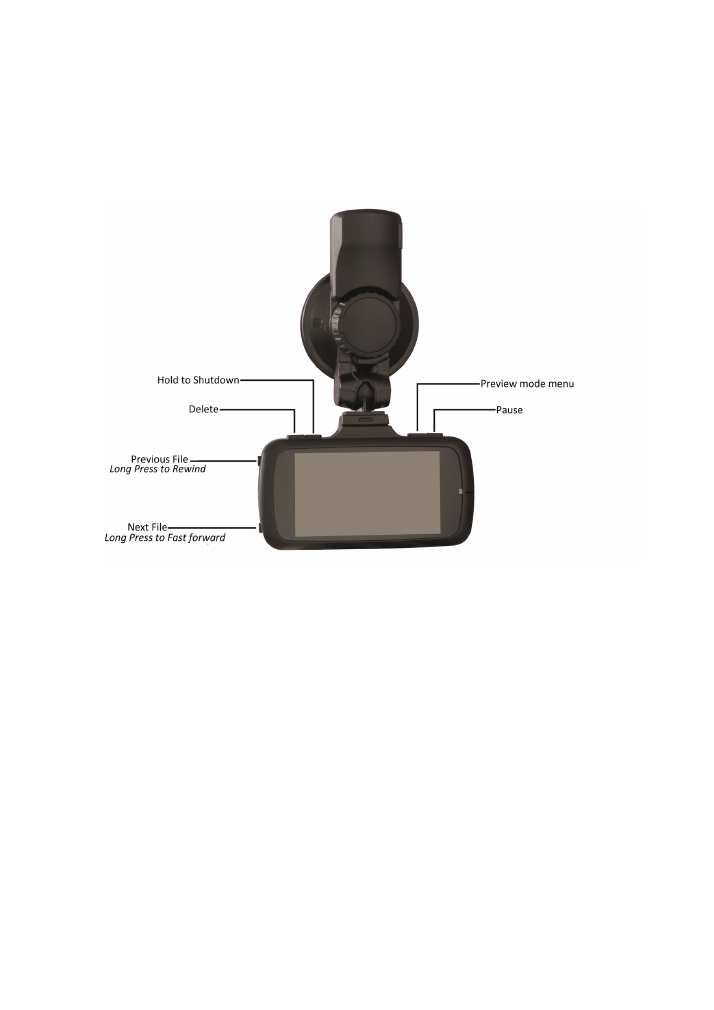
PREVIEW MODE (WATCHING YOUR FOOTAGE)
Below are the button functions for when your footage is playing.
14
MENU
Below are the button functions for the
Menu
Menu
Options
Information
Volume
0 - 9
Adjust K4 speaker
volume.
Overspeed
Off, 60 KPH 140KPH Will sound alarm if in
excess of selected speed.
Area
Auto, 400m 1000m
Speed camera Alert.
Firmware updates are
available for the latest
speed camera database.
More about Firmware
updates on page 20.
GPS
On / Off
To record speed, location
ect, GPS must be turned
on.

15
Menu
Options
Information
Resolution
1920x1080
30fps,
2304x1296
30fps,
2560x1080 30fps,
1280x720 30fps,
1280x720 60fps
Default : 1920x1080
Quality
Normal,
Fine,
S.Fine
Default : S.Fine
WDR
On / Off
More info on Page 17.
Time Stamp
On / Off
Time will be stamped
onto the video footage
in bottom corner.
Loop Recording
1min, 2min,
3min, 5 min
More info on loop
recording on page 2.
G Sensor
Class 1 (High) Class
7 (Low)
Lateral G Detection
sensor.
Motion Detection
On / Off
Will automatically start
recording when motion is
detected.
Record Audio
On / Off
Toggles Mic On / Off
Fatigue Warning
Off 1 Hour 4 Hours Alert for prevention of
falling asleep while
driving.
GPS Track
On / Off
Must be turned on to add
GPS location to video
files.
LDWS Calibration
-
More info on LDWS
Calibration on page 18.
LDWS
On / Off
Lane Departure Warning
System
16
Menu
Option
Information
Date/Time Setup
MM/DD/YYYY
HH:MM
Date/Time
can
be
adjusted. GPS will sync
time.
Frequency
50Hz, 60Hz
Screen Frequency
AE Meter
Centre,
Spot,
Average
How
the
Camera
estimates exposure to
light.
Screen Saver
Constant Light, 15sec
5mins
Turns the screen off
during recording.
Beep Sound
On / Off
Toggle Beep sound
Plate Stamp
Off / Ent. The plate
Enter your number plate
number to be stamped
onto your video footage.
Speed Stamp
On / Off
Speed rating stamped
onto your video footage
Time zone
GMT 00:00
Set the time zone. With
the GPS connected it will
sync to the correct time
zone.
Image Rotation
On / Off
Flips the picture 180
Degrees
for
reverse
mounting.
Language
English, Russian
-
Format
-
Format the SD Card
System Info
-
-
17
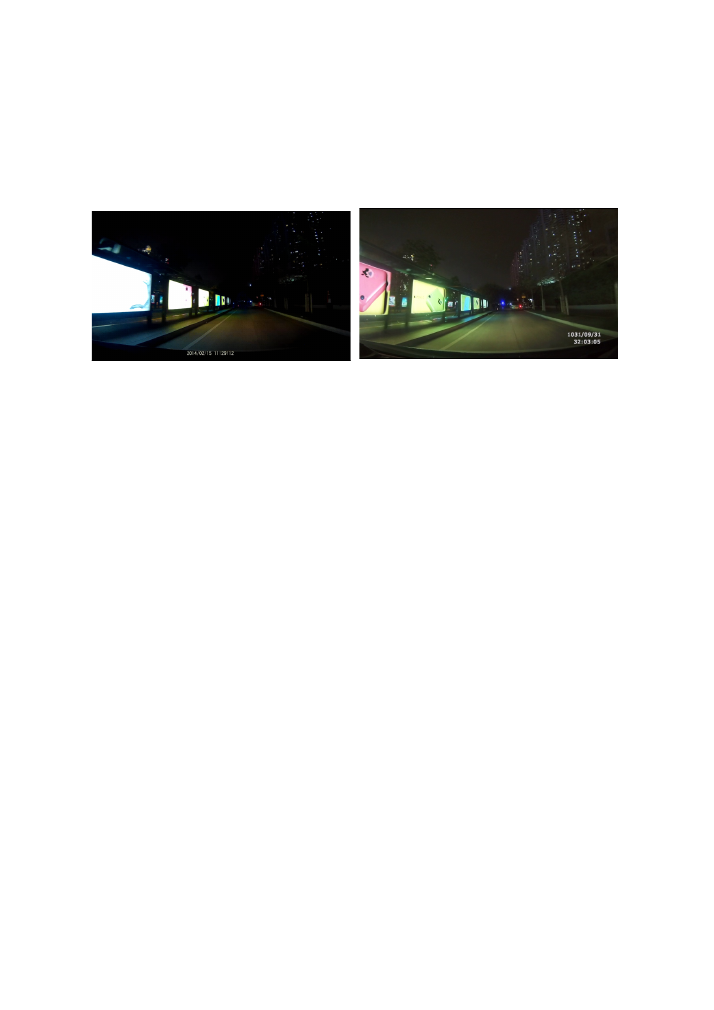
WDR
Wide Dynamic Range is an advanced photosensitive image processing technology. Videos
processed by WDR will be clear even when recorded in a strong contrast of light and shade
environment. The image will not be overexposed or dark.
(
WDR OFF
)
(
WDR ON
)
18
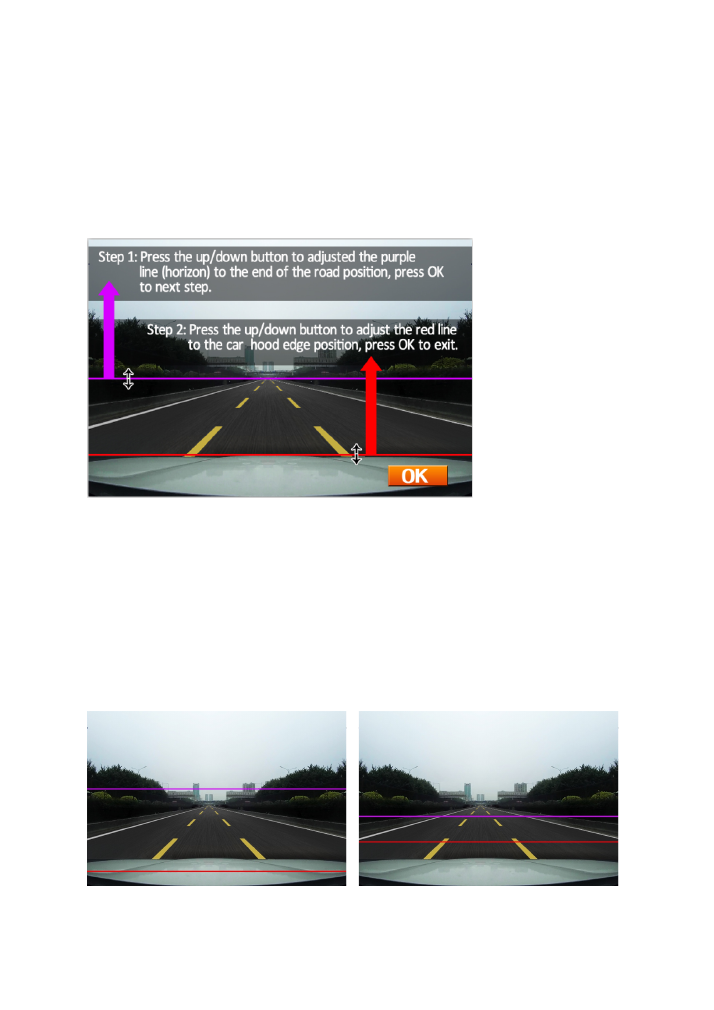
LANE DEPARTURE WARNING SYSTEM (LDWS)
With the GPS and LWDS feature enabled the K4 dash camera can see lane markings on the road
to warn you when your vehicle drifts from the current lane. The warning is an audible and visual
icon displayed on the DVR screen.
Calibration
To Start the LWDS Calibration please select LDWS calibration in the Menu.
Push the
‘OK’
button to start
Use the
‘UP’
and
‘DOWN’
buttons to adjust the purple line. The
Purple
line must line up with the
horizon of the road. Press
‘OK’
to move to the
Red
line.
The
Red
line must line up with the top of the Bonnet. After adjusting, press
‘OK’
to exit LDWS
calibration.
You must adjust the purple and red lines accurately. If the distance between the purple line and
red line is too big (pic 1), it will make an alarm sound.
If the distance is too close (pic 2), the LDWS will not work.
(
Pic1
)
(
Pic2
)
19
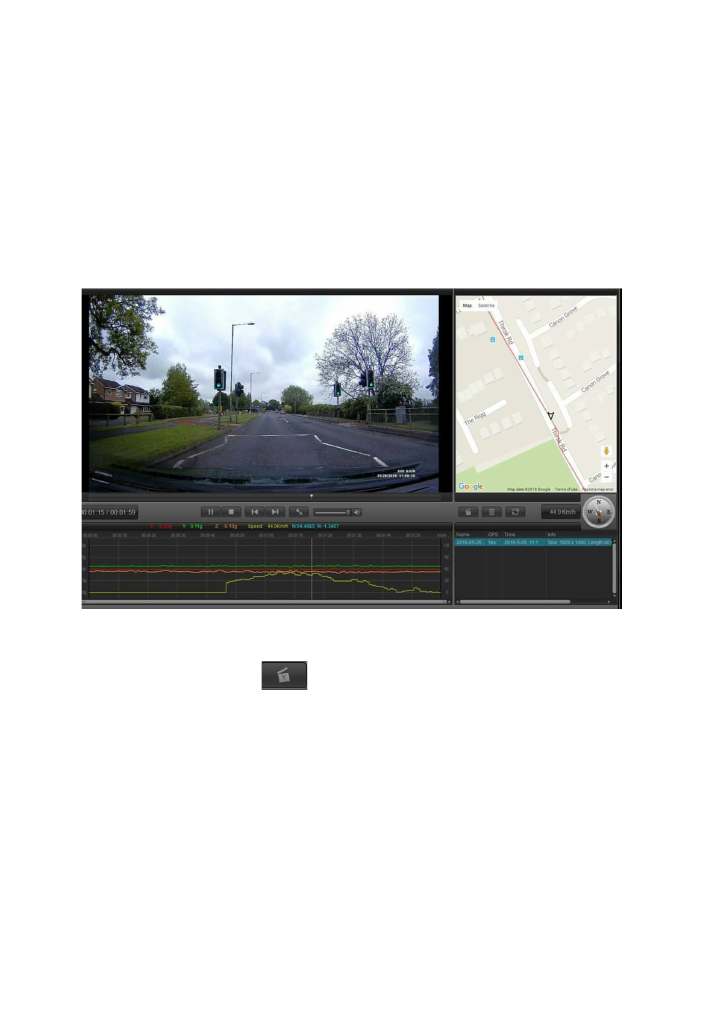
GPS PLAYER SOFTWARE
Use the supplied
Car Recorder Player Software
to show your location, speed, G-reading and
direction of travel.
Installing the software
Connect the Dash cam to your PC using the supplied Data cable or use an SD card adapter. The
K4 automatically transfers over the installation file onto the SD card when you starting using it.
This is the home screen for the
Car Recorder Player
.
To attach a video file push the
button.
To view your location, you must select ‘Google maps’ which can be found in the menu.
The menu tab can be found in the top left hand corner.

20
CUSTOMER SUPPORT
CAMTOURS
is dedicated to providing the best possible service.
To contact us please visit our website at
www.camtours.online
Download Firmware for Speed Rating changes and speed camera database updates
at
www.camtours.online/downloads
You can also find us on facebook at www.facebook.com/camtoursuk
TECHNICAL SPECIFICATIONS:
DVR chip: Ambarella A7LA50
Input voltage: DC 5V
Work current: ≤600mA
Charge current: >120mA
Battery: 280mAH
G-sensor: support
Camera: 170 wide angle
,
12 Mega pixels
Display model: 16
:
9
,
2.7 inch
Video format: MP4
Display resolution: 320*240
SD card specification: 8GB Min, 64GB Max Class 10
HDMI output: Support
Voice record: In Built MIC
Support computer system: Windows/2003/XP/vista/Win7