Full Text Searchable PDF User Manual
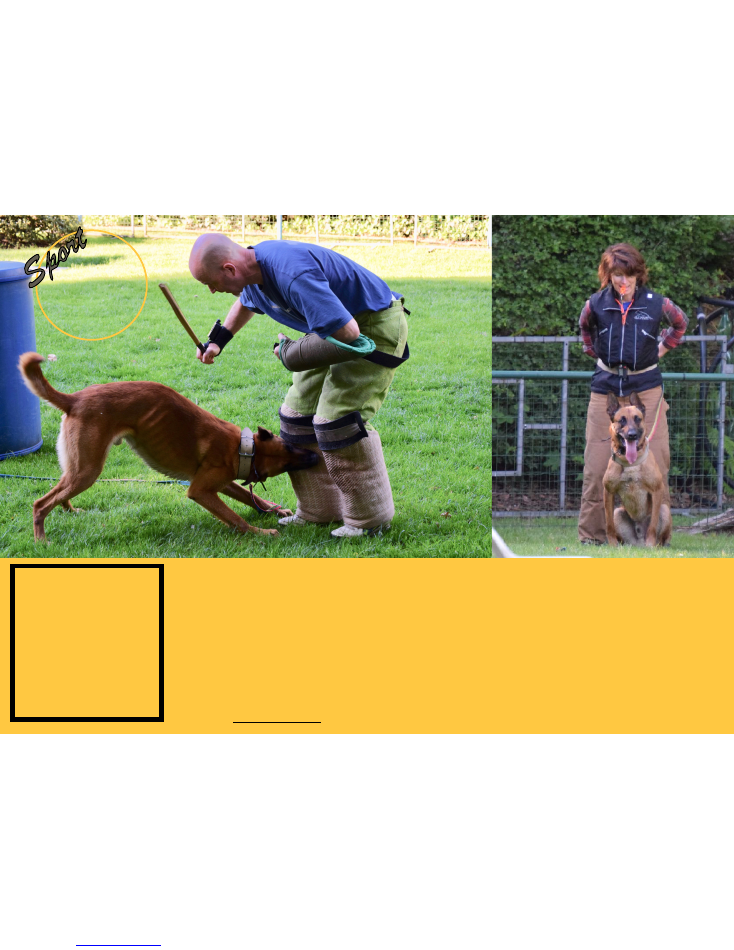
THE CHAMELEON®
TACTICAL TRANSMITTER - SPORT
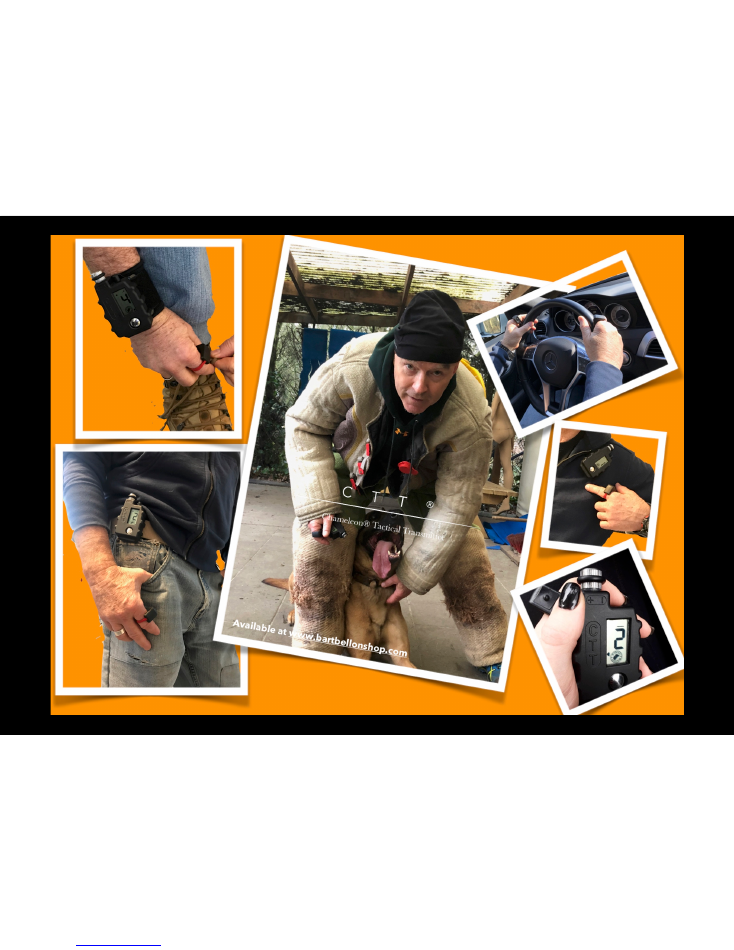
Unique on the market: small, waterproof, sophisticated settings, and
designed for a hands free experience.
MICHAEL AND BART
BELLON® ANNOUNCE THE
CHAMELEON®
TACTICAL
TRANSMITTER - SPORT
CTT®
1
Congratulations on your top notch
transmitter!
The CTT®
Sport is specifically designed by
Michael and Bart Bellon® to fulfil the needs of
most modern dog trainers who need fine
tuning, roughness in exterior, toughness,
practicality and realistic features. The CTT®
Sport is tuned by Martin System technology.
The CTT® Sport is specially designed to be
practical and easy to use. Modern dog training
is based on timing, minimum motion from the
handler and discretion towards the
environment. Due to different ways to affix the
CTT® Sport to your body and due to the
discretion of the Finger-Kick: your transmitter
can be invisible.
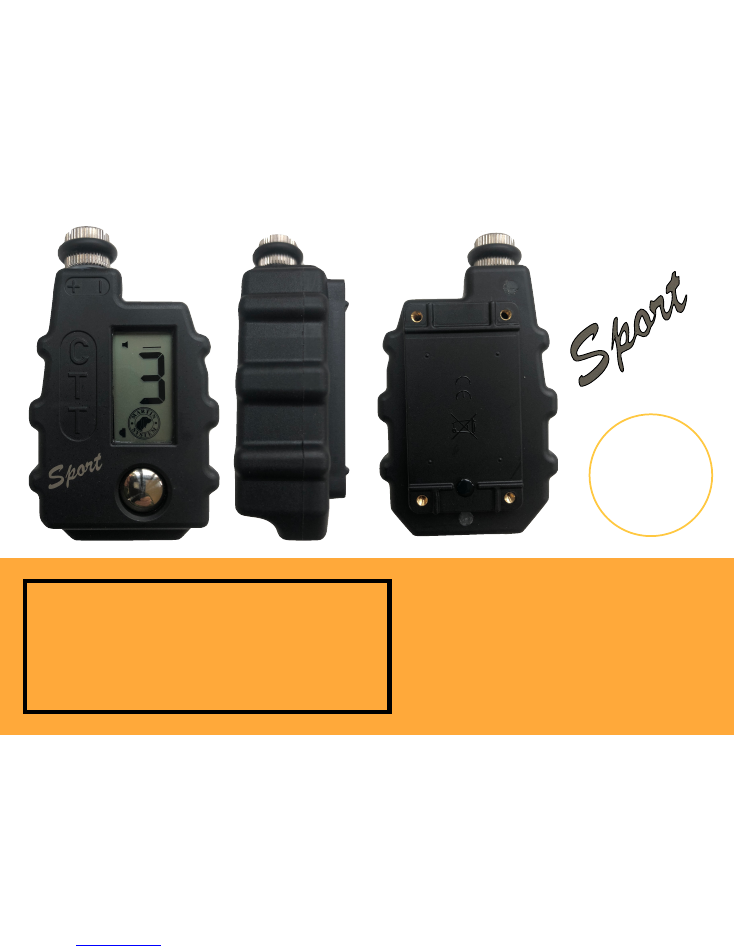
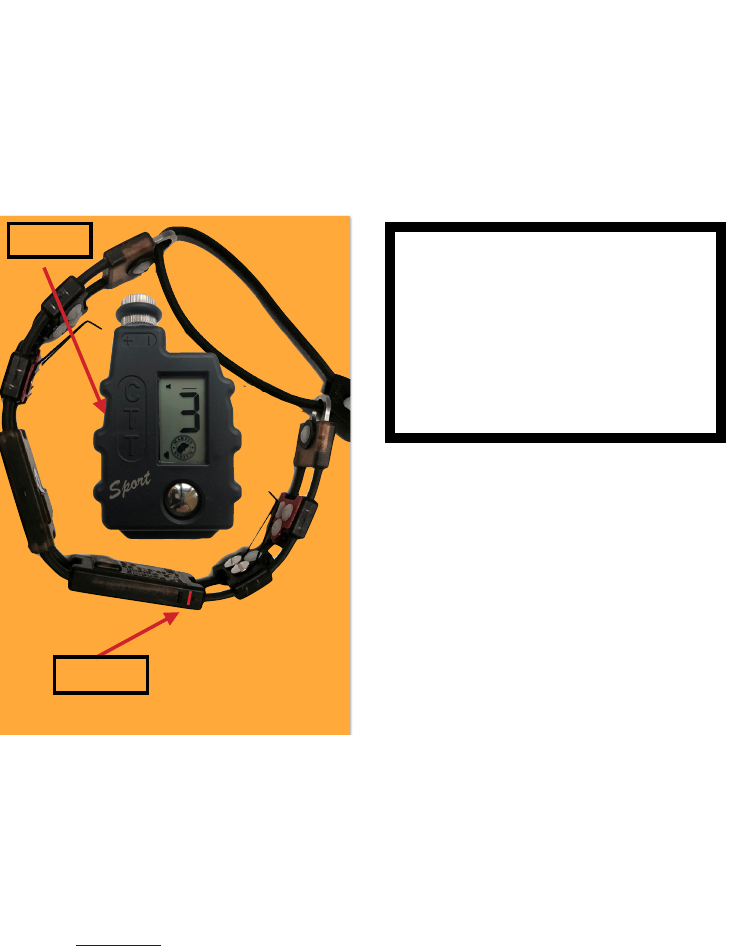
Figure 2
shows the main components
of the display: the rotation knob with
special o-ring for smoother tuning
(increases, decreases levels of
stimulation, 0 = clicker, and OFF); the
LED display (not lighted for tactical
reasons); the magnetic start point; and
the Program button that has the
following functions:
1. an “ON” button
2. A navigating button
3. A pairing button (to the Finger-Kick)
4. A stimulation button in SOS
2
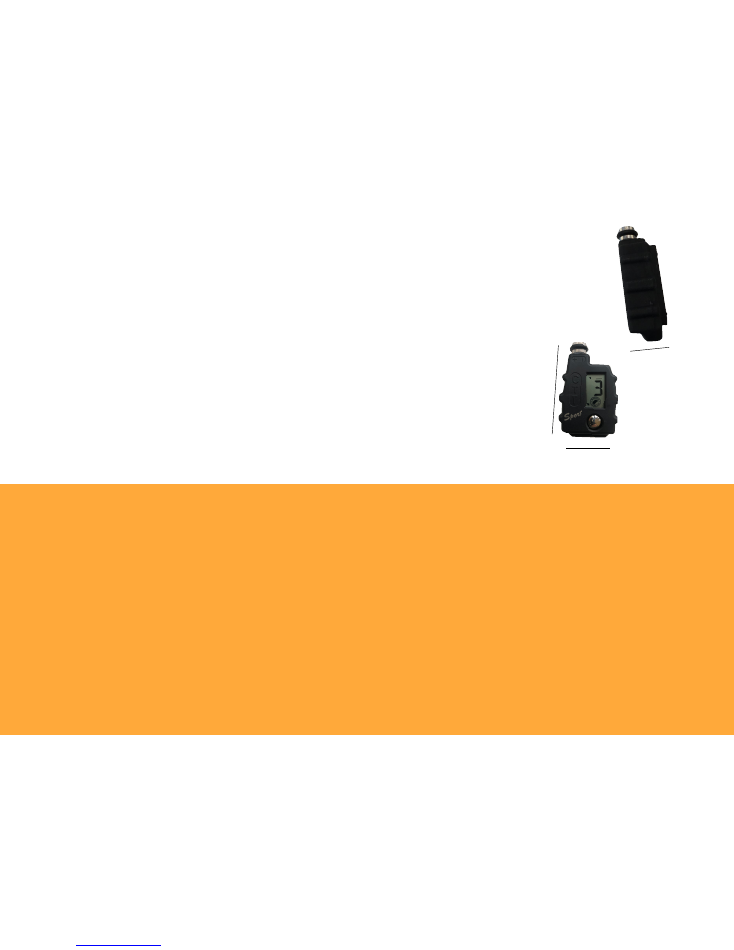
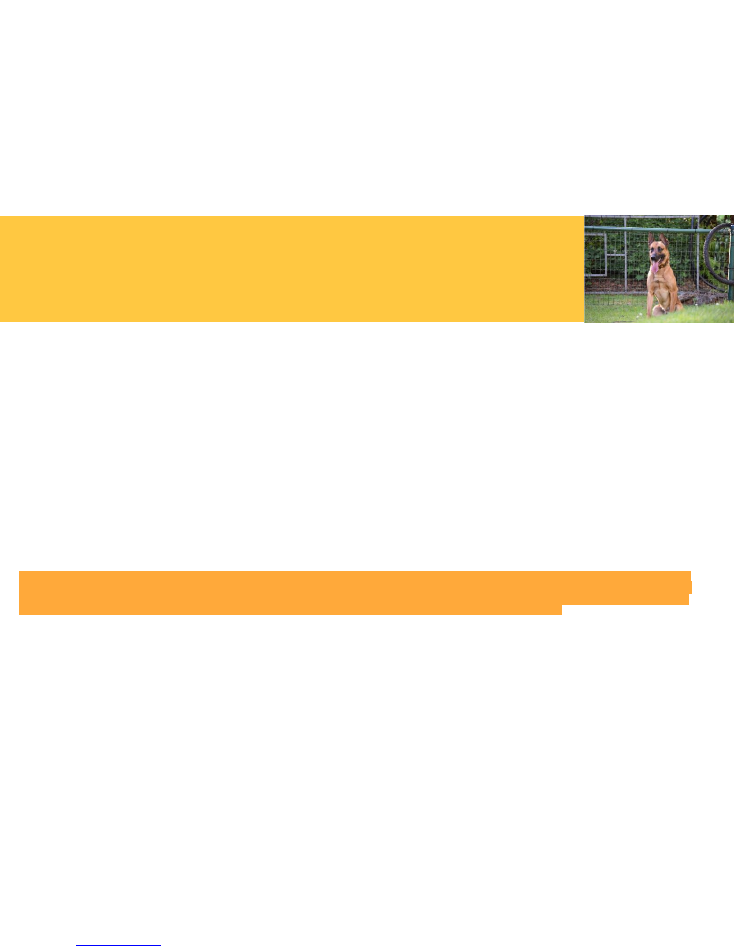
Chameleon® II
collar receiver
with Feather
contact
accessories.
Figure 2.
LED
display
Magnetic start point
Rotation knob
Special o-ring for
smoother tuning
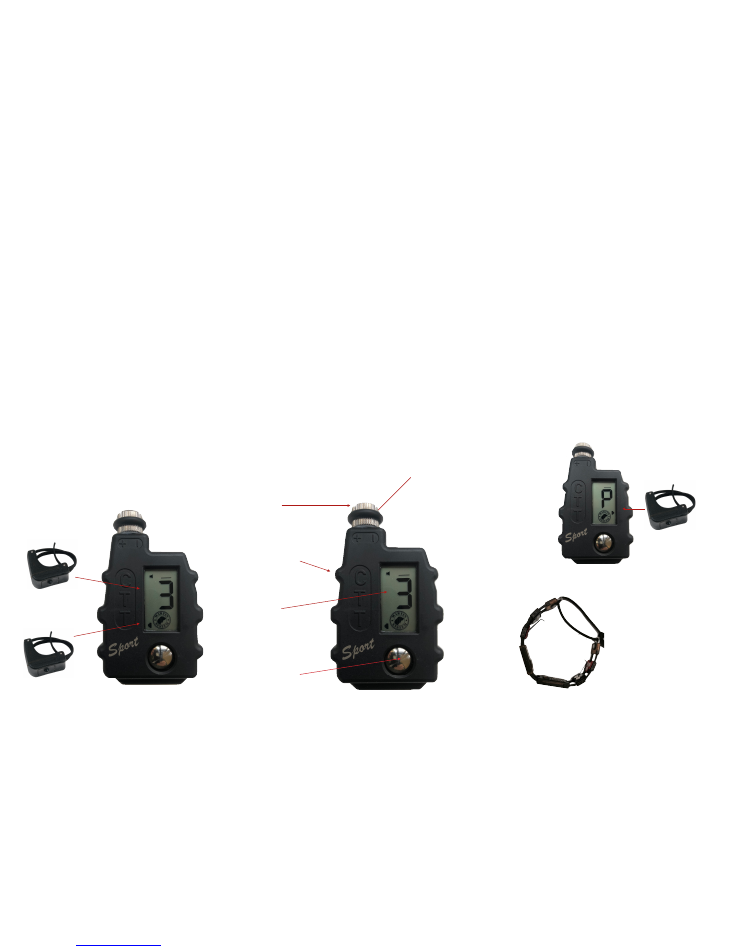
Figure 1.
Figure 3.
Display
when
viewing
Option “P”
Program
button
Figure 4.
Composition of the Remote CTT®
The CTT® Sport is fitted with two
identification codes and is a one dog
system. There are two programmable
stimulation options.
See Figure 1
. A
Chameleon® collar receiver (
Figure 4
)
comes by factory settings accepting 4
identity codes (4 masters). You can pair your
Chameleon® with a CTT® Sport and up to 3
more independent transmitters that are
compatible with the Chameleon®. Each
CTT® Sport has one identity code with two
preset options and an Option “P” (
Figure 3
).
See Page 5 for more information about how
to use Option “P”.
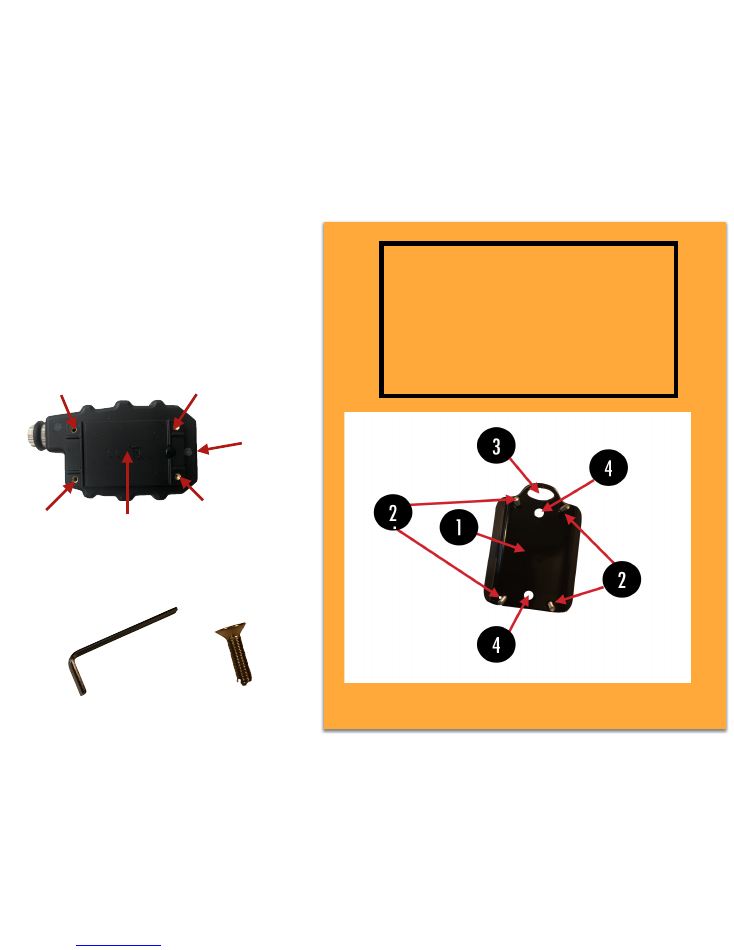
THE BACKSIDE OF
THE CTT® SPORT
1. CONNECTION, FIXATION PLATE (STAINLESS STEEL)
2. CONNECTION HOLES TO CONNECT WITH SCREWS TO THE BACKSIDE
OF THE CTT® SPORT
3. HOLE IN STAINLESS STEEL FIXATION PLATE FOR ATTACHMENT OF
LANYARD OR STRAP
4. LED HOLE
3
Holes for fixation of plate via screws:
Metal plate that is under the molded injection
will affix the CTT® Sport to a strong magnet.
LED will be
GREEN if
in loading
procedure
on induction
plate
A wrench and 5 screws
will be provided.
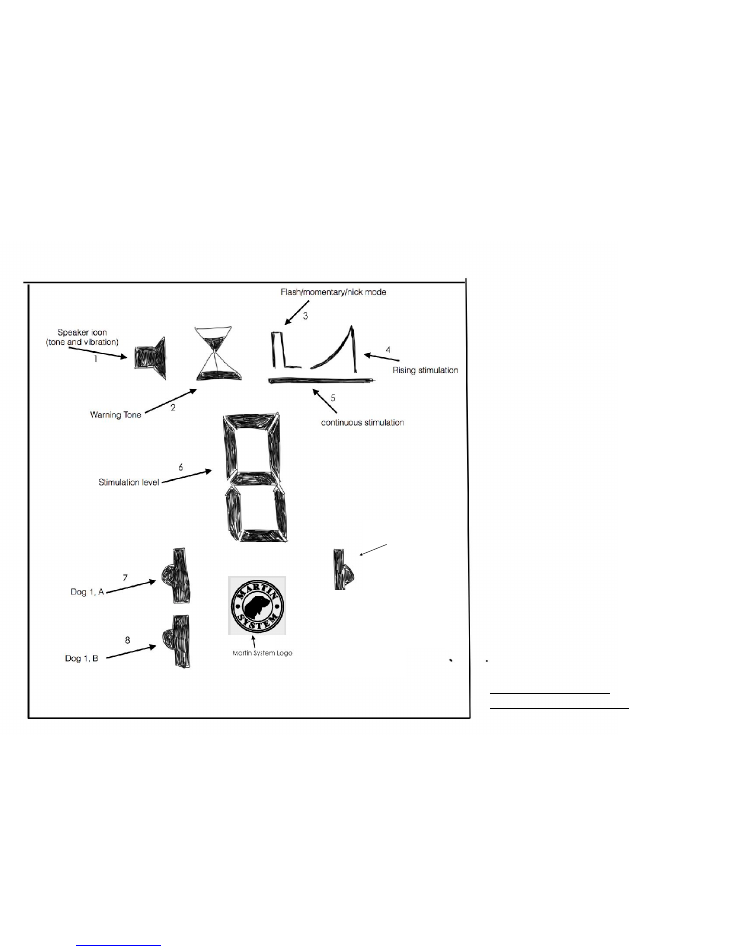
1. Speaker icon (tone
and vibration as factory
setting. This can be
changed with USB Emily*)
2. Warning tone
3. Flash, momentary, nick
mode
4. Rising Stimulation mode
5. Continuous stimulation
6. Stimulation level
7. Option Dog 1, A
8. Option Dog 1, B
9. Option “P” comes from
factory with setting set on
Level 18.
10. Martin System Logo
*USB Emily is an accessory and
can be purchased separately.
USB Emily can customise features
of Chameleon® II, Chameleon®I,
and micro collar receiver (Martin
System). USB Emily is available on
bartbellonshop.com or
shop.martinsystem.com.
CTT® Display Configuration
4
10
Option “P”
• Power supply: 3,7V 250 mAh lithium polymer/auto off feature
• for tactical reasons, no lighted display
• Range: 400 m (under optimal conditions) with Chameleon® II 2018 (all other Chameleons® and Martin System micro collar receivers will get 200m)
• Frequency 869,500MHz
• Maximum Radio Power 5000 MW
• no external antenna
• Number of Stimulation Levels: 1-17
• Click tone at 0 (Factory setting). Can be changed to warning tone with USB Stick Emily which works with Chameleon® receivers and the micro
from Martin System.
• Operating temperature: -5°C to +40°C
• Waterproof (1 meter for one hour)
• Rechargeable by induction
• The Chameleon® can accept 4 ID codes and so can be paired to After pressing a Finger-Kick that is paired to option “P”, all stimulation levels of
collar will be deleted. (Only light, tone, vibrations.) The CTT® Sport is fitted with two identification codes and is a one dog system. There are two
programmable stimulation options. One identification code is used only to remove stimulation. Note that the Chameleon® can be paired from
factory setting to both identification codes. The micro collar with 4 masters can also be paired at factory settings to both identification codes. The
micro collar can be tuned with USB Emily to accept 4 identification codes.
5
2,7 cm
Technical specifications of the CTT® Sport
1. Can control 1 dog.
2. The CTT® Sport can give you immediate access (via Finger-Kick) to 2 preset programs/levels
for one dog (if the collar receiver is a Chameleon® II or a micro collar)
3. You will need USB Emily to install the “Disable Stimulation on Level 18” on your
Chameleon® or micro collar in order to use “Option P” as a Delete Kick! After using
“Option P”, you must use Emily again because due to setting install the “Disable
Stimulation on Level 18” on your Chameleon® or micro collar, a Finger-Kick paired to
Option “P” will delete all electricity!
Standby time: CTT® Sport shuts off after 3.5 hours to conserve battery.
After going 6 times for 3.5 hours on standby or active use,
5,5cm
9,5cm
Dimensions
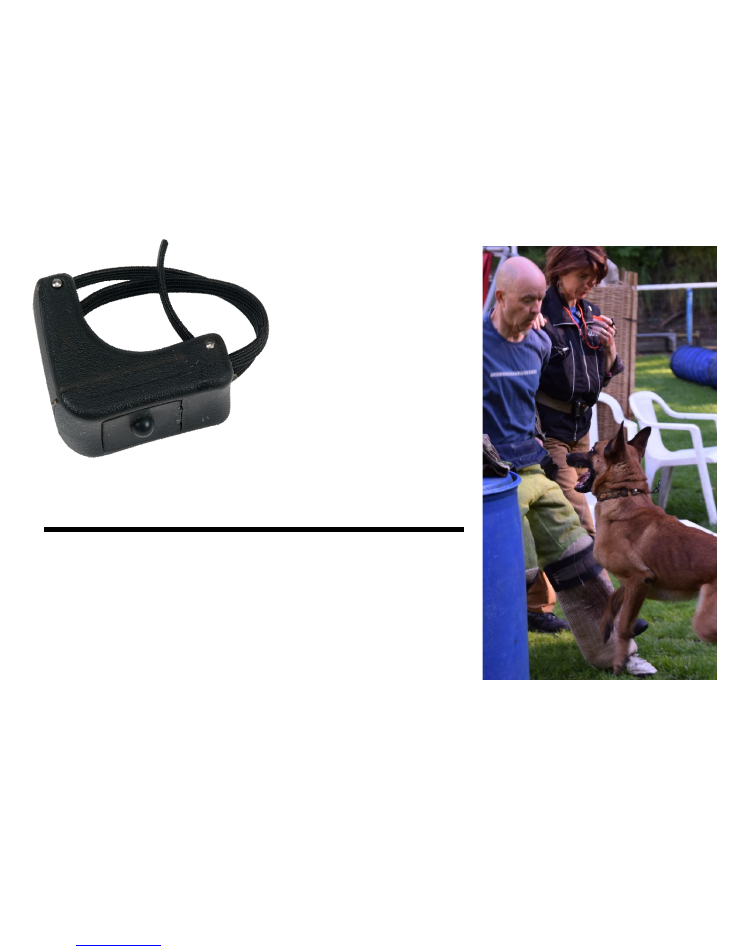
The Finger-Kick uses the CTT® Sport as a relay for radio transmission so it is
important that the Finger-Kick is in the remote’s range (i.e. less than 5 meters).
Once the Finger-Kick is successfully paired with the CTT® Sport, the linking is
unique and can not disturb another user of similar material. To pair the Finger-
Kick to the CTT® Sport, please consult page 9 of this manual.
THE FINGER-KICK (BLUETOOTH RING/
STIMULATION BUTTON)
Technical
Characteristics of the
Finger-Kick
Dimensions: 27x30x17 mm
Weight: 6 grams
Waterproof
Battery: CR 1025, 3V 30mAh
Frequency: 2,4 GHz
Power < 1mW
No charging necessary
6
ON/OFF
Press and immediately release the program button to turn on your CTT® Sport. When the CTT® Sport is on, there is
information on the display. After you push a paired Finger-Kick one time, the following information will be on the display:
1. The level of stimulation that is activated by depressing the Finger-Kick
2. With which electronic program the Finger-Kick is linked
Reading the Display on the
CTT®
Sport
Reading the display, the arrow for each possible setting
goes from Dog 1A, to Dog 1B, to Option “P”.
The little arrow at left side of display indicates DOG 1.
The little arrow at right side of display indicates Option “P.
Program A is when the arrow is at the top of the left (Dog
1A) and Program B is when the arrow is on the bottom of
the left.
SOS
In the case of emergency — SOS — you can work with the
program button as your stimulation button. For example, if
you lose your Finger-Kick or when the battery from the
Finger-Kick is unexpectedly empty, you can use the
program button as an SOS button. In SOS mode, the
display will always refer to Dog 1A at continuous
stimulation. You can still modify the stimulation level but
you cannot change the mode in SOS functioning. More on
how to set the SOS functioning later in the manual.
Note: When you press the Finger-Kick, the CTT®
Sport will
always refer back to the last setting on that Finger-Kick.
7
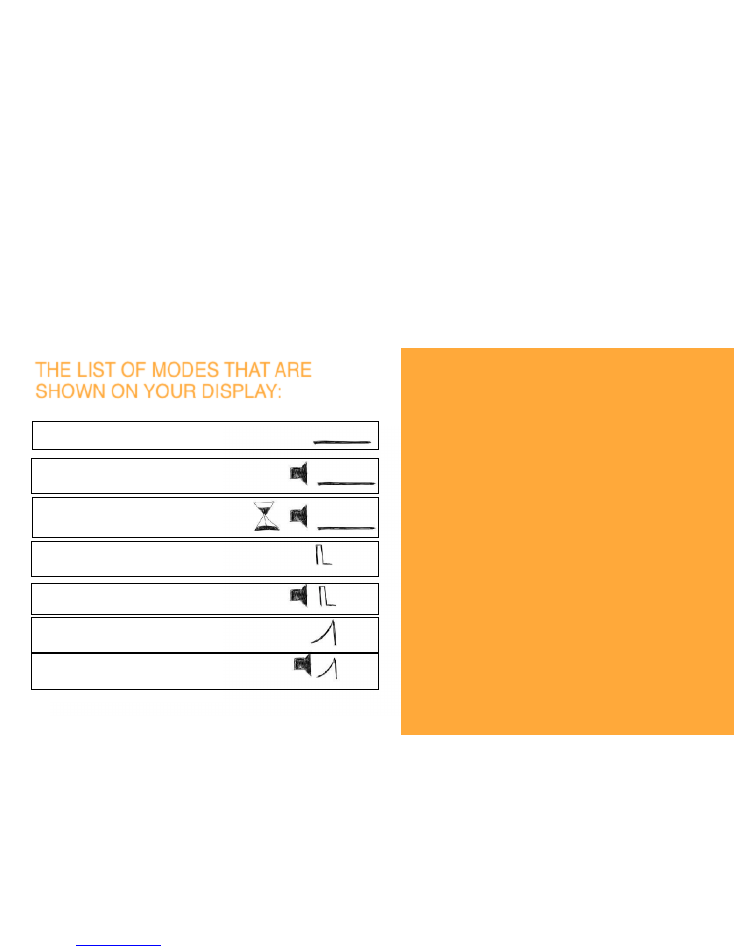
• CONTINUOUS STIMULATION
•
CONTINUOUS STIMULATION WITH
TONE
•
WARNING TONE FOLLOWED
BY STIMULATION WITH TONE
•
MOMENTARY/FLASH/NICK
STIMULATION
•
MOMENTARY/FLASH/NICK
STIMULATION WITH TONE
• RISING STIMULATION
•
RISING STIMULATION WITH TONE
THE LIST OF MODES THAT ARE
SHOWN ON YOUR DISPLAY:
OFF
To turn OFF your CTT® Sport,
turn the rotation knob under 0.
The display will go blank. The
transmitter is now OFF. You
cannot turn off the CTT® Sport
when your transmitter is
showing Option “P” on the
display.
CTT
®
HOW TO MANIPULATE THE CTT® SPORT IN SOS MODE
In the case that your CTT® Sport is in SOS functioning (where the program button is your stimulation button):
1. Press and release the program button to switch on the transmitter.
2. The display will now refer to Dog 1, A and the program is reduced to continuous stimulation only at the level you choose with the rotation
knob.
3. A second press on the program button will inevitably send a continuous stimulation at the preset level to your collar.
4. To turn off the CTT® Sport, just turn the rotation knob under 0. The display will go blank and the transmitter is now OFF. You cannot turn
off the CTT® Sport when your CTT® Sport is on Option “P”.
5. After three and a half hours, your CTT® Sport will automatically switch off. This count down will start after your last manipulation with the
transmitter.
Note that due to modern manufacturers obliged standards, if stimulation is activated for more than 10 seconds, the receiver (Chameleon® II, Chameleon®
I,
micro, or TT collar) will shut down automatically for 10 seconds and then will respond again. (More information about the Chameleon® II, micro and TT collar
can be found on www.bartbellonshop.com.)
8
• Be certain that your CTT® Sport is charged (see charging procedures).
• Make sure that your Finger-Kick is working properly.
• Make sure that there is no other CTT® Sport, CTT®, PT3000, PT3004, or TT1000 transmitter which is ON within 20 meters from the unit that you want to pair with your Finger-Kick.
• Decide with with which dog (1 or 2) and with which preset (A or B) you want the Finger-Kick to be paired. From now on, we will call this choice of dog and preset an “option”. When pairing your Finger-Kick,
you get the easiest results when your mode on the CTT® Sport is set to rising with tone. Modes and levels are easily adjusted once your Finger-Kick is paired.
• When you press and release, you will navigate from the last used option and if you continue to press and release, you will scroll through them all. You will see when the options change because they are
marked with an icon at the left or the right sides of your transmitter. (See page 4 for diagram).
• For best results, do not cup the small CTT® Sport in your hands when pairing your Finger-Kick. Please hold it by the rotation knob or set it down on a flat surface.
• Once you have set your choice with which option you want the Finger-Kick to be linked, press and hold the program button for 15 seconds. During this time, the display will navigate two times through all
possible programs. After this navigation, the display will begin to flash. When the display is flashing, release the program button and there is a 10s window with with to pair your Finger-Kick. To pair the
Finger-Kick, press for one second and then release the Finger-Kick while the display is flashing and keeps pressing and releasing until the display stops flashing. If pairing is not successful, repeat this
procedure. If there are still problems, contact the service centre.
• To double check if the pairing was successful, press and release your program button and the display arrow will now navigate to another option. Now press your Finger-Kick. If the display jumps back to the
option where you paired the Finger-Kick, you know your Finger-Kick is paired.
• It is possible to link each option (Dog 1A, Dog 1B, and option “P”) with a Finger-Kick. After pairing a Finger-Kick to Option “P”, if you push the Finger-Kick linked to that option, you will need USB Emily to
reinstall your CTT® Sport to factory settings or to your custom settings because pushing a Finger-Kick that is paired to Option “P” will delete the possibility to use stimulation. (Note that you will need USB
Emily to install the “Disable Stimulation on Level 18” on your Chameleon® or micro collar in order to use “Option P” as a Delete Kick! To reinstall the electricity after using “Option P”, you must use Emily
because after setting install the “Disable Stimulation on Level 18” on your Chameleon® or micro collar, a Finger-Kick paired to Option “P” will delete all electricity!)
• It is possible to change the pairing of a Finger-Kick to another option. Note that a Finger-Kick can only be paired to one option at a time. The former option to which the Finger-Kick was paired will
automatically become un-paired. Anytime a Finger-Kick is re-paired to another option, on the same or on a different transmitter, the Finger-Kick will automatically wipe out past pairings.
• If a CTT®
Sport is in SOS mode, all the Finger-Kicks are automatically unpaired.
• To pair a finger-kick again to the CTT® Sport if you want to go out of SOS function, press and hold the program button for 15 seconds. The display will not scroll through the options but will stay on continuous
electricity on the level you did select for 15 seconds. The display will disappear. Release the program button and press the Finger-Kick or the Program Button again. Automatically the last Finger-Kick setting
will be re-activated. In reality, you probably need to pair a new Finger-Kick after SOS mode. To do that, see above.
HOW TO LINK (MARRY) A FINGER-KICK WITH
THE CTT® SPORT
9
How to Pair My
Chameleon® to
the CTT® Sport
Depressing the Program Button quickly and then
releasing it lets you choose the options (
see Page 9
)
you want to program. Option Dog 1A and option
Dog 1B are both using the same identification
code. Option “P” is a second identification code. If
you pair your Chameleon® with option Dog 1A, it is
automatically paired with option Dog 1B (and vice
versa). If you pair your Chameleon® with option
Dog 2A, it is automatically paired with option Dog
2B (and vice versa). The Chameleon® can accept
up to 4 identification codes. On the CTT® Sport, you
can pair your Chameleon® to both identification
codes. In this way, you can have up to 2 Finger-
Kicks working as independent and immediate
preset levels and modes on each CTT®
Sport and one Finger-Kick paired to Option
“P”, which is the delete option.
Magnet Point of
Chameleon®
10
Magnet Point
of CTT® Sport

Why do we want to unpair the CTT® Sport
from the Chameleon®?
If you have four ID codes paired and you pair a fifth
ID code, the fourth ID code will be knocked out. The only way
to delete ID code 1, 2, 3 from being paired is to knock them all
out!
Unpairing a Chameleon® Collar Receiver from the
CTT® Sport
1. Make sure that the CTT® Sport and the collar receiver are
charged.
2. To unpair a Chameleon® Collar Receiver from the CTT®
Sport, one must follow the same steps as when pairing, but
when the 4 fast blinking LEDS begin to flash, the transmitter
must be moved at least one meter from the Chameleon®
Collar Receiver for about three seconds.
3. Then you bring the magnet on the transmitter back to the
synchronization point on the receiver until the fast lights stop
flashing. This erases the pairing. Now you will see that your
collar receiver immediately goes in standby (1 LED blinks every
2 to 3 seconds). This collar will not respond to any transmitter.
If you hold the Chameleon® Collar Receiver and the
transmitter apart for too long before bringing them back
together, the transmitter and receiver will not unpair. If the
Chameleon® Collar Receiver is not unpaired, try again.
Sometimes it is easier to use the independent magnet from the
set for unpairing instead of the magnet on the transmitter.
Once the ID codes are unpaired, the collar needs to be
paired again with one or more ID codes for subsequent use.
To program the receiver (Chameleon® or Micro Collar)
to operate with the CTT® Sport, you need to first turn on
the CTT® Sport by pressing and releasing the Program
Button.
Make sure that the CTT® Sport and the collar receiver
are charged.
1. Hold your CTT® Sport with the Magnetic start point (see Figure
2 on Page 2) to the Magnet Point of the Chameleon® (the
on/off for the Chameleon®). Let them touch and hold still and
wait. Wait until the 4 LEDs flash quickly and simultaneously.
(This is after LEDs light in a repeat of what happens when the
collar is switched “on”.)
2. After you see the quickly and simultaneous 4LEDs, you may
separate the CTT® Sport and the Chameleon® to
approximately 1 meter distance apart and then press a
Finger-Kick that is paired to an option on your CTT® Sport. You
will see that the collar receiver will react. We call the 4 fast
blinking LEDS “pairing mode”. The pairing mode will last for
approximately 10 seconds. If you do not pair during pairing
mode, the collar will go back into standby (1 LED blinks every
2 to 3 seconds).
3. Test your pairing by pushing the Finger-Kick and see if the
Chameleon® LED shows that it is paired. A LED will light on the
Chameleon® Collar Receiver when a Finger-Kick paired to
an option on the CTT® Sport transmitter is depressed after
there is pairing with the collar to that identification code.
Other ways to check the pairing are that you can set the
transmitter to tone for testing purposes, and you can test
output on yourself (manually) to check if the pairing is
complete.
4. If the pairing between the Chameleon®
and the CTT® Sport
was not successful, repeat the procedure.
11
THE CHAMELEON®
TACTICAL TRANSMITTER - SPORT
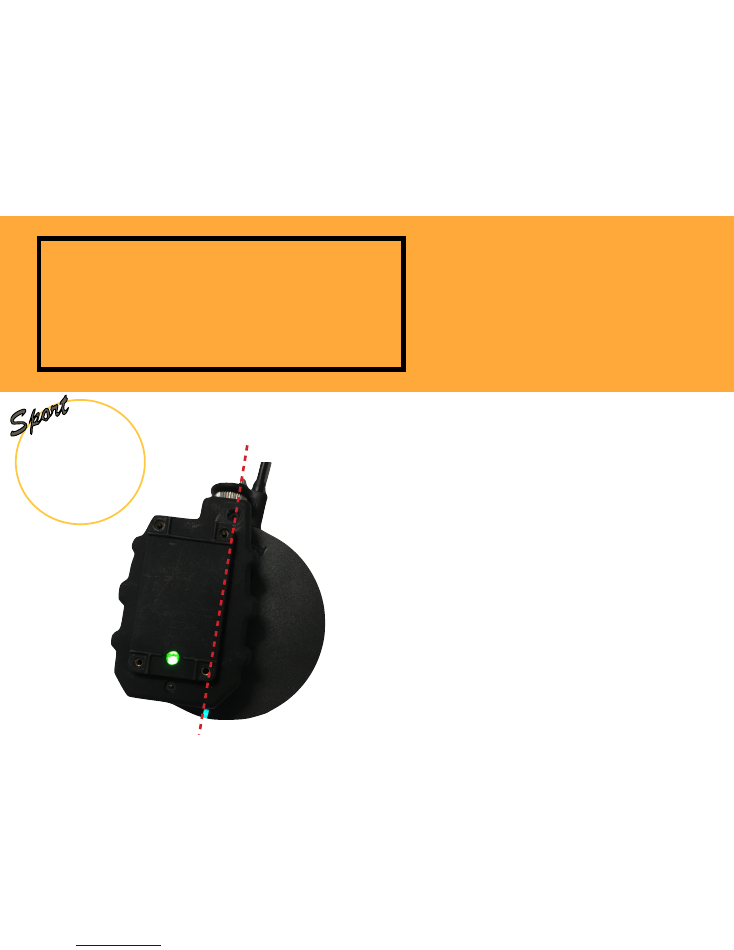
CHARGING
12
CTT®
When charging, the CTT® Sport must
sit on the charging plate like this
picture shows you:
•display must be touching the charging plate
(display can be on or off)
•the position of the CTT® Sport on the charging
plate is not symmetrical (see red dotted line)
•The CTT®
Sport must be on the LEFT side of the
charging plate (where from the backside of the
CTT®
Sport the two screw holes for the fixation
plate on the right side of the CTT® Sport bisect
the charging plate) and the bottom of the CTT®
Sport should be about a centimetre above the
edge of the plate.

Use the provided cable that comes with the charging plate. Connect the induction plate
to power. (USB end on cable will plug into a USB socket in wall plug.) The induction plate
must be with the black side up. The white informations and 4 anti-slip pads are on the
bottom side of the charging plate. Place the CTT® Sport with the display side down onto
the top side of the charging plate as in the picture above. (As you can see, the CTT®
Sport is on the left side of the charging plate; it is NOT centralised on the charging plate.)
The LED on the CTT® Sport will be green if the CTT®
Sport is charging. If the CTT®
Sport
does not need charging, no light will be illuminated. Put your CTT® Sport on the
charging plate in charging position when not in use to have it always perfectly charged.
www.bartbellonshop.com
Service Center:
info@martinsystem.com
13
How to Re-Install
Finger-Kick
Connection
To pair again a Finger-Kick
to the CTT® Sport and to
go out of SOS Function,
press and hold the
program button for 15
seconds.
The display will disappear.
Release the program
button and press on the
Finger-Kick. The last Finger-
Kick Setting will be
reactivated automatically.
If nothing happens, please
start over the procedure of
linking a Finger-Kick to the
CTT® Sport(p.9).
How to Set the CTT®
Sport on SOS Mode
Press and hold the program button for 15 seconds. (The
display will go twice through setting modes.) When the
display flashes release the program button, press the
program button again and release. The display now will show
Dog 1A in continuous electricity.
From now on, your program button is the stimulation button.
(Remember: in SOS mode, the program is set on continuous
electricity with no tone!)
When in SOS mode, your Finger-Kicks are automatically
disconnected from your CTT® Sport.
This means that no Finger-Kick will or can control your CTT®
Sport on purpose or by accident.
In the SOS mode, the 10 second stimulation rule will still apply:
after pushing the program button for 10 seconds
continuously, the stimulation will automatically shut off for a
10 second period. This is a safety rule applied by all quality
brands.
SOS FUNCTIONING
If we are without a Finger-Kick, we can use our CTT® Sport in SOS
14

Notes:
My CTT® Sport chip number:
My Chameleon® chip number: