Full Text Searchable PDF User Manual
Manufacturer of the food
smokers with smoke generator
ZUT BORNIAK Dawid Szurlej
ul. Bolesława Chrobrego 31E,
78-449 Borne Sulinowo
NIP: PL 899-234-30-25
Tel: (+48) 94 373 00 02
Tel: (+48) 94 716 22 29
E-mail: info@borniak.eu
User manual for Electric Smokers with
smoke generator for domestic use
Before using the device,
read the instructions.
MANUAL FOR SMOKERS:
BBD-70, BBD-150, BBDS-70, BBDS-150, UWD-
70, UWD-150, UWDS-70, UWDS-150
SMOKE GENERATOR:
GD-01, GDS-01
I. Safety requirements and precautions
II.
Terms of use
III.
Technical parameters
IV.
Composition of the set
V.
Construction and description of the operation
VI.
Operation of the electronic control panel
VII.
Assembly and installation
VIII. First start
IX.
Maintenance
X.
Questions and answers
XI.
Regulations
XII.
Contact
The sections included in this manual
EN

Page 2
Dear user,
Thank you for choosing the Borniak device.
Page 3
I. Safety requirements and precautions
• Device should be powered from the mains with an alternating current of 220 - 240V.
• Internal installation must have a 16A fuse.
• Device must be unconditionally connected to the socket outlet with earthing contact.
• If the power cord or plug is damaged, to avoid danger, it should be replaced at the
manufacturer, or by a specialised repair shop, or by a qualified electrician.
• Before starting cleaning the device, disconnect the power supply.
• Smoke generator can only be connected to the power supply after it has been installed in
the device adapted to its assembly.
• If you use an electric extension cord, its current load should be at least as much as the rated
load of the device.
• If you use an electric extension cord, make sure it has an efficient earthing contact (ground).
• Lay the power cords in such a way that they are not crushed, prevent it against pulling or
stumbling over by children.
• If you use electric extension cords, they must be adapted for outdoor use and should be
labelled "for outdoor use".
• Power cords of the device should be arranged in such a way that they are not in contact with
hot parts of the housing.
• The smoker is intended for outdoor use but it must not be exposed to atmospheric
precipitation and strong gusts of wind. The optimal solution is to work in roofed, sheltered
and, at the same time, ventilated places.
• Do not use the device in closed rooms, in case of use under a roof ensure sufficient
ventilation.
• Do not use the device near gasoline or other flammable liquids, gases or places where
flammable vapours may be present.
• Do not use the device near flammable objects.
• Do not use the device when it comes in contact with parts, objects made of materials not
resistant to high temperature.
• It is recommended to put an extinguisher near the device. Information on the proper size
and type of the extinguisher can be obtained from the local authorities.
• Do not connect the device until it has been fully assembled.
• Do not move the device before removing all moving objects inside the smoker and the
smoke generator.
• Do not connect the device to the chimney, ventilation grille or other wires that may cause
forced air draft.
NOTE - LOCATION
NOTE - ELECTRICITY
Page 4
• When using parts, they can get very hot. There is a risk of burns when carelessly handled.
• Do not touch hot surfaces, use suitable gloves.
• Children and pets must not approach the device unattended, there may be a risk of burns.
• Before cleaning the device, allow the device to cool down.
• Do not use gasoline, kerosene, spirits or other flammable substances to clean the device.
ATTENTION - TEMPERATURE
• Do not allow the device to be flooded with water (e.g. during cleaning or by leaving the
device uncovered outside during atmospheric precipitation).
• The smoke generator can only work with smoking unit recommended by the manufacturer.
• Using accessories not recommended by the manufacturer may result in injury or damage to
the device for which the manufacturer is not responsible.
• Be careful with sharp edges when assembling and disassembling the device.
• Do not use the device contrary to its intended use.
• The device is intended for home use.
• Do not leave the device switched on after finishing smoking.
• The device should be inaccessible to animals.
• Do not allow children to use the device without strict surveillance and care.
• This device is not intended for use by persons (including children) with limited physical,
sensory, or mental capabilities, or insufficient knowledge and experience.
• Children should not have access to the device.
• Do not use the device contrary to its intended use.
• The devices require strict surveillance during use.
PRECAUTIONS
Please read the above notes and tips,
it will ensure safe and comfortable work
with your new device.
Thank you, Borniak.

Page 5
II. Terms of use
• Do not use the smoker as an oven (do not use high temperatures for a long time).
• Do not leave the device unattended.
• Do not exceed the maximum temperature.
• Do not use damaged electric cables.
• Do not use the smoker during rain, strong wind or storm.
• Do not use the smoker near flammable substances.
• It is not recommended to wear loose clothing or untied hair.
• Do not move the device during operation.
• Do not use in closed rooms, only for outdoor use.
• Do not put the device in a place accessible to children or animals.
• Do not touch hot components to avoid burns, it is recommended to use gloves protecting
against high temperature.
• Do not use the packaging to cover the device.
• It is mandatory to connect the device to a grounded electrical outlet, an extension cord.
• Protect against rain and water access.
• After each use, switch off the device from mains / power supply if it is not used.
• Thoroughly clean the smoker after each use.
• Do not cover or put anything on it when the device is in use.
• Empty the bowl for ash and fat every 2 - 3 hours and fill it with fresh water.
If you have questions or concerns about using
Borniak products, we encourage you to contact us.
You can find contact information on the website www.borniak.pl
Page 6
III. Technical parameters
Model/Type
UWD-70,
UWDS-70
BBD-70,
BBDS-70
UWD-150,
UWDS-150
BBD-150,
BBDS-150
GD-01,
GDS-01
Rated voltage
230V
230V
230V
230V
230V
Power
615W
1115W
1515W
2015W
115W
Power of the
chamber burner
500W
1000W
1400W
1900W
110W
Fuse
3,15A (1,25A)
6A (1,25A)
8A (1,25A)
10A (1,25A)
1,25 A
Chamber
capacity
70L
70L
150L
150L
2L
Maximum
temperature
120°C
150°C
120°C
150°C
-
The Degree of
the housing
tightness
IP20
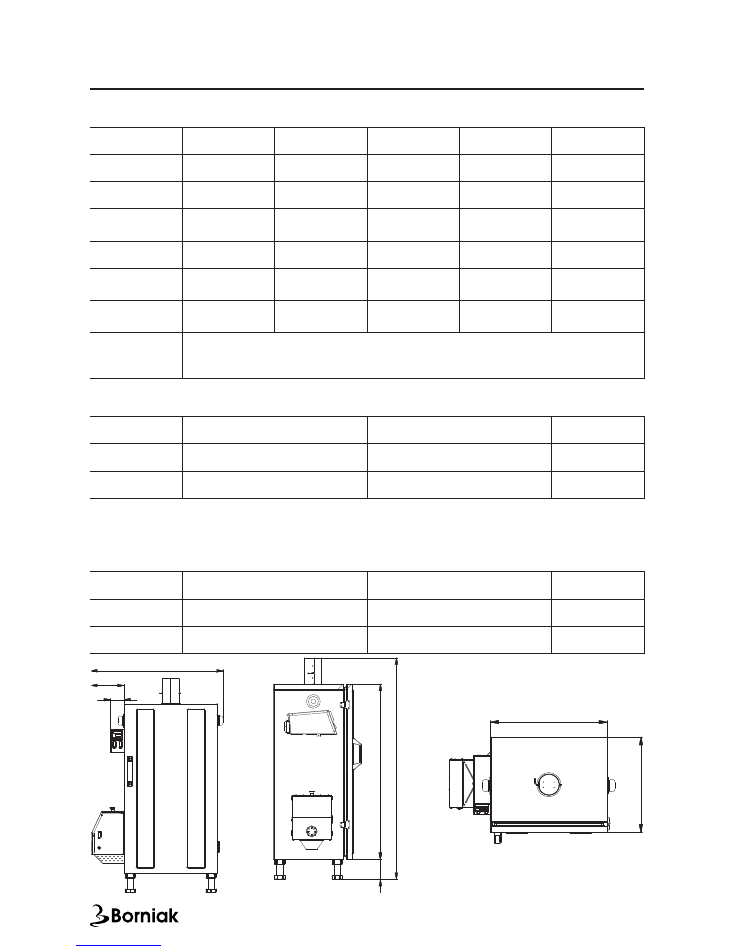
TECHNICAL PARAMETERS OF THE SMOKER,
Width [mm]
440 (540*) (625**)
530 (630*) (715**)
355
Depth [mm]
350 (400*)
475 (520*)
180
Hheight [mm]
820 (1040*)
991 (1211*)
250
OVERALL DIMENSIONS (EXTERNAL)
Width [mm]
400
490
-
Depth [mm]
300
420
-
Height [mm]
580
755
-
DIMENSIONS OF THE CHAMBER (INTERNAL)
* dimensions of a smoker assembled without a smoke generator
** dimensions of a smoker assembled with a smoke generator
65
157,5
627,5
80
5
91
10
16
36
0
440
Page 7
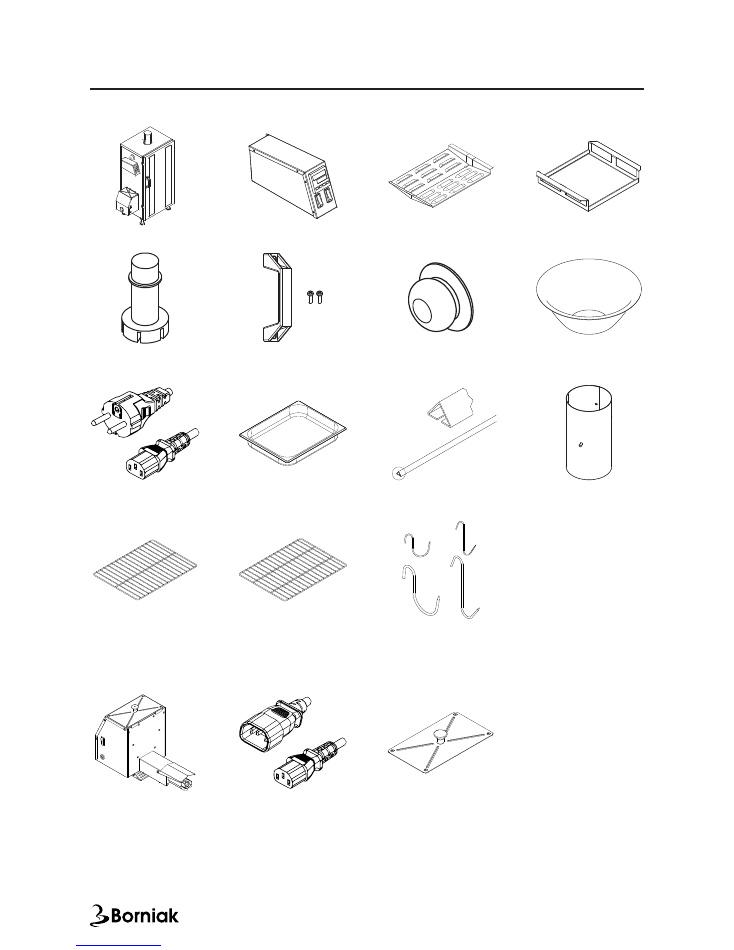
IV. Composition of the set
SMOKER UWD/UWDS/BBD/BBDS:
SMOKE GENERATOR GD-01/GDS-01:
Smoker
Smoke generator
Control panel
Drip tray
Condenser
Adjustable legs
4 pcs.
Door handle
+ screws 2 pcs.
Carrying handles
2 pcs.
Water bowl
2 pcs.
A chimney with
an air damper
Illustrative drawings do not reflect the actual dimensions of the parts.
* the plug type depends on the distribution country
** type of product and quantity dependent on the set
Power cord
EU* - C13
GN ½ tray
(only BBQ version)
Crossbars for
hanging 3 pcs.
A ( 10 : 1 )
A
A cover for
the generator
Power cord
C13 - C14
Wood chips
A chimney with
an air damper
Smoker rack**
Smoker rack**
Smoking hooks**
Page 8
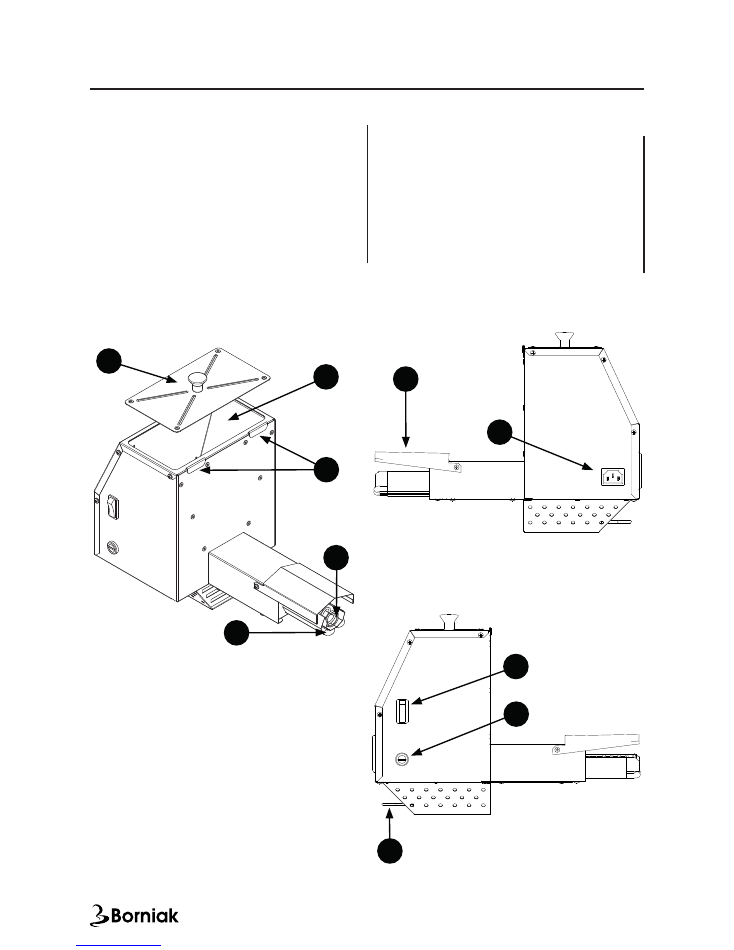
V. Construction and description of the operation
1. Lid
2. Wood chips hopper
3. Feeder and burner ON switch
4. Fuse
5. Power cord
6. Burner (heater)
7. Sawdust feeder
8. Latch
9. Burner cover
10. Air shutter
SMOKE GENERATOR
After switching on the smoke generator, the
feeder (7) starts to rotate, at the same time
the burner (6) begins to heat.
The feeder uniformly transports chips from
the storage tank (2) to the burner, where
they start to smoulder. Smouldering chips
are pushed through the entire length of the
burner (6) where at the end they fall into a
container filled with water.
8
9
7
6
4
1
5
3
LEFT
RIGHT
2
10
Using a smoker does not require
any special skills, and the perfect
smoking effect is achieved with
a minimum of involvement.
Page 9
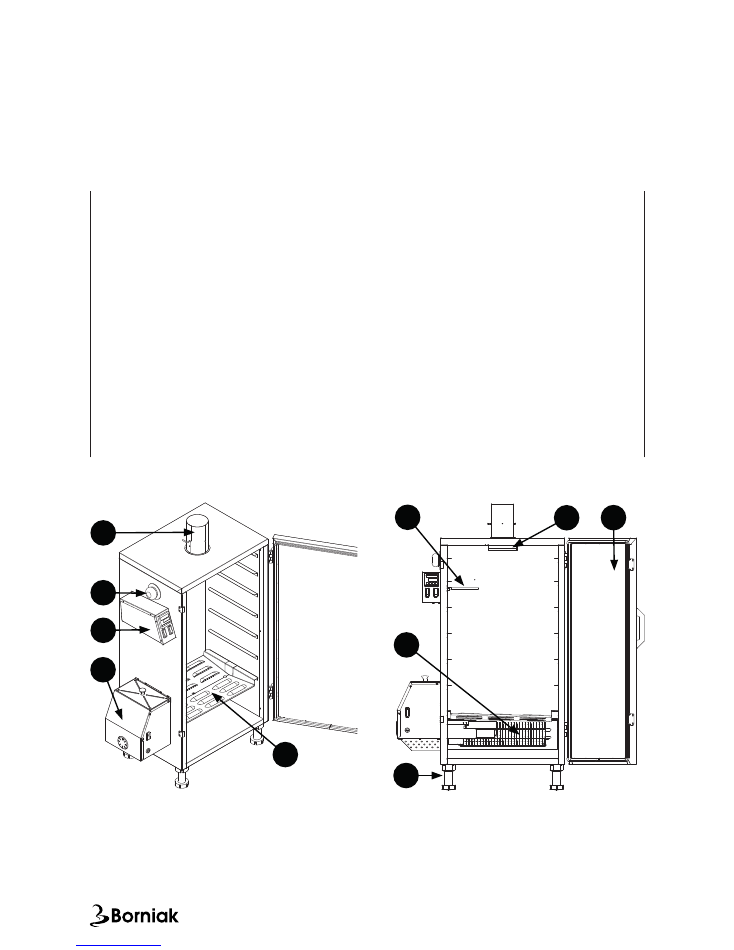
SMOKING UNIT
The smoke generator (10) causes slow and even smoke generation. A chimney with a baffle
(1) at the top of the smoker regulates the smoke density in the chamber. A burner with a
radiator (7) is installed in the main chamber.
Set the desired temperature in the chamber on the panel (3). The burner switches on
depending on the needs and maintains the desired temperature. The condenser (8) is used
to protect the smoked meats against dripping of smoke condensate. It should be cleaned
after each use of the smoker. The drip tray (4) protects the smoking unit burner and the
generator against the juice from the smoked meats.
In the smoking unit there are two bowls which are filled halfway with water and one is
placed under the generator burner, the other under the drip tray opening (4). The first bowl is
used to extinguish the falling chips, the second one is used to collect the juices from smoked
meats. The ambient temperature and wind have a large impact on the operating conditions
of the device. In unfavourable atmospheric conditions, the chamber heating time may
increase. It is advisable to use an independent thermometer to measure the temperature
inside the smoked product. The consumption of materials for the production of smoke is
small - for about 1 hour about 250ml of smoking chips.
One generator charge of about 2l is enough for 6 to 8 hours of operation.
1
2
3
4
5
10
FRONT
6
7
8
9
1. Exhaust chimney with a baffle
2. Carrying handle
3. Electronic control panel
4. Drip tray
5. Door with magnetic closing
6. Temperature measurement probe
7. Burner
8. Condenser
9. Adjustable legs
10. Smoke generator
PROJECTION
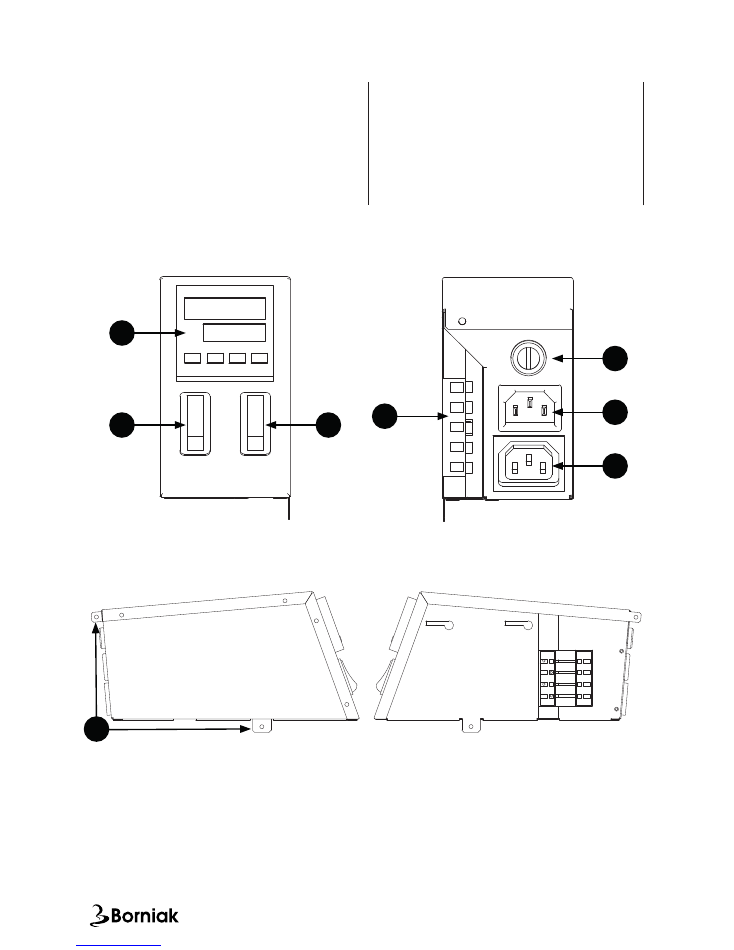
Page 10
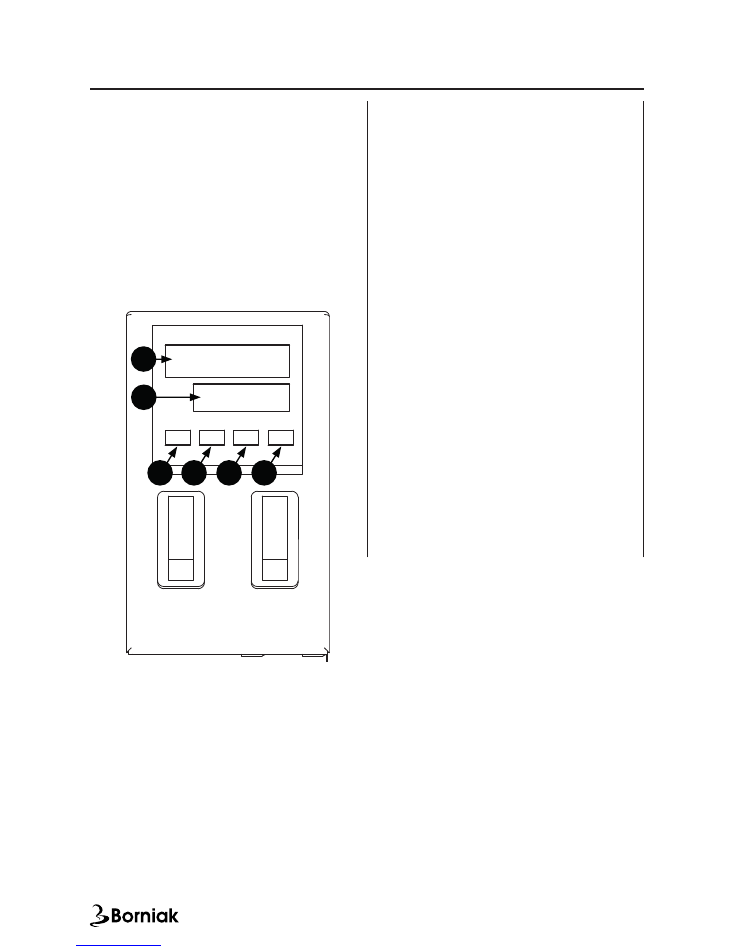
1. Display of the temperature controller
2. Smoker switch
3. Smoke generator switch
4. Fuse
5. Power outlet
6. Generator power outlet
7. Electrical connector
8. Holding and locking plates
DIGITAL CONTROL PANEL
The panel is used to control the temperature
in the chamber. We start the smoker with the
switch (2).
On the controller (1) - see p. 11 - set the
desired temperature. With the connector
(7), the controller controls the burner in the
smoker. With the switch (3), we activate the
smoke generator connected to the outlet (6).
4
FRONT
BACK
LEFT
RIGHT
5
6
7
1
2
3
8
Page 11
VI. Operation of the electronic control panel
Electronic
temperature
controller
works on the principle of a proportional-
integral-differential calculus. Its aim is to
maintain the initial value at the given level
- the setpoint. Setting the temperature is
performed by setting the digits in the row
of units, tens and hundreds, respectively.
To set the temperature press the button
“
/AT”. The flashing digit field, on the value
screen, means entering the temperature
change mode.
To change the digit in the flashing place,
press the “
” button to increase or “
” to
decrease the value. Press “
/AT” to go to
the next row of digits. To accept / end the
temperature change, press the "SET" button.
Auto-tuning can be turned on / off by
holding the “
/AT” button for 3 seconds.
Successful switching on is indicated by the
"AT" diode.
We use auto-tuning when ambient
conditions have changed since the last use
(e.g. temperature difference).
CAUTION! The "SET" button (1)
changes view on the display (6) from the
set temperature to the burner activation
frequency in percent (e.g. value "50" means
that the burner is on for the same time as it
is off).
FRONT
1
2
3
4
1. “SET” - confirmation button
2. “
/AT” - setting / auto- tuning
3. “
” - value increase / change button
4. “
” - value reduction / change button
5. “PV” - current temperature in the chamber
6. “SV” - set temperature / frequency of the
burner activation.
CONTROLLER DISPLAY
6
5
SET
/AT
To maintain a consistent temperature, it is recommended to use the "Auto Tuning" mode
before each use. The device tunes the frequency of switching on the heater depending on
atmospheric conditions and amount of products inside the chamber..
"Auto Tuning" mode consists in reaching set temperature twice by investigating the inertia
of the chamber heating dependent on changing conditions.
When the set temperature is reached for the first time, it can be exceeded by 10 - 15%.
After the AT diode goes out, the temperature should oscillate within 1 - 2 degrees from the
set value.
After switching on, the indicated temperature may be lower than the actual temperature,
this is due to sensor calibration. This phenomenon should take from 5 to 10 minutes.
Page 12
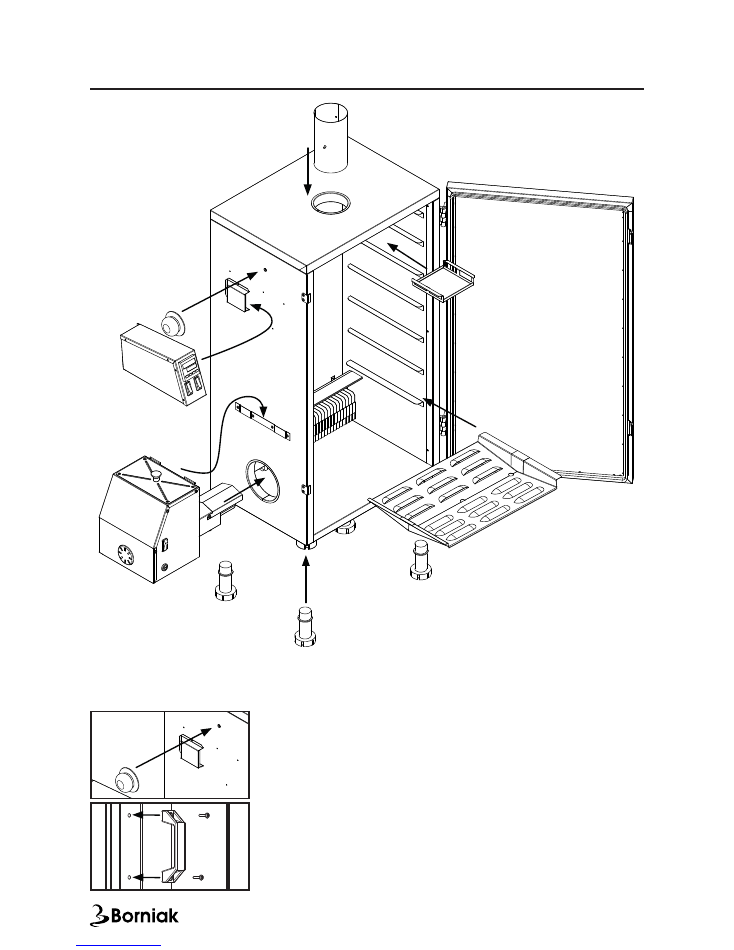
VII. Assembly and installation
1. After taking out of the carton, remove unnecessary packaging
and elements protecting the product and read the instructions.
2. Screw two handles to carry the device.
3. Screw the handle to open the door.
Ws
un
ąć
Ws
uną
ć
Ws
unąć
Page 13
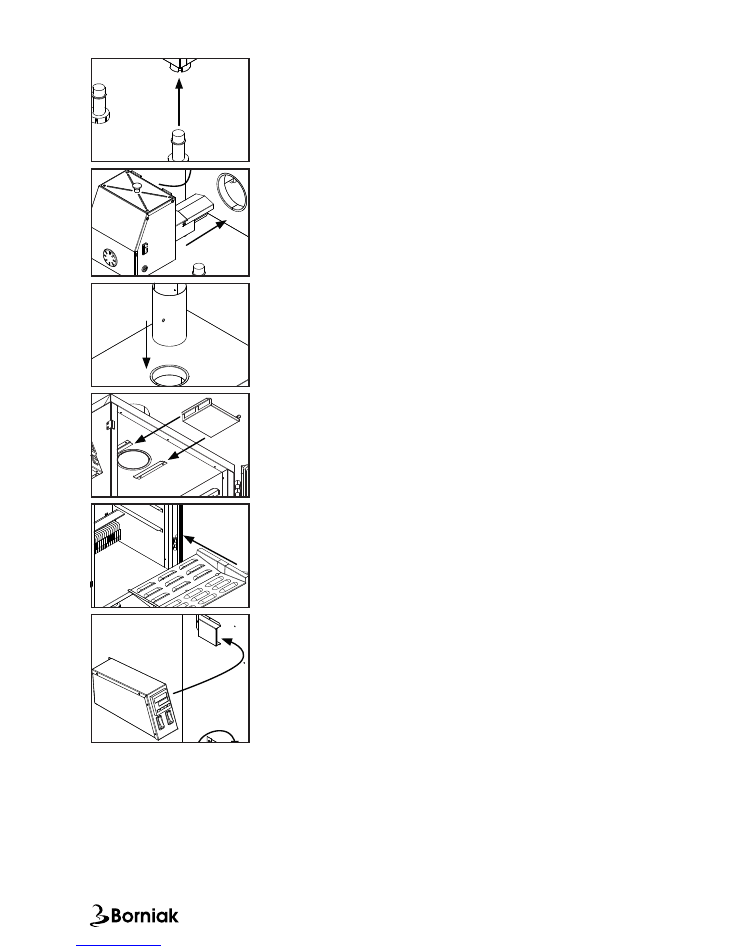
4. Place the device in a suitable place, slightly tilting the smoking
unit, insert the legs into the slots on the bottom and adjust
them so that the device reaches the level.
5. Insert the protruding heating element of the smoke generator
into the side hole on the left side of the smoker. Tilt the
generator slightly to put it on the latches.
6. Insert the chimney into the hole at the top of the smoker. Pay
attention to the correct position of the throttle valve.
7. Insert the condenser under the chimney.
8. Insert the drip tray onto the bottom rack.
9. Mount the electronic control panel - see the description p. 14.
Ws
unąć
Ws
unąć
Wk
ręc
ić
N
ał
oż
yć i
zac
ze
pi
ć
Ws
unąć
Wk
ręc
ić
Wsu
nąć i
dokr
ęcić
Ws
un
ąć
Ws
un
ąć
Ws
uną
ć
Ws
un
ąć
Ws
un
ąć
Ws
unąć
Ws
uną
ć
N
ał
oż
yć i
zac
ze
pi
ć
Ws
unąć
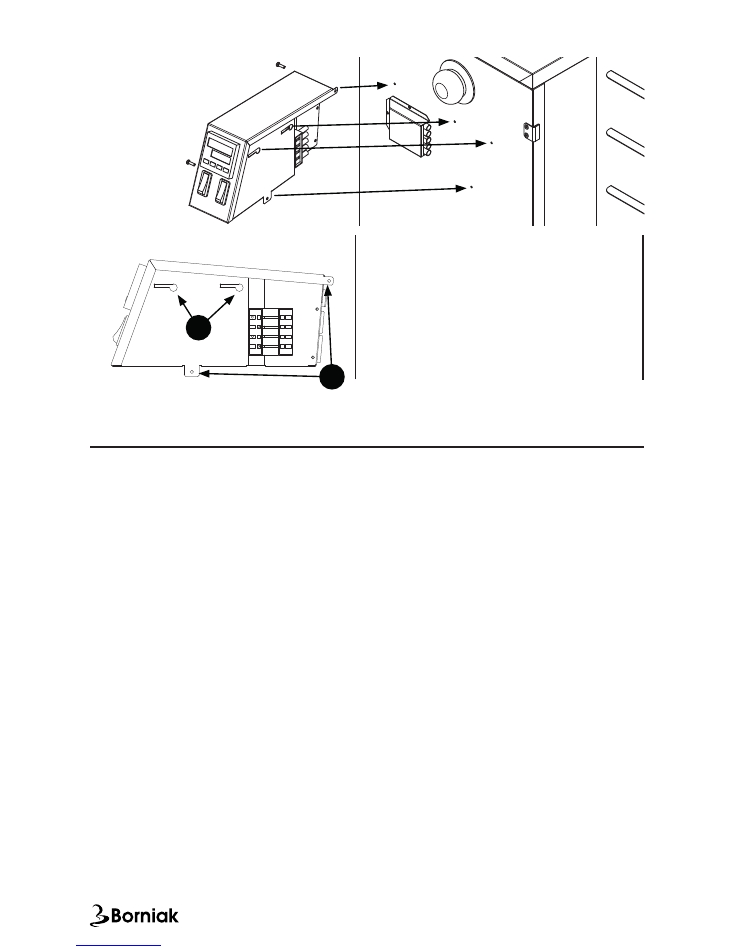
Page 14
Embed electronic panel on the left side of the
smoker having regard to protruding screws
from the wall - they should enter into the
corresponding holes (point. A) of the panel.
Move the electronic panel to the left so that the
connectors on the panel and the smoker are
joined.
Finally, tighten the holding and locking screws
in the appropriate places (point B).
RIGHT
A
B
VIII. First start
Fill the bowls halfway with water and place them under the generator burner - under the
drip tray openings. Fill the generator hopper with the supplied chips and slightly open the air
damper at the top of the smoker. The bowls should be cleaned and filled with fresh water every
2 - 4 hours.
Connect the generator and the smoker to 230V mains with protective grounding. Switch to
start the smoke generator and the smoking unit, on the electronic panel set the temperature
to approx. 80°C (see: Operation of the electronic control panel)
Heat the smoker for about 2 hours. This will reduce technological odours and ensure initial
flavouring of the device. After heating, you can start the proper smoking.
NOTE: Fill the storage tank of the smoke generator only with wood chips indicated by the
device manufacturer.
Warm smoking (30°C - 60°C) - With only the smoke generator on, we can conduct warm
smoking. In unfavorable atmospheric conditions, we can turn on the smoking unit by setting
the right temperature on the temperature controller.
Hot smoking (60°C - 90°C) - Turn on the generator and the smoking unit, and set the
electronic panel to the desired temperature.

Page 15
IX. Maintenance
After finishing smoking, disconnect the generator and the smoking unit from the power
supply. It is necessary to clean the smoker: it is best to use water with washing-up liquid. The
interior of the smoker should have residue after smoking, it should not be scrubbed or washed
with caustic agents. If there is fat or other deposits on the housing, wipe them gently with a
damp cloth.
The shutter and the bowl in which fat and ash are collected, must be kept clean because
excess fat may ignite.
NOTE: When smoking excess fat falling very fat products, control on the shutter, it must be
removed unconditionally.
NOTE: During the operation of the device, carbon deposit forms on the part of the sawdust
feeder. It should be removed after 8 hours of the generator operation, using a scraper, pliers or
other blunt tool. Failure to remove carbon deposits can result in poor operation of the device
and, in the worst case, its damage.

Page 16
X. Questions and answers
During operation of the device, the temperature indicated on the external thermometer is
higher than set on the thermostat.
When working in an empty chamber, the air stream passes through the centre where the
tip of the thermometer is located. Temperatures should be the same when working with the
charge, which causes mixing of warm air and its even distribution in the whole chamber.
Temperature differences may also be affected by atmospheric conditions.
The thermostat has turned off, the temperature in the chamber is still increasing.
The temperature in the chamber increases after turning off the thermostat due to inertia.
So the heating element releases heat accumulated in itself after turning off for a certain time.
For stable operation of the device, it is recommended to place a bowl with water under the
generator burner. This improves the temperature stability inside the chamber.
The chips burn on the smoke generator burner.
Do not connect the smoker chimney outlet to chimneys, ventilation shafts or other
extensions of the smoke outlet due to the possibility of producing draft in the smoker, which
can cause wood chips to ignite. The only way that is acceptable for extending the smoke
outlet, is to apply a hood over the smoker so that smoke can be extracted from the smoker at
its own speed.
Igniting wood chips may cause accumulated carbon deposit on the feeder and unfavourable
weather conditions (e.g. wind gusts). Both these factors should be eliminated by removing the
carbon deposit and protecting the smoker from the gusts of wind or covering the air inlet
under the smoke generator.
Smoke is led outside at the bottom of the smoker or through the smoke generator.
The chimney is too closed, it should be tilted enough to let the smoke come out only
through it.
There is no smoke escaping from the chimney.
No smoke is a sign that a flame has appeared on the smoke generator. Stop the smoke
generator immediately and put out the flame. The reason for this phenomenon may be the
connection of the smoker to chimney flues or gusts of wind.

Page 17
XI. Warranty card
This warranty is effective for 24 months from the date of purchase. The warranty as
described herein shall only apply in the territory of the Republic of Poland.
TERMS OF WARRANTY:
1. ZUT BORNIAK guarantees the user efficient operation of the appliance provided its proper
installation, maintenance and operation, in accordance with the guidelines of this MANUAL.
2. ZUT BORNIAK takes responsibility for manufacturer's defects (i.e. in material or
workmanship) of the appliance for 24 months from the date of its selling.
3. The defects of products which shall arise during the warranty period will be removed in the
time not longer than 30 days from the day of returning it to the manufacturer.
4. The warranty flows only to the Buyer, i.e. a natural person, who purchases a moveable item
for a purpose different than conducting business activities or any professional activities.
(Journal of Laws of 2002, No 141, item 1176).
5. The defective appliance must be returned with its standard accessories, in its original
packaging.
6. When sending in your defective appliance for service, a valid Warranty Card, without any
traces of changes or interference, must be included.
7. Damage resulting from events such as: lightning strike, power surge in power lines,
mechanical impacts, fires, flooding or other uncontrollable events beyond the Seller's
control, are not covered by this warranty.
8. The User shall deliver the defective product for service repair purposes at their own expense.
After the repair, the appliance shall be returned to its owner at the Manufacturer's expense.
9. It is recommended to contact the Manufacturer before sending in the defective appliance.
10. While sending the appliance to the Manufacturer, the User must include their contact
details, the return address, as well as a short description of the defect.
11. Liability of the Manufacturer is limited to the amount equal to the price of the defective
product.
12. Damages and missing goods in the case of orders delivered by Poczta Polska or courier
companies shall be dealt with only based on the report drawn up by the courier while
delivering the parcel.
Date of sale:
Proof of purchase No:
Seller’s signature:
Stamp:
Device serial number:
Notes: