Full Text Searchable PDF User Manual
USER MANUAL
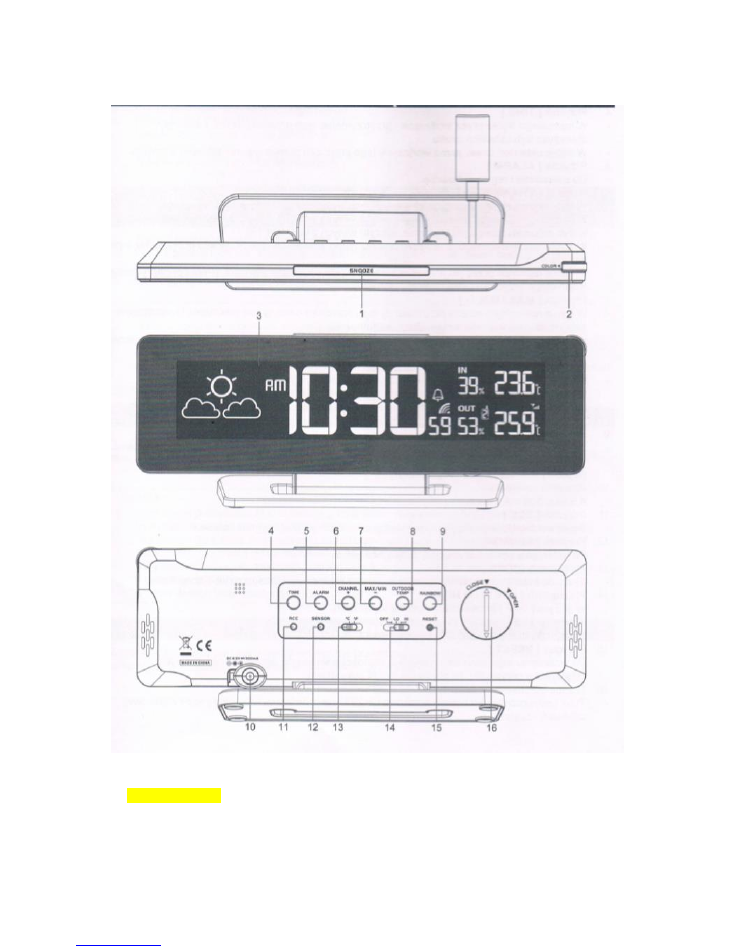
1.
[SNOOZE] key
✓
When the alarm is sounding, press to stop the current alarm and enter snooze mode.
✓
When the alarm is sounding, press and hold 2 seconds to stop the current alarm when
sounding for 24 hours.

2.
[COLOUR] backlight colour control knob
✓
Rotate the knob clockwise or anticlockwise to tune the backlight with 256 colour.
✓
Press [COLOUR] knob to turn on or turn off the backlight colour change.
3.
LCD display
4.
[TIME] key
✓
In normal time mode, press and hold 2 seconds to enter time setting mode.
✓
In time setting mode, press to step next setting mode.
5.
[ALARM] key
✓
For alarm setting and operation
6.
[CHANNEL / +] key
✓
In normal mode, press to switch between Channel 1-3 of outdoor sensores
✓
In normal mode, press and hold 2 seconds to enter auto-cycle mode of Channel 1-3 readings.
✓
During auto-cycle mode, press once to return to normal mode.
✓
In setting mode, press to increase the setting values (Hold it without releasing to speed up
the setting).
7.
[MAX / MIN] key
✓
In normal mode, press to check the minimum and maximum records of temperature and
humidity.
✓
In setting mode, press to decrease the setting values (Hold it without releasing to speed up
the setting).
8.
[OUTDOOR TEMP] key
✓
Press to enter Colour by temperaturę mode and change colour according to the o
utdoor
temperature. Value that received from the wireless sensors. It has 17 backlight colours to
display different temperature ranges).
9.
[RAINBOW] key
✓
When the backlight is on, press to change backlight colour in this sequence: white, red,
orange, yellow, green, cyan, blue, purple.
10.
Power jack
✓
DC 4.6V 300mA
11.
[RCC] key
✓
Press to receive the RC signal manually.
12.
[SENSOR] key
✓
Press to receive the data from the transmitter.

13.
[C / F] slide switch
✓
Slide to switch between Celsius and Fahrenheit.
14.
[OFF / LO / HI] slide switch
✓
Slide to [OFF] position to turn off the backlight.
✓
Slide to [LO] position for the dimmer backlight.
✓
Slide to [HI] position for the brighter backlight.
15.
[RESET] key
✓
Press to reset all values to default values.
✓
In case of malfunction, press it to reset all values.
16.
Battery door
✓
Accommodates a buton cel CR2032 for backup time and setting.
WIRELESS HYGRO-THERMO OUTDOOR SENSOR
1.
LED indicator
✓
Flashes when the remote unit is transmitting.
2.
LCD display to show the detected temperature or humidity of the sensor.
3.
Wall mounting holder
4.
[RESET] key
✓
Pres to restart the sensor.
5.
[CHANNEL] slide switch
✓
Assign the transmitter to Channel from 1 to 3.
6.
Battery compartment
✓
Accommodates 2 x AA size batteries.
BEFORE USING THE OUTDOOR SENSOR
1.
Remove the battery door.
2.
Insert 2 x AA size batteries into the battery compartment. Make sure you insert them the
right way according to the polarity information marked on the battery compartment.
3.
Replace the battery door.
NOTE:
✓
Once the channel is assigned to a sensor, you can only change it by removing the batteries or
resetting the sensor, you also need to press the [SENSOR] key on main unit to pair this
sensor.
✓
Avoid placing the transmitter in direct sunlight, rain or snow.

DAYLIGHT SAVING TIME (DST)
The clock has been programmed to automatically switch when the daylight saving time is in effect.
User can disable DST function in time and calendar setting mode.
RECEPTION OF RADIO CONTROLLED SIGNAL
The time and date are radio-controlled. The current time and date are automatically synchronized
with the time signal transmitted from RC station.
User can disable or enable RC function by press and hold the [RCC] key for 8 seconds.
RCC SIGNAL STRENGHT INDICATOR
The signal indicator displays signal strenght in 4 levels. Wave segment flashing means time signals are
being received. The signal quality could be calssified into four types.
✓
This unit will automatically search RCC signal at 2.00 am, 8.00 am, 2.00 pm and 8.00 pm per
day.
✓
Always place the unit away from interfering sources such as TV set, computer, etc.
✓
Avoid placing the unit on or next to metal plate.
✓
Closed area such as airport, basement, tower block or factory is not recommended.
✓
Do not start reception on a moving article such as vehicle or train.
TIME SETTING
If you are reach of the Radio Controlled Transmitter or if the reception is not reachable, the time can
be set manually. As soon as the transmitter is received again, the clock will automatically synchronize
with received time.
1.
In normal time mode, press and hold [TIME] key for 2 seconds to enter 12/24 hour format
setting.
2.
Press [CHANNEL / +] or [MAX / MIN -] key to set your desired. (Press it without releasing to
speed up the setting).
3.
Press [TIME] key again to step the setting items in this sequence: 12/24 format
–
Hour
–
Minute
–
Second
–
23 hour offset
–
DST AUTO/OFF.
4.
Press [TIME] key to save and exit the setting mode, or the clock will automatically exit the
setting mode 60 seconds later without pressing any button.
ALARM ON/OFF
1.
In normal time mode, press [ALARM] key to show the alarm time.
2.
Press again to turn on/off alarm function and alarm icon appearing/disappearing on display.
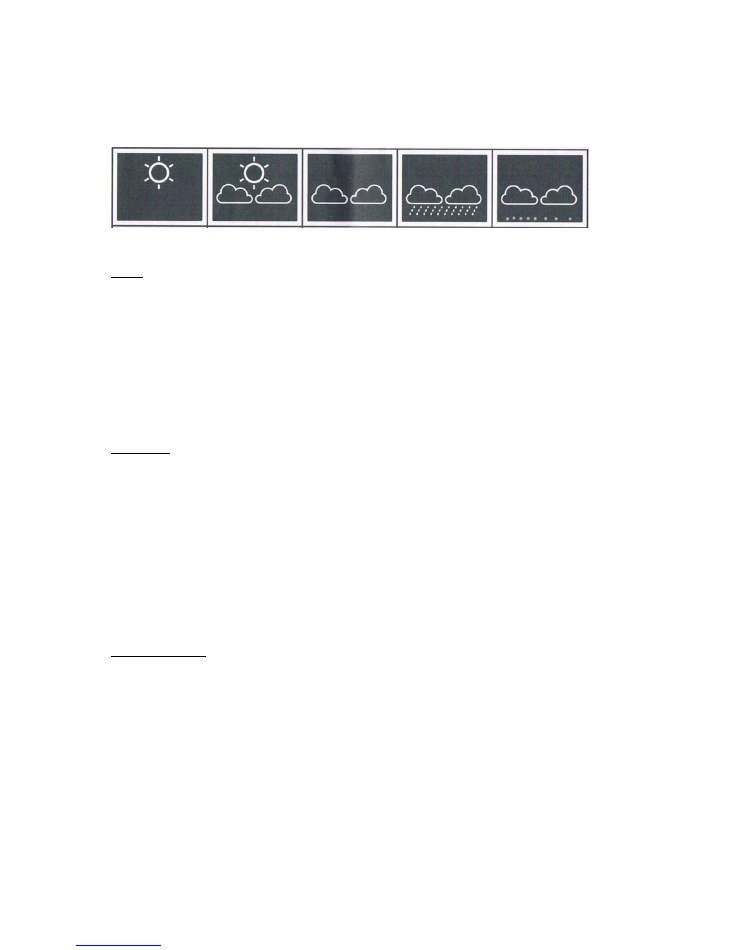
WEATHER FORECAST FUNCTION
The indor console contains a built-in sensitive pressure to predict the weather forecast for the next
12-24 hours.
Sunny
Partly cloudy Cloudy Rainy Snowy
NOTE:
✓
If there is any inconsistency of weather forecast between any local weather station and this
unit,
the local weather station’s forecast should prevail. The manufacturer is not responsible
for any errors due to incorrect forecasting resulting from this unit.
✓
Snowy is base on outdoor temperature condition, once equal or below -3 C.
SPECIFICATION
MAIN UNIT
Operating temperature range -5 C
–
50 C 23 F
–
122 F
Temperature resolution 0.1 C 0.1 F
Operating humidity range 20% - 90%
Display humidity range 1% - 99%
Humidity resolution 1%
Radio controlled signal DCF or MSF
WIRELESS SENSOR
Operating temperature range -20 C
–
60 C -4 F
–
140 F
Temperature resolution 0.1 C 0.1 F
Operating humidity range 20% - 90%
Display humidity range 1% - 99%
Humidity resolution 1%
RF transmission frequency 433 MHz
No. of remote sensor up to 3 units
RF transmission range maximum 30 meters

POWER
Main unit AC / DC 4.5V, 300 mA adapter, CR2032 lithium battery for backup
Remote sensor 1.5V, AA x 2 (alkaline battery recommended)
DIMENSION
Main unit 230(W) x 87.5(H) x 49(D) mm
Remote sensor 65(W) x 100(H) x 35(D) mm