Full Text Searchable PDF User Manual
COMPLETE AQUARIUM SYSTEM
RECIFE
SERIES
OWNER’S MANUAL
INTRODUCTION
MODELS: RC-24G, RC-32G, RC-40G, RC-48G
Thank you for purchasing AQUATOP’s Recife Series. The Recife / Reef
3
Cube is a complete reef
aquarium system consisting of high quality accessories that help to provide an ideal habitat for marine
fish and corals. The in-sump filtration system keeps equipment out of sight, providing optimum viewing
conditions for your aquarium.
SAFETY & OPERATION INSTRUCTIONS
1. The product must be placed on a level surface at all times
2. Use specified voltage.
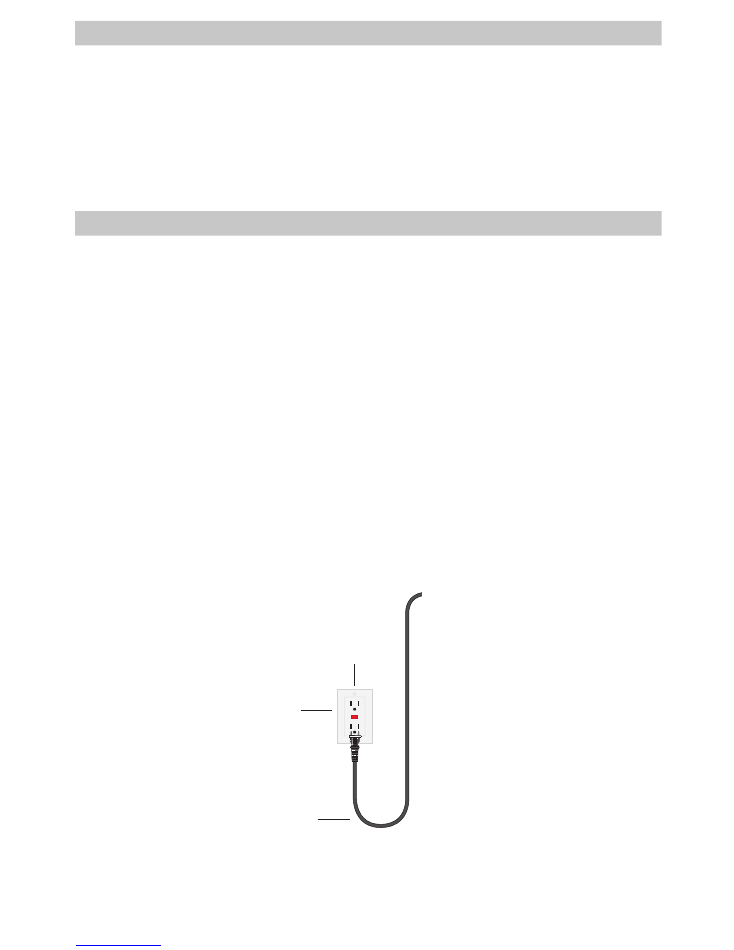
3. A drip loop must be used with all electrical aquarium devices. A drip loop is a self-made part of the
cord hanging below the receptacle. (See Fig. 1)
To guard against injury, basic safety precautions should be observed, including the following:
READ ALL SAFETY INSTRUCTIONS BEFORE USE.
Please read this instruction manual thoroughly before operating. AQUATOP is not responsible for
damage caused by failure to comply with the recommended set up procedures.
WARNINGS & SAFETY
ELECTRICAL
OUTLET
DRIP LOOP
Fig. 1
1
GFCI

SAFETY & OPERATION INSTRUCTIONS
4. A GFCI (Ground Fault Circuit Interrupter) (See Fig. 1) should be used in the branch circuit supplying
all power to water pumps and electrical aquarium equipment. If you do not have a GFCI, we
strongly recommend having a qualified electrician Install one prior to operating any aquarium
component.
5. The aquarium is made of glass. Please handle with care.
6. When opening the boxes, use caution and beware of any broken glass that may have occurred
during shipping.
7. Check the power cables and plugs for damage before plugging into an outlet. If damaged, do not
operate.
8. For Indoor use only. Do not place the product in damp areas like yards or patios.
9. Please cut all power before installing, cleaning or performing maintenance. Make sure hands and
plugs are dry before plugging in the power cord.
10. Keep children away from this product.
11. Do not use chemicals or solvents when cleaning; use warm water only.
NITROGEN CYCLE
NOTE: Before adding aquatic creatures to your new aquarium, please be aware that there are
changes in the water parameters that occur within 2-4 weeks of a new tank setup that can create
a toxic environment for healthy fish and invertebrates. This process is known as the nitrogen cycle
or ‘tank cycling.’ Ensuring that your water is properly ‘aged’ prior to introducing fish will greatly help
prevent the loss of livestock in the early stages of a new tank. We recommend using an aquarium
grade test kit to test your aquarium water parameters before adding new livestock.
NOTE: To accelerate the nitrogen cycle period, we recommend using Aquatop’s NitroBoost Dry
Nitrifying Bacteria. For more information, please contact your local dealer or visit www.aquatop.com
WARNINGS & SAFETY
PREPARATION
2
SET UP / PARTS LOCATION
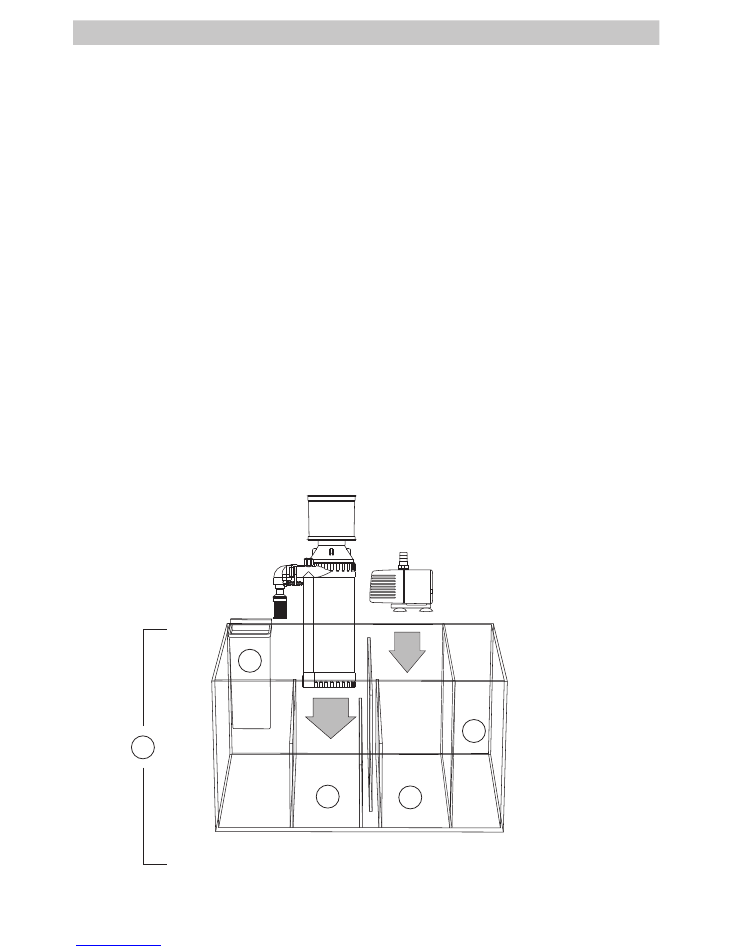
1. Sump Tank
2. Pre-Filter Sock
3. Protein Skimmer Location
4. Return Pump Location
5. Optional Top Off Reservoir With Glass Lid (RC-48G & RC-40G only)*
RC-48G
* Optional Top Off Reservoir Equipment Sold Separately.
KNOW YOUR EQUIPMENT
Read and follow all the instructions, even if you feel you are familiar with the product and find a place
to keep the instructions handy for future reference. Your attention is drawn particularly to the sections
concerning “IMPORTANT SAFEGUARDS” and the “GUARANTEE CONDITIONS”. Please ensure you
retain your original purchase receipt in the event that guarantee service is required. Carefully unpack
the aquarium making sure you keep all the packing material until all the parts of the product have been
found and the product has been assembled. This product is shipped to you in a factory sealed carton.
Should the product malfunction in any way or if the unit is damaged and requires replacement, contact
the retailer where the product was purchased for inspection.
REPLACEMENT PARTS AND FILTER MEDIA
Use Aquatop Genuine Spare Parts Only. See your local Aquatop Dealer and refer to the spare
part numbers listed in the instructions supplied with the accessories.
PREPARATION
PREPARATION
2
1
3
4
5
3
INSTALLATION
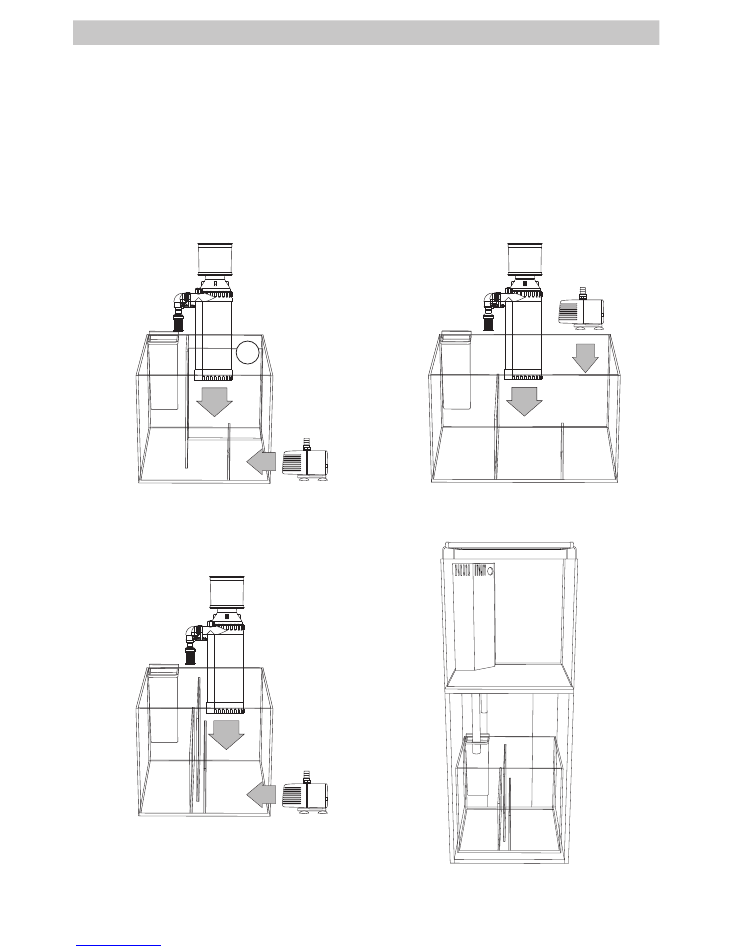
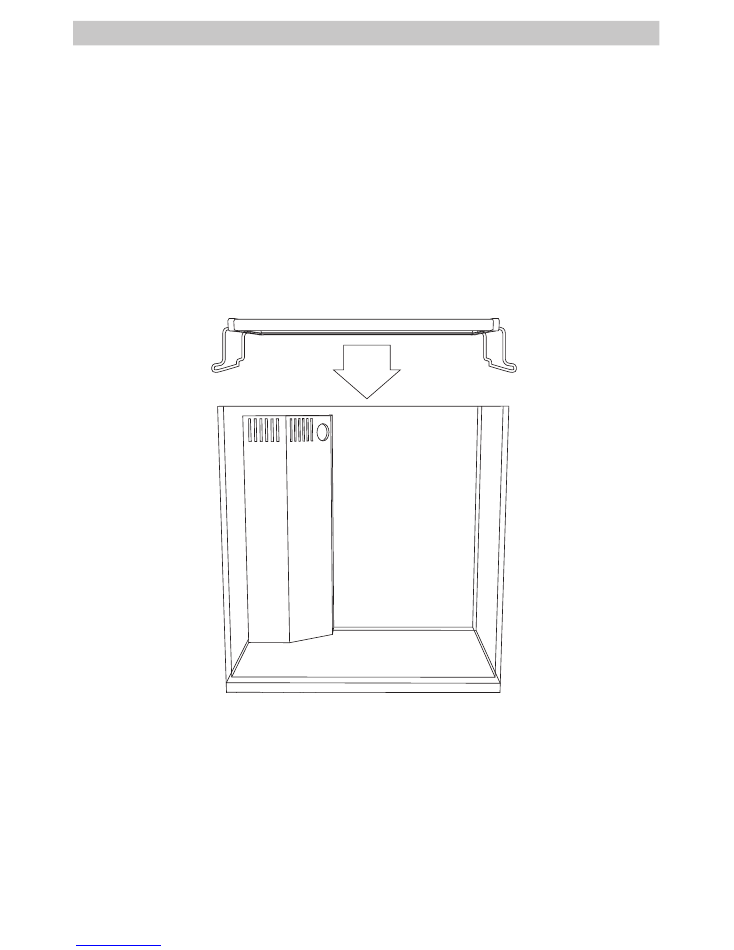
Your aquarium will be in 2 separate boxes, one will contain the aquarium and light unit, the other will
contain the cabinet with sump in place and the plumbing components. Place the cabinet in position
and carefully place the aquarium on the cabinet. Ensure the aquarium is centered on the cabinet. The
protein skimmer mounts on the designated glass partition specified in sump diagrams below.
RC-40G
RC-24G
Sump Placement
SUMP SETUP / MODEL VARIATIONS
RC-32G
5
4

SETTING UP YOUR REEF CUBE AQUARIUM
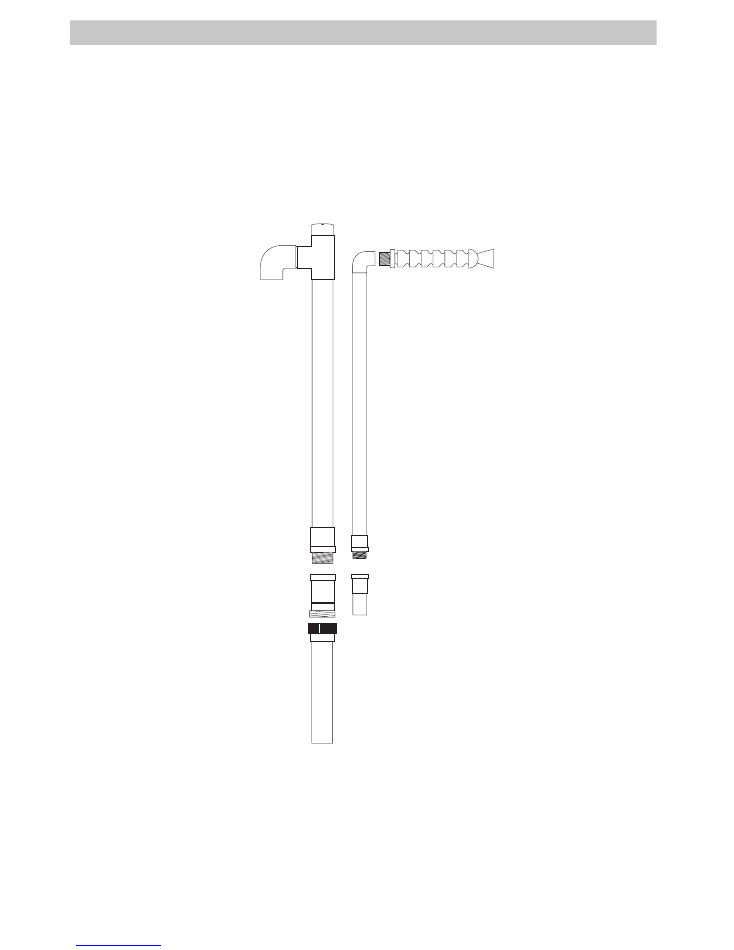
All plumbing components are already glued into place except where threaded joints are required
for assembly into the aquarium or to allow access for maintenance. Two people may be required to
connect the plumbing through the base of the aquarium, one to access from above the weir and one to
hold pipes in place below the aquarium. (Fig. 2)
1. Insert the threaded end of the drain pipe (1) into the larger hole in the base of the weir. Ensure the
rubber grommet is placed between the glass and the connection.
2. Attach the lower drain bulkhead (2) to the male thread beneath the aquarium. Ensure a rubber
grommet is in place beneath the glass. Do NOT over tighten, hand tightened is sufficient.
3. Repeat step 1 and 2 with the return pipes (5 & 6). Ensure rubber grommets are used on both sides
of the glass and the threaded elbow at the top of the return pipe is facing towards the round hole in the
overflow.
4. Ensure the sump is on the far left hand side of the cabinet so that the drain pipe sits directly over
the sump inlet. Attach the bottom section of the drain (3) by connecting the barrel union.
5. Attach the flexible outlet (4) to the return pipe. The outlet extension should pass through the round
hole in the overflow grill.
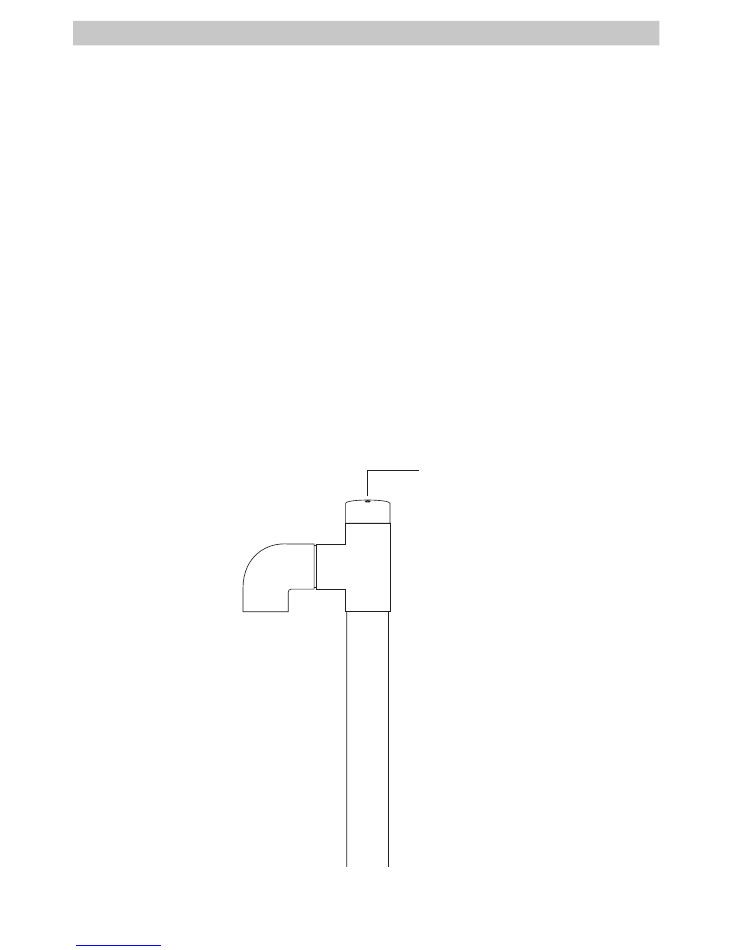
6. Ensure the hole in the top of the drain pipe remains free, this will minimize noise caused as water
exits the aquarium. (Fig. 3)
7. Follow the instructions provided with the return pump to install into the sump. Place the pump in the
position noted on pages 3-4 and use the elbow intake as described in the instructions. A short length
of flexible hose is provided to connect the pump to the return pipe (6). A hose clamp is also provided to
secure the hose onto the pipe.
8. Unpack the supplied filter sock and place it in the location shown on pages 3-4.
9. Fill the aquarium with water such that the water overflows into the sump and fills the last section
(where the return pump sits) to about 5cm above the maximum operating water level mark. When
running, the water level should always remain above the minimum operating water level mark.
10. Unpack and install the protein skimmer in the left hand side of the sump. Follow the instructions
supplied with the skimmer. The intake strainer should be removed from the Xyclone skimmer before
installation.
11. Unpack and install the heater in the sump in the same section as the protein skimmer. Ensure the
heater is fully submerged at all times.
NOTE: Plumbers tape is supplied on threaded fittings; it is highly recommended that this be replaced if
the plumbing is disconnected at any time.
INSTALLATION
5
PLUMBING DIAGRAM
INSTALLATION
Fig. 2
1
4
5
6
2
3
6
INSTALLATION
SETTING UP THE LED LIGHT
1. Ensure your hands are dry. Connect the light unit to the power supply units. The plugs/ sockets are
marked with blue and white rings to denote which power supply connects to which cable. Ensure these
are connected correctly.
2. Connect the power supply units to the power outlets and switch the power on. Switch the light units
on using the switches on the side of the light unit.
7
TROUBLESHOOTING
BUBBLES ARE COMING OUT THE OUTLET INTO THE AQUARIUM
1. The water level in the sump is too low. Check specific gravity after topping up to the
correct level.
2. The elbow has become loose or come off the pump inlet.
WATER FLOW INTO THE AQUARIUM HAS DROPPED
1. Pump needs to be cleaned. Refer to maintenance instruction provided with pump.
2. Outlet is blocked. Remove and clean the flexible outlet.
DRAIN PIPE IS MAKING A GURGLING NOISE
1. Air intake may be blocked. Remove and rinse in fresh water, salt build up can cause a
small blockage (Fig. 3)
2. There is a blockage in the drain pipe. Remove air intake and check pipe for blockage. (Fig. 3)
8
Fig. 3
Clean Regularly

WHAT’S INCLUDED WITH YOUR SYSTEM:
1- High Clarity Tank With Glass Lid
1- Glass Sump
1- HTG Heater
1- MaxFlow SWP Pump
1- Xyclone Protein Skimmer
1- Pre-Filter Sock
1- LED Light With 3 Position Switch
1- Pre-Assembled Aquarium Stand
All Connections & Fittings
Model: RC-24G
Tank Capacity:
24 Gal.
Sump Capacity:
7 Gal.
LED Light:
20W
White Temp:
12,000K
Blue Wavelength:
465nm
Model: RC-32G
Tank Capacity:
32 Gal.
Sump Capacity:
10 Gal.
LED Light:
30W
White Temp:
12,000K
Blue Wavelength:
465nm
Model: RC-40G
Tank Capacity:
40 Gal.
Sump Capacity:
12 Gal.
LED Light:
30W
White Temp:
12,000K
Blue Wavelength:
465nm
Model: RC-48G
Tank Capacity:
48 Gal.
Sump Capacity:
14 Gal.
LED Light:
40W
White Temp:
12,000K
Blue Wavelength:
465nm
NOTE: Please refer to the other included accessory manuals for their setup and specification
information.
SPECS
SPECIFICATIONS
9

AQUATOP 1 YEAR LIMITED WARRANTY
Products are warrantied by AQUATOP Aquatic Supplies to the original purchaser against defective
material and workmanship under normal use for a period of 1 Year from the date of the original
purchase. Products have no warranty if: 1.) The product has been serviced, modified or tampered
with by anyone other than AQUATOP Aquatic Supplies, 2.) The product has been abused or damaged
(including broken or cracked bulbs) 3.) Aquarium Stands/Cabinets are not cared for properly (ie.
warping or discoloration from water damage or salt residue), and/or 4.) The product has been
transported without proper packaging.
WARRANTY LIABILITY DISCLAIMER
In no event will Aquatop
®
be liable for any consequential or incidental damages, including but not
limited to, lost sea life, personal injury, property damage, equipment damage, lost profits, lost wages,
lost savings, lost income, etc., arising out of the use of any Aquatop
®
product.
For more information on tank health and maintenance as well as other products carried by Aquatop,
visit our website: www.aquatop.com
775 Columbia St. Brea, CA 92821
Tel: (888) 915-2782 (562) 697-9860
www.aquatop.com
WARRANTY
10

Recife Manual 2016
aquatop.com