Full Text Searchable PDF User Manual

HS-DVR
THANK YOU FOR CHOOSING ANTAIVISION !
DVR QUICK INSTALLATION GUIDE
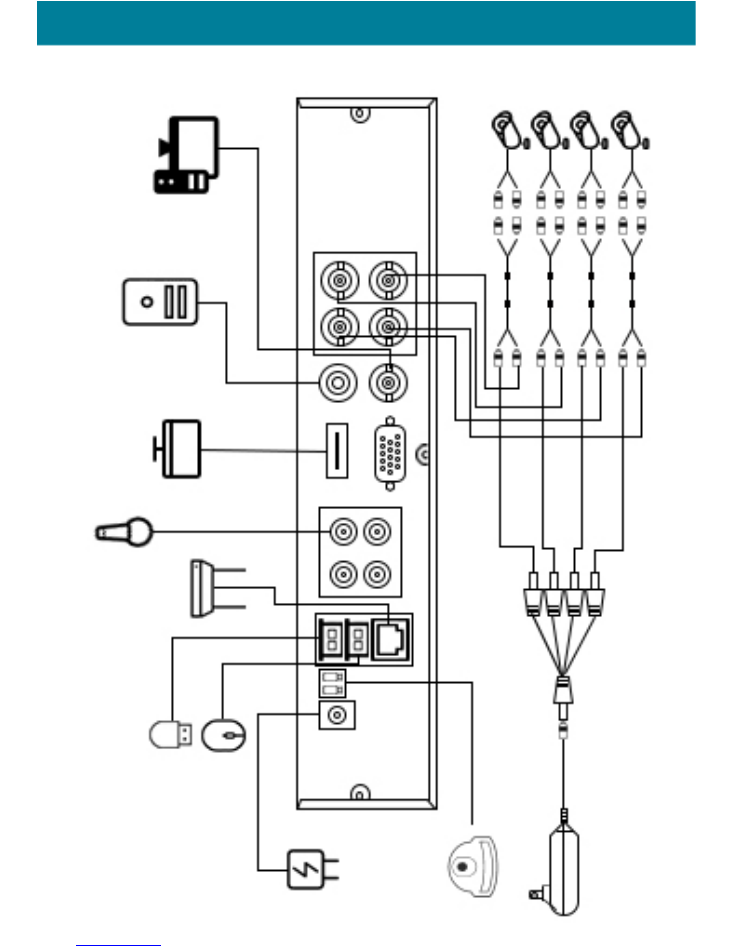
Monit
or
Speak
er
Display
Micr
ophone
R
out
er
USB
Mouse
PTZ Camera
Pow
er supply
Pow
er supply
1-4Splitt
er
Cameras
1
2
3
4
I:STEPS FOR CLOUD ACCESS FROM MOBILE DEVICE
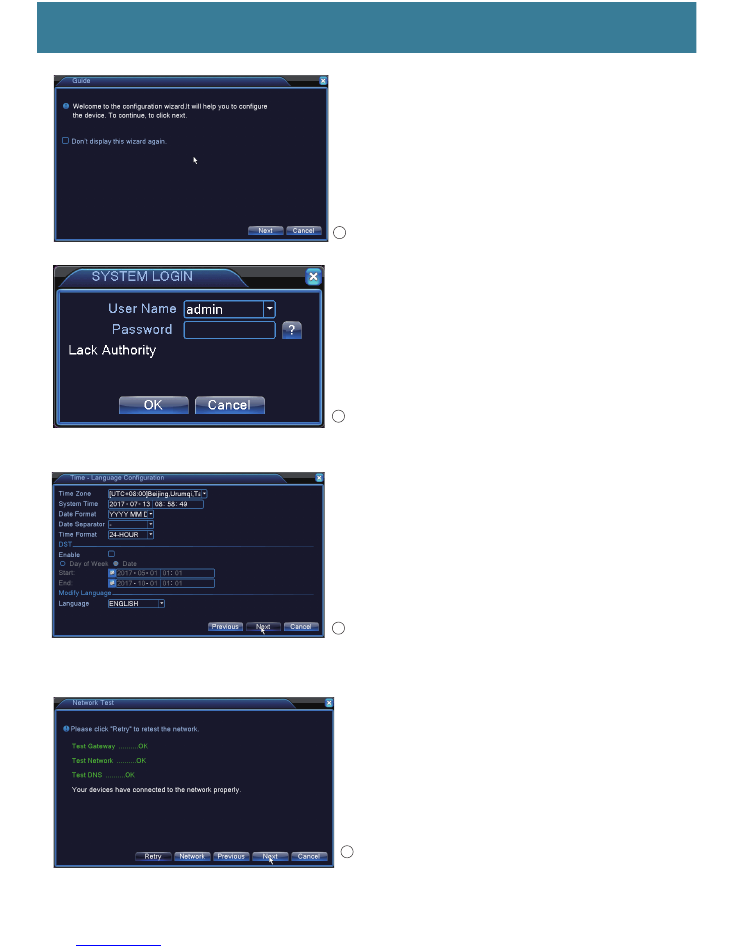
1,Step One:Startup Wizard
They system will automatically open the ‘Setup
Wizard’ screen.to guide the User to set up basic
settings.You click ’next’ to continue.
2.Step Two: After Step One.the system will display
the ‘login’ Screen,as shown in Picture 2,othe
r functions can be carried out after user login.
The text edit box ’User name’ and ‘Password’
don’t need to enter anything,
The system ‘user name’ default is : admin and
the ‘Password’ only left it blank and click ‘OK’
to complete login.
3,Step three : After the step two,it shows the picture
3:Set up language,date ,and Time zone,click ‘next’
when finished.
4,Step Four: After the step three , it as shown in the
picture 4,you only to do is click ‘next’.
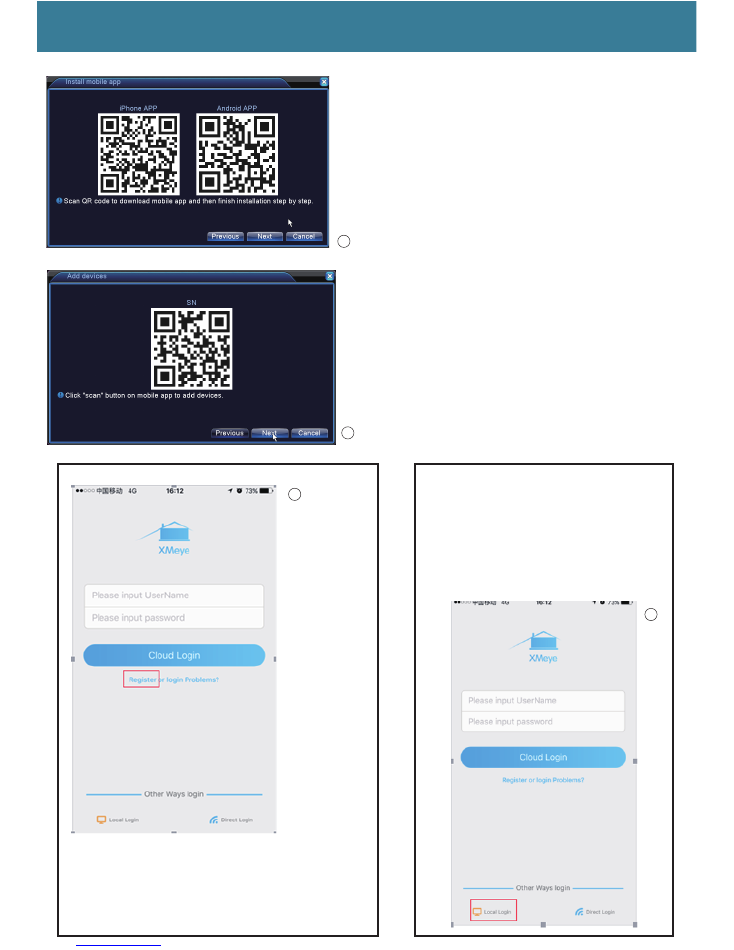
5,
Step Five
:After the step four,it as shown in the picture
5:Scan the QR code to begin downloading he app directly,
It can be download by the phone which is Iphone or Android
system.
By the way:another method to download the app,you
can open your app store or Google Play by your phone
to search ‘XMEye’ and download the app Click ‘next
‘ when finished.
6. Step SIx: After the step five ,it as shown in the picture 6 :
open your ‘XMEye’ app :(1) you can click ‘Register’
to apply an account to login,shows as bellowing:
Set up User name, passord and email ,click ‘Register’
when finished setting. Shown as picture 7 and
picture 9.
When you finished register account,you go
back to the ‘XMEye’ app homepage and
enter your user name and password and click
‘Cloud Login’ button to complete login.
(2)If you don’t want to register an
account ,you can click ‘Login’ to
complete login directly.
5
6
7
8
7.
Step Seven
:After the step six, you complete
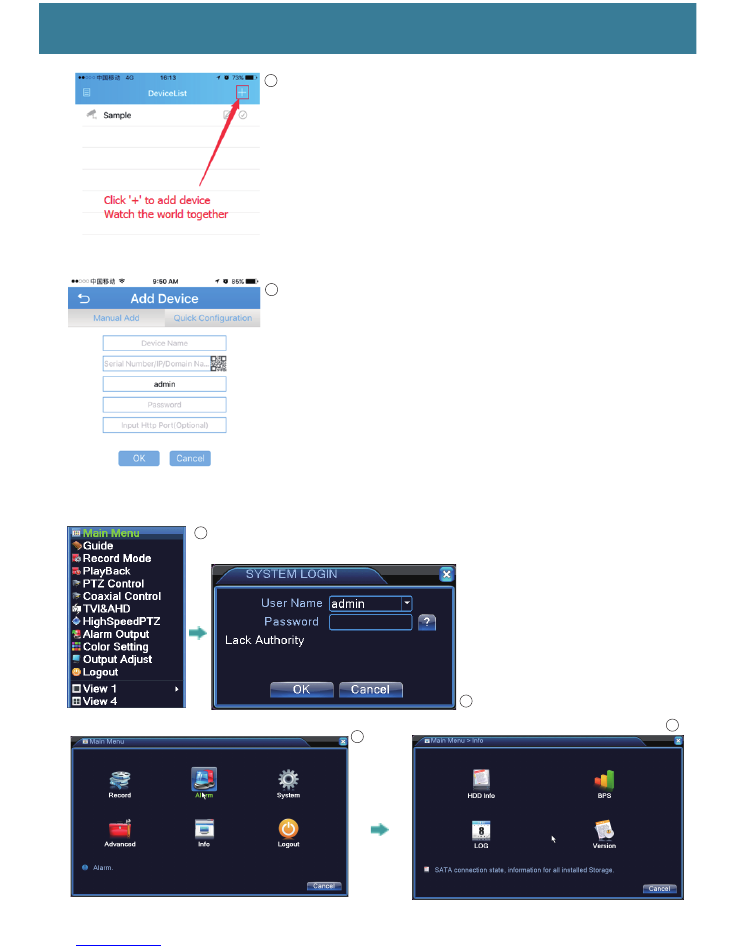
login the app ,it shows as picture 11 : Click “+”
to add device.
8.After you click “+”, it show as picture 12 :
You only to do is set device name by yourself and
left the pasword and port blank: don’t change the
user name,it is default :admin.
And then click the Serial Number’s QR code to scan
the QR code as the picture 6
Shown , then ‘SN QR code’ or you can enter a
serial number, pls click the right button of the mouse,
it shows the ‘Main Menu’ and click it ,pls see the
picture below:
After you click the main Menu , it shows
login , pls see the picture 14:
You only todo is click ‘ok’ button and
continue.
Then click ‘info’ and continue
Then click the ‘version’ and continue
9
10
11
12
13
14
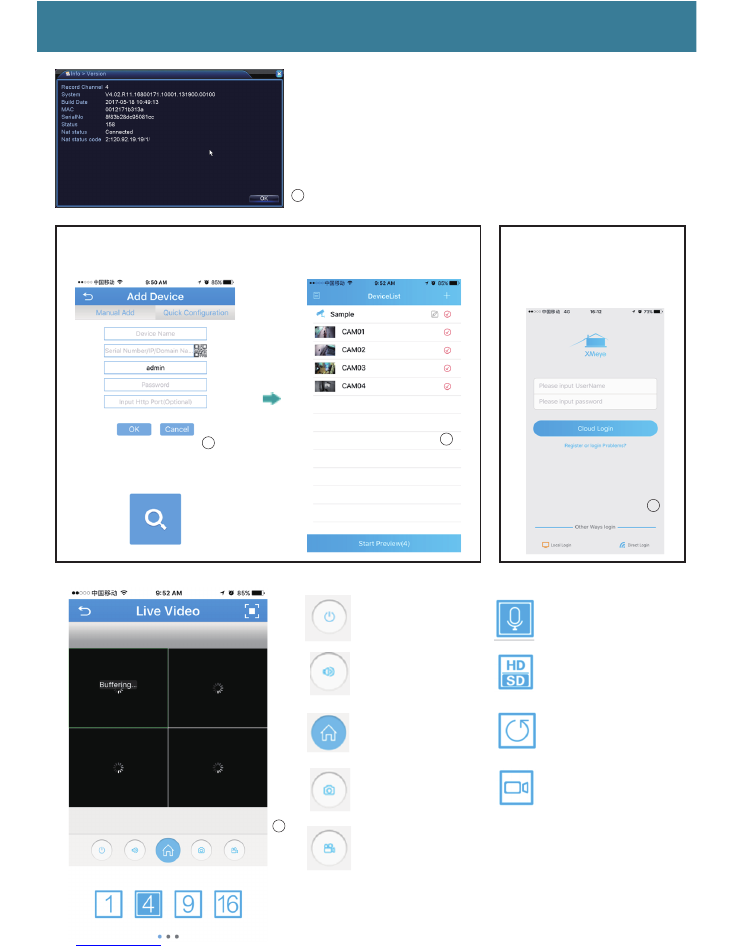
Then you can see the serial No and enter it into your app.
Then you can view by your
phone now:
When you finish entering your
Device name and serial number,
click ‘ok’ to finish.
Edit Password
If you want to change your
passwordYou can click
‘password’ button as shown
below.
Play Video
Voice
Menu
Screenshot
Recorder
Talking
Transfer resolution
Refresh
Play back
15
16
17
18
19
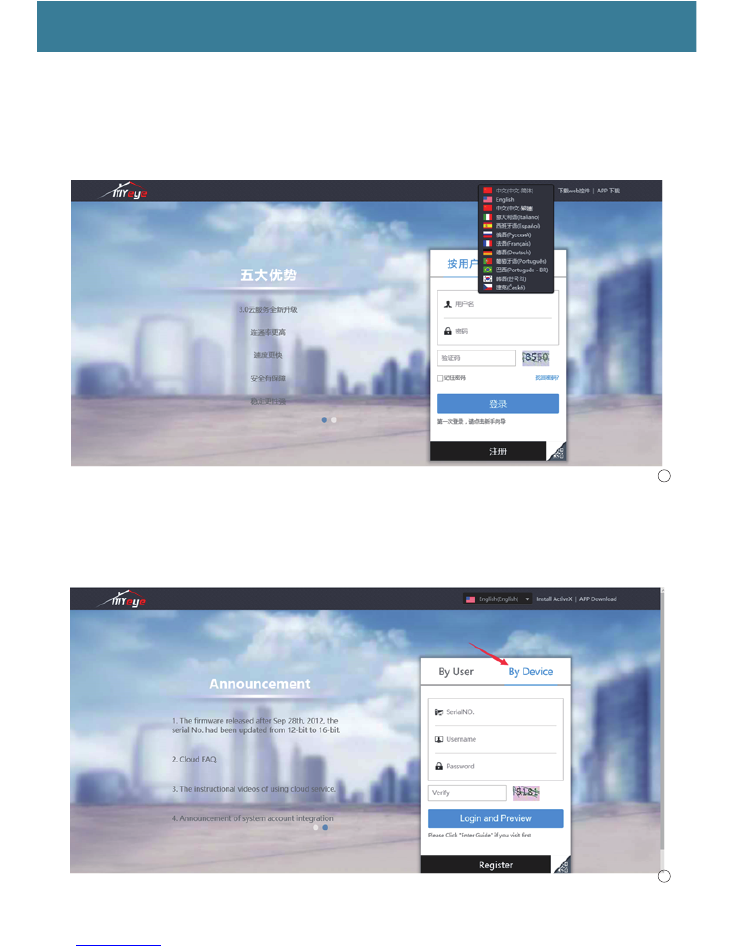
II:STEPS FOR CLOUD ACCESS FROM INTERNET EXPLORER
1,Enter the link :www.xmeye.net into your internet explorer ,it shows as below: You can set
language from Chinese to English.
2,Click ‘by Device’ and enter your device serial NO.and set the user name as ‘admin’ ,
pls note :you need set the user name as ‘admin’, so you can login successfully .
You don’t meed to input password, left it blank and input the Verify ,and click ‘login and
preview’ to continue.
20
21
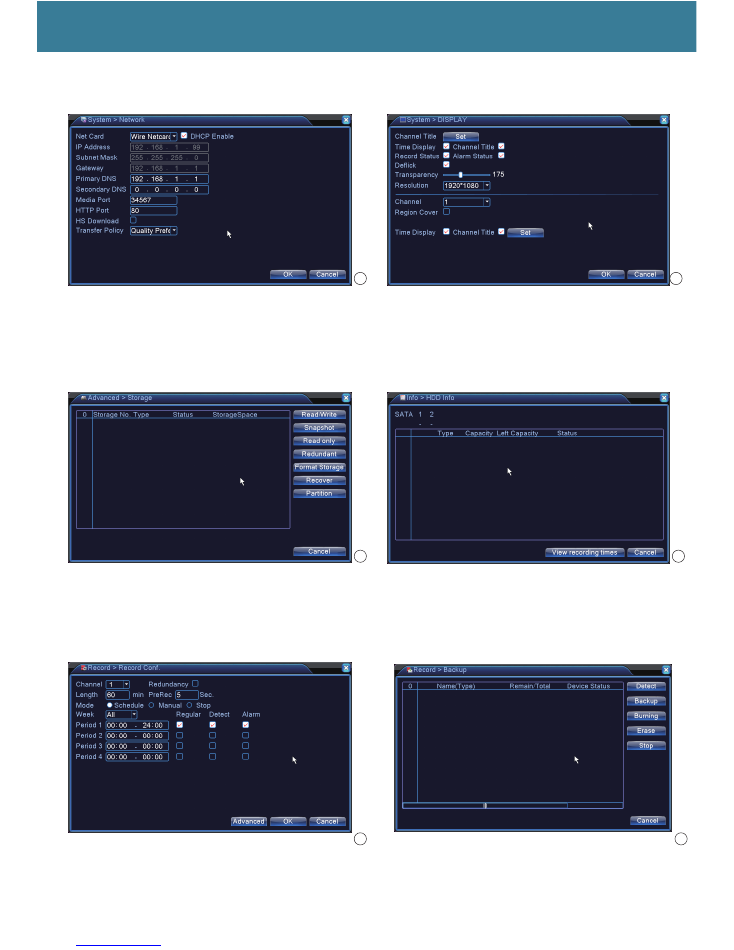
III:FUNCTION
1,Main Menu/System/Network
2,Main Menu/System/Display
3, Main menu/advanced/storage
4.main menu/info/HDD info
5,Main menu/record/record conf
6,main menu/record/Back up
22
23
24
25
26
27
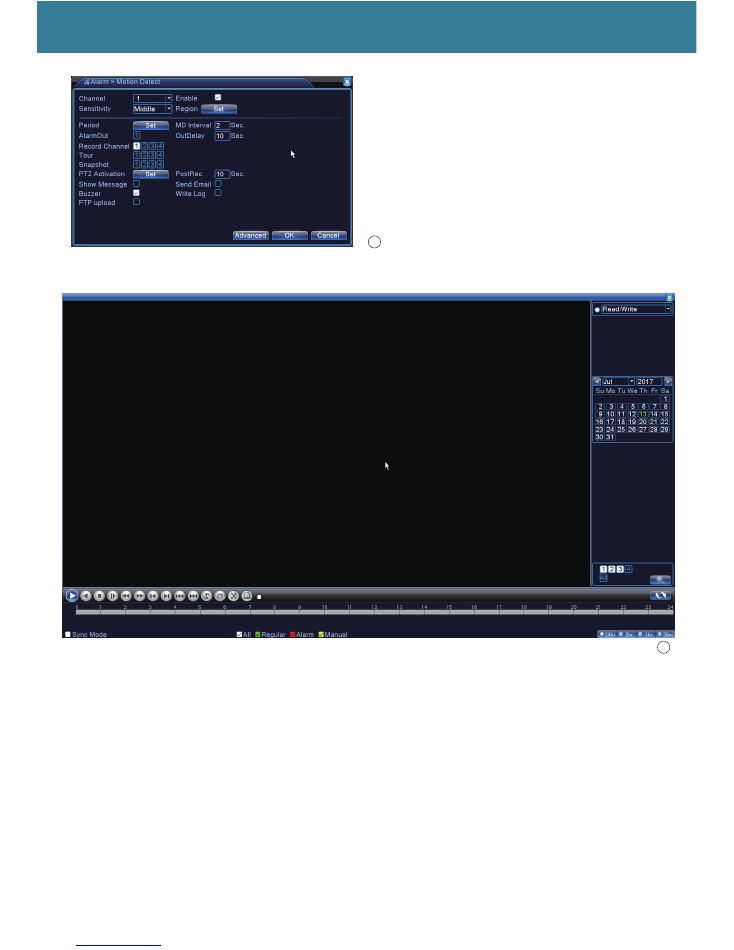
7,main menu/alarm/motion detect
8,main menu/Record /playback
Any question,please contact ATcloud Custome Support:
1.Contact person:Icey
2.Whats app:8613537732900
3.Email add:info@antaivision.com
28
29