Full Text Searchable PDF User Manual
OWNER’S MANUAL

2
Table of Contents
Page
Installing the Axle Clamp [Brackets]
7
Adjusting the Wheelbase
8
Charging the Battery
9
Setting Up Before the Round
10
Severe Inclines
11
Controller: First Time Use
11
Controller: Speed Control
12
Controller: Steering
13
Controller: Distance Timer
14
Controller: Cruise Control
15
Controller: Electronic Brake Release
16
Controller: Pairing Your Remote with Club Booster
17
Warranty Information
18
Alphard Golf USA Contact Information
18

3
Important Safety Information about Lithium-Ion Batteries and Chargers
To avoid the risk of damage, fire, overheating and electric shock:
•
Never allow the Lithium-Ion battery or remote to become submerged in water.
Should submersion of the battery occur: (1) do not use the product, (2) store it
outside in a non-combustible container, and (3) contact Alphard Golf USA at 833-539-1200 for
further
instructions:
• Only charge the battery with the supplied charger.
• The charger should not be exposed to rain, moisture or dampness.
• Do not use the charger or battery if either become damaged.
• The supplied battery charger generates heat during use;
place it only on heat
resistant surfaces.
• Do not charge the battery in temperatures below freezing.
• Always check with your airline before flying with the battery.
• Only dispose of the battery in accordance with local regulations.
Battery Specifications
This product utilizes 20 lithium ion cells (18650) packed and shrink-wrapped with protection
circuitry. The maximum rated capacity is 158.4Wh. The battery inside this product complies
with UN38.3 and IEC62133 safety requirements.
General Warnings
•
Warning:
eWheels are intended solely for the transportation of golf equipment on
golf courses.
•
Warning:
Be aware of your surroundings when using eWheels to avoid the risk of
collision with other players, carts, trees, water hazards, bunkers or other objects.
•
Warning:
Operate cart with care over terrain that could cause the cart to tip over
•
Warning:
In the unlikely event that your Club Booster becomes submerged, to not attempt to
air-dry and charge the battery. If it becomes submerged, please contact Alphard Golf USA at
833-539-1200 for further instructions.
•
Caution:
Use care not to pinch fingers when connecting eWheels to your cart.
Warnings and important safety instructions appearing in this manual are not meant to cover all
possible conditions and situations that may occur. Common sense, caution and care must be
exercised when operating or cleaning this equipment. Please contact Alphard Golf USA at
833-539-1200 about any concerns you may have.

4
Remote Controller
Warning:
This product uses radio frequency control. Radio waves can go through walls. To
avoid accidental triggering, keep the remote in a safe location and away from children.
RF Signals
This product complies with FCC, IC, CE, C-TICK.

5
FCC Statement
This device complies with Part 15 of the FCC Rules. Operation is subject to the following conditions.
(1)
This device may not cause harmful interference, and
(2)
This device must accept any interference received, including interference that may cause
undesired operation.
Warning:
Changes or modifications not expressly approved by the party responsible for compliance
could void the user’s authority to operate the equipment.
NOTE: This equipment has been tested and found to comply with the limits for a Class B digital
service, pursuant to Part 15 of the FCC Rules. These limits are designed to provide reasonable
protection against harmful interference in a residential installation. This equipment generates, uses
and can radiate radio frequency energy and, if not installed and used in accordance with the
instructions, may cause harmful interference to radio communications. However, there is no
guarantee that interference will not occur. If this equipment does cause harmful interference to
radio or television reception, which can be determined by turning the equipment off and on, the
user is encouraged to try to correct the interference by one or more of the following measures:
•
Reorient or relocate the receiving antenna.
•
Increase the separation between the equipment and receiver.
•
Connect the equipment into an outlet on a circuit different from that to which the receiver is
connected.
•
Consult the dealer or an experienced radio/TV technician for help.
RF Warning Statement:
This device has been evaluated to meet general RF exposure requirements. The device can be used in
portable exposure conditions without restriction.
6
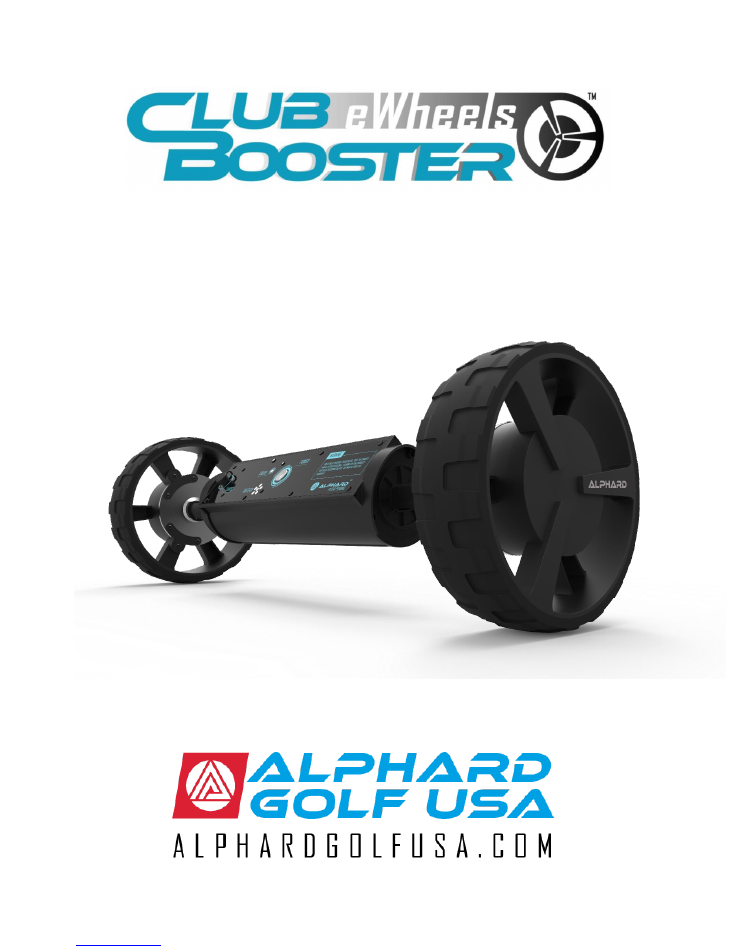
Congratulations!
We know you are going to love your Club Booster for years to come. To maximize the product’s
benefits and ensure safe operation, it is important to read this manual in its entirety, prior to
first use.
Check the box to make sure you have all components. It should include:
•
Club Booster eWheels
•
Left and Right Axle Clamp Brackets with (4) Bolts, (4) Washers and (4) Nuts
•
Remote Control Unit
•
Charger
•
Magnetic Remote Holder
•
3 X AAA Batteries
This will not be printed. For our reference only
Terminology Changes
Was
Now
Outrigger Tubes
Strut Tubes
Crimp
Axle Clamp
eWheels (as unit name)
Club Booster (and Club Booster eWheels)
Face Panel
Console
Main Console
Club Booster eWheels
7
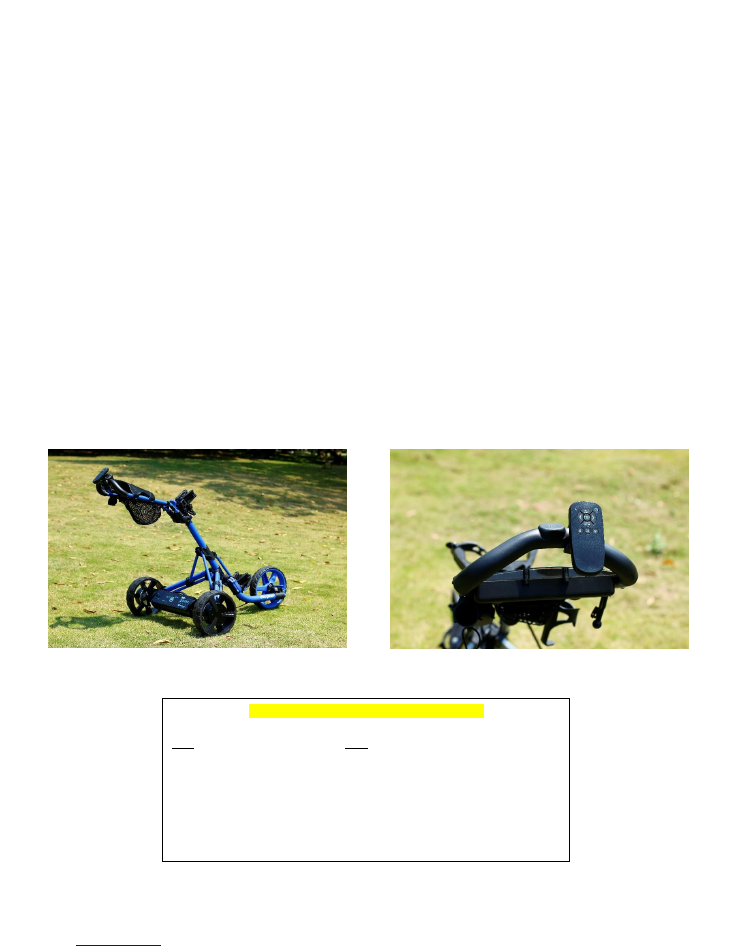
Installing the Axle Clamp [Brackets]
The Axle Clamps are specific to a cart brand and model(s). Please be sure the brand and model(s) listed
on the box matches the brand and model of your cart. If they do not match, contact your retailer to
exchange to the correct brand and model.
Tools Needed
•
Philips Screwdriver,
•
Open-end, Adjustable, or Socket Wrench for: Wheel Nut, Strut Pivot Nut and Bracket Nut
Installing the Axle Clamps
Step 1
Remove the Rear Wheels. If your push cart has a rear wheel
braking mechanism, you will need remove it first.
Step 2
Remove the Wheel Pivots on both sides.
Step 3
Slide the Axle Clamp (Left or Right) onto its corresponding
Strut Tube (opening of Axle Clamp should be facing away
from cart) and align the holes and fasten them with the Bolt
and Nut with Washer.
8
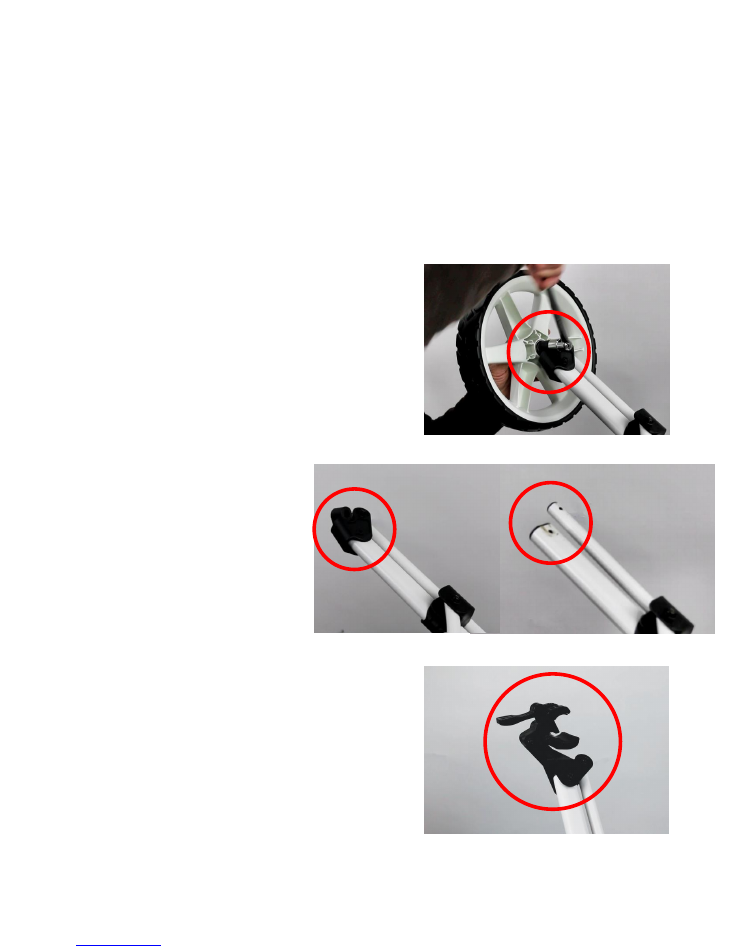
Adjusting the Wheelbase
The wheelbase (length between the wheels) can be adjusted to fit different cart frames. This procedure
is only
necessary if there is a gap wider than 1” on the outside of both Ax
le Clamps when they are placed
on the Club Booster Axle. Most 3-wheel carts have a wider wheelbase than 4-wheel carts.
Adjusting the Wheelbase:
Step 1
Unfold your push cart. Measure the distance from the
outside edge of one Axle Clamp to the outside edge of the
other.
Step 2
Fully extend the wheels on the Club Booster. Rotate the
main body so the Console is facing downward and remove
the screws on the Stoppers.
Step 4
Slide the wheels inward until the distance between the tube
ends matches the distance you measured.
Step 5
Slide each wheel outward until the holes on the tube align
with the hole on the Stopper.
Step 6
Fasten the screw tightly again.
Measure
9
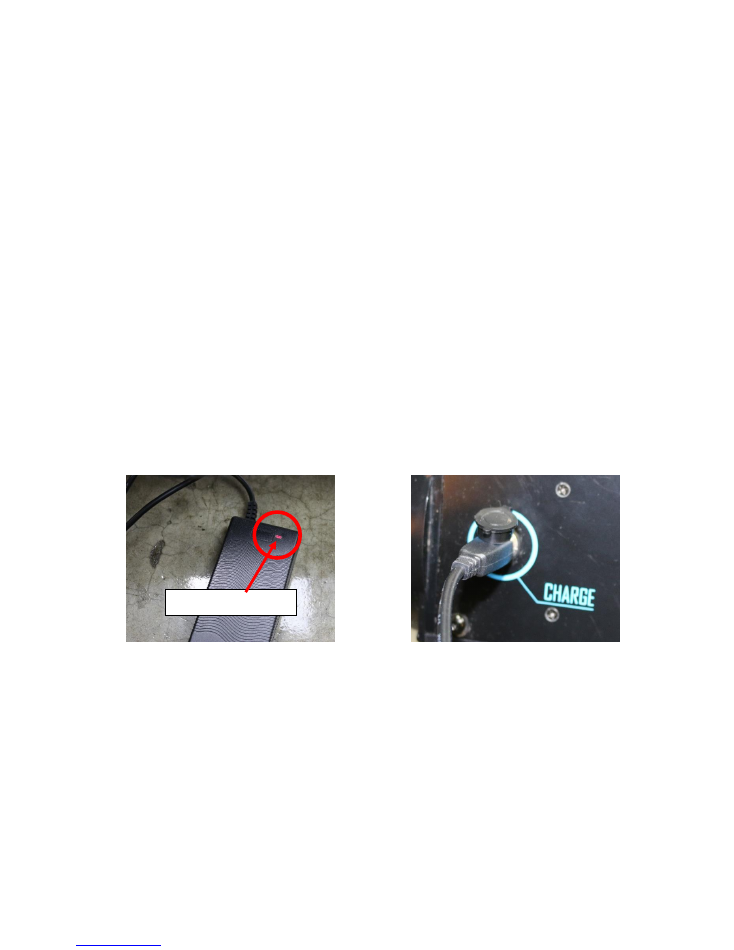
Charging the Battery
The battery in your Club Booster is at an extremely low charge level from the factory. Please charge
fully prior to first use, to ensure the battery will last the entire round.
Charging the Battery:
Plug
the charger into the Club Booster Console where it is labelled “Charge.” The LED indicator on the
battery charger will turn red when charging begins.
When charging is complete, the LED indicator on the charger will change from red to green. It should
take about 4 hours to fully charge the battery from a drained/low level. You can switch on the power on
the Club Booster console during charging to check the battery level.
Unplug the charger as soon as possible after charging is complete. This will prolong battery life and
prevent over-heating. It is not recommended to charge overnight. Charge in a controlled environment
when you can unplug the unit once it is fully charged.
This product comes with a universal charger suitable for line voltage between 100
–
240VAC, 50/60Hz
input, 42VDC 1.5A MAX output. For safety, use only chargers provided by the manufacturer. Over-
charging voltage or current may cause damage to this product. Do not charge outdoors, to avoid
exposure to the elements. Store the unit and the charger in a cool, dry place and avoid direct sunlight.
LED Charge Indicator

10
Setting Up Before the Round
Step 1
Unfold your push cart.
Step 2
Fully extend the wheels on your Club Booster.
Step 3
Place the Axle Clamps onto the axle. Make sure
the clamps are laying on the flat surface of the
axles and not on the plastic end caps. Got back to
“Adjusting the Wheelbase” on the previous page if
the wheelbase is not wide enough.
Step 4
Fully tighten the cam lever on the Axle Clamp.
Reverse these steps to disassemble after the
round.

11
Severe Inclines:
Caution:
For severe inclines, we recommend slowing your Club Booster to its slowest speed and
holding onto the cart handle to ensure it does not tip backwards.
Controller: First Time Use
For first time use, make sure to practice in an open area. Practice maneuvering left and right and
slowing down, speeding up and stopping.
The remote controller is rated for a range of 50 yards, but you can often control it up to a range of 100
yards or more. However, we do not recommend running your cart unattended in case there are
obstacles, or interference with transmission. The Club Booster has two-way communication, so it will
stop automatically when the remote is out of range.
When you first power on the Club Booster console, there can be a delay of around 5 seconds for unit to
respond to the remote. Allow for this delay prior to operating the unit.
12
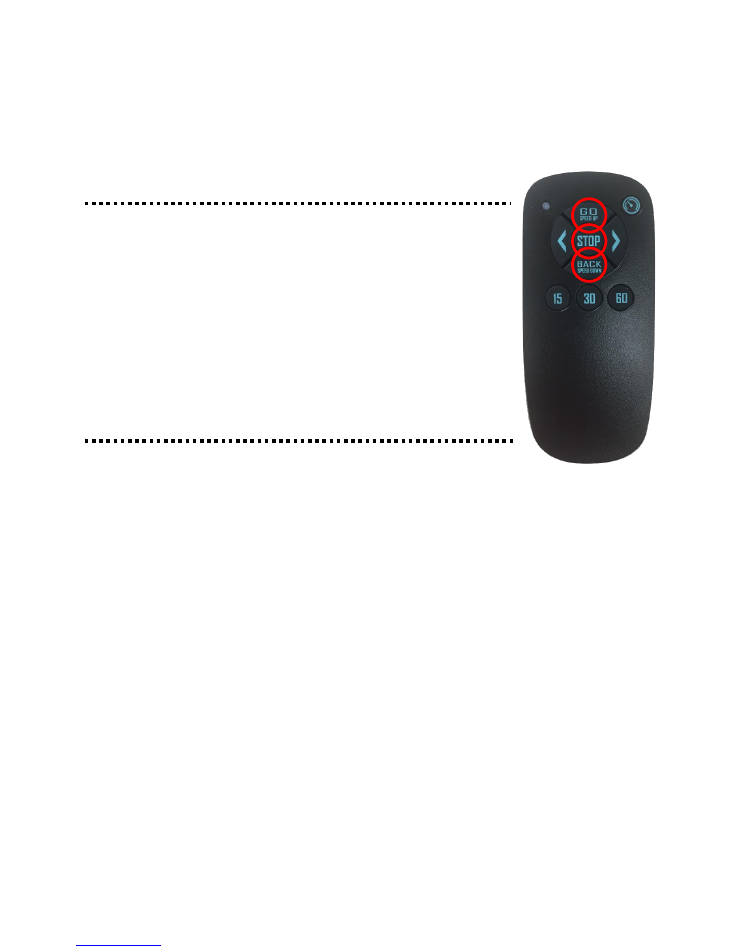
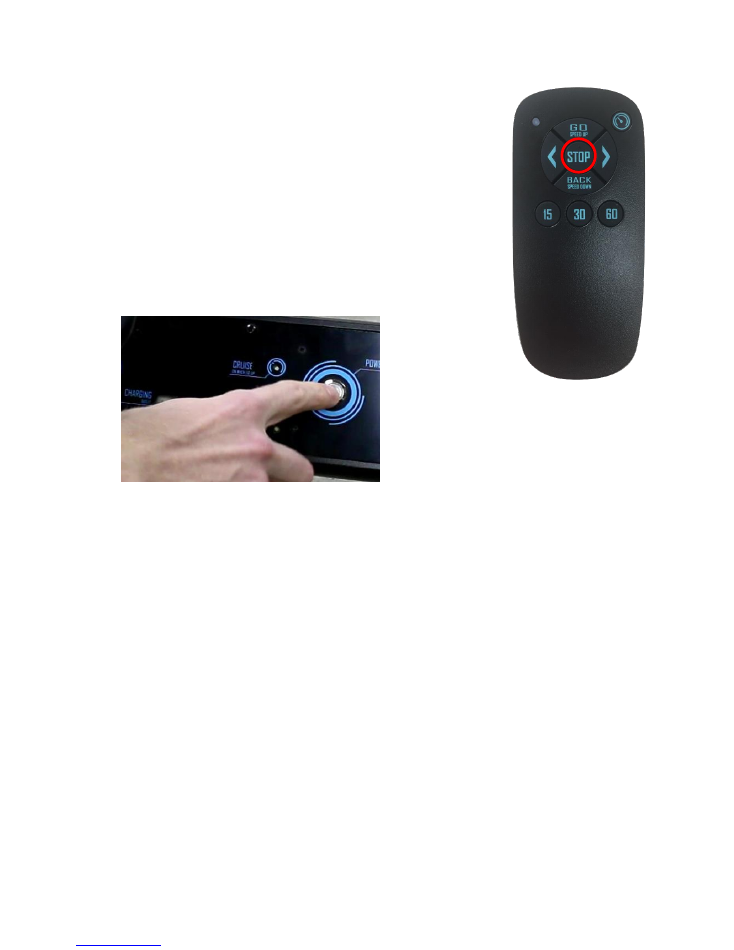
Controller: Speed Control
Speed control is as important on the course as it is on the road. Your Club Booster has six speeds. The
default speed is Level 3. You can speed up by pushing the “GO/Speed Up” button, or slow down by
pushing the “BACK/Speed Down” button.
IMPORTANT
When you stop your cart, the next time you push GO your Club Booster will
start at the last speed used. This is VERY important, because the cart is often
stopped around greens and tee boxes that require maneuverability and care
around other players, their equipment and the surrounding area.
We therefore HIGHLY recommend slowing the Club Booster down to its
slowest speed when approaching the area where you wish to stop. This will
make the cart easier to maneuver both before and after it is stopped. As
stated earlier, fixed-wheel carts may not be able to turn at higher speeds and
may endanger others or damage property if the unit starts at a high rate of
speed and cannot be turned.
Press the “Go/Speed Up” button and the cart will move forward.
Press the “Stop” button and the cart will stop. For a smoother stop
, slow the cart down prior to
stopping.
To reverse the cart, hold down the “Back/Speed Down” button and release the button to stop.
13
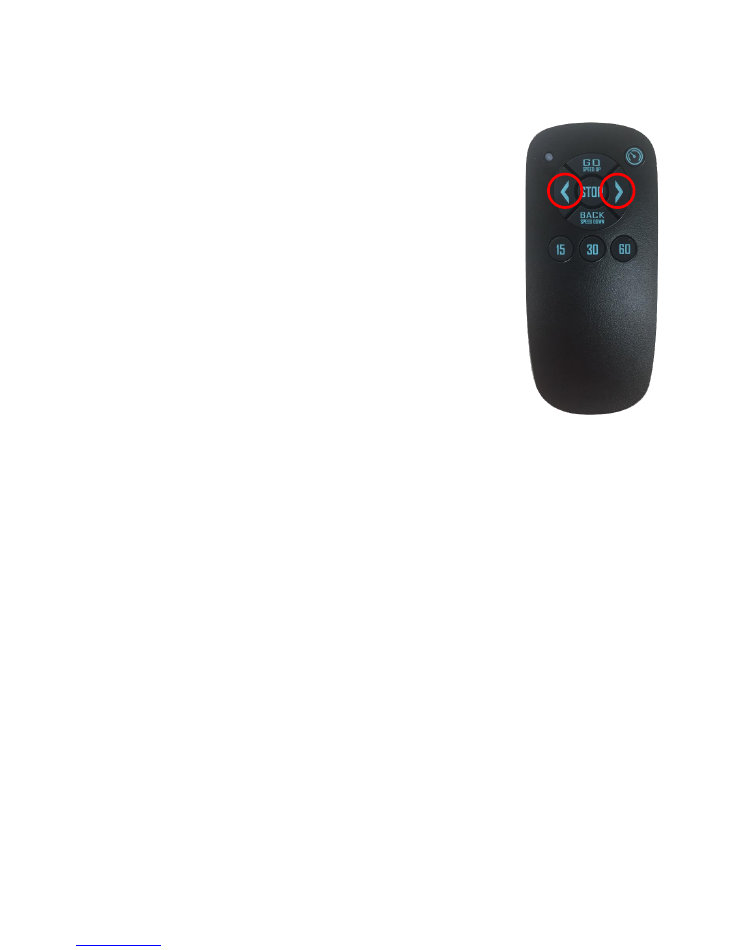
Controller: Steering
Steering takes a little bit of practice. The sensitivity of turns varies from one
cart to another. Carts with a swiveling front wheel can turn easier than fixed-
wheel carts.
Fixed-wheel carts may be unable to steer at speeds 3
–
6, so always slow down
when you approach areas where you will need to steer.
For long, straight runs, it is best for both fixed and pivoting front wheel carts to
engage “Cruise Control.” Cruise Control sets both motors at the same speed,
so the cart will track straighter with it turned on.
Turning will vary when going uphill, downhill or sidehill. The turning radius for
fixed-wheel carts is also affected by the wetness and height of the grass. It will
turn quicker on wet or shorter grass than it will on dry or longer grass. The
turning radius is always best at slower speeds.
We do not recommend turning a fixed-wheel cart on concrete. This can cause
misalignment and potential damage to the wheel and tires. When in a parking
lot, we recommend you power off your Club Booster and push your cart for safety,
reduced risk of damage to property and reduced wear.
To Steer:
Press the “G
O
/Speed Up” button to start the cart moving. Once moving, you can press and hold the Left
or Right Arrow button to turn the cart. The cart will continue to turn until you let go of the Arrow
button. Quickly pressing and letting go of the Arrow buttons will cause a jerking motion, rather than a
smooth turn.
WARNING
SOME CARTS HAVE WEAKER FRAMES THAN OTHERS. STEERING A FIXED-WHEEL CART WHEN
STATIONARY CAN CAUSE DAMAGE TO THE CART FRAME OR WHEEL ALIGNMENT. DO NOT ATTEMPT TO
STEER A FIXED-WHEEL CART ON CONCRETE WHETHER IT IS STATIONARY OR IN MOTION. THIS CAUSES
ACCELERATED WEAR AND TEAR OF THE FRONT TIRE(S).

14
Controller: Distance Timer
There are three distance timers located on the remote: 15, 30 and 60 Yards.
When pressing one of these buttons, the Club Booster will travel the selected
distance and then come to a stop.
Tips for using the Distance Timers
To pick up the pace, send the cart to the next tee box using the Distance Timer
(After grabbing your putter, of course).
Use the Distance Timer to calculate how far you drove your ball. After hitting
your tee shot, use the 60-Yards timer multiple times and then the 15 or 30-Yard
Timers to calculate the distance of the drive.
15
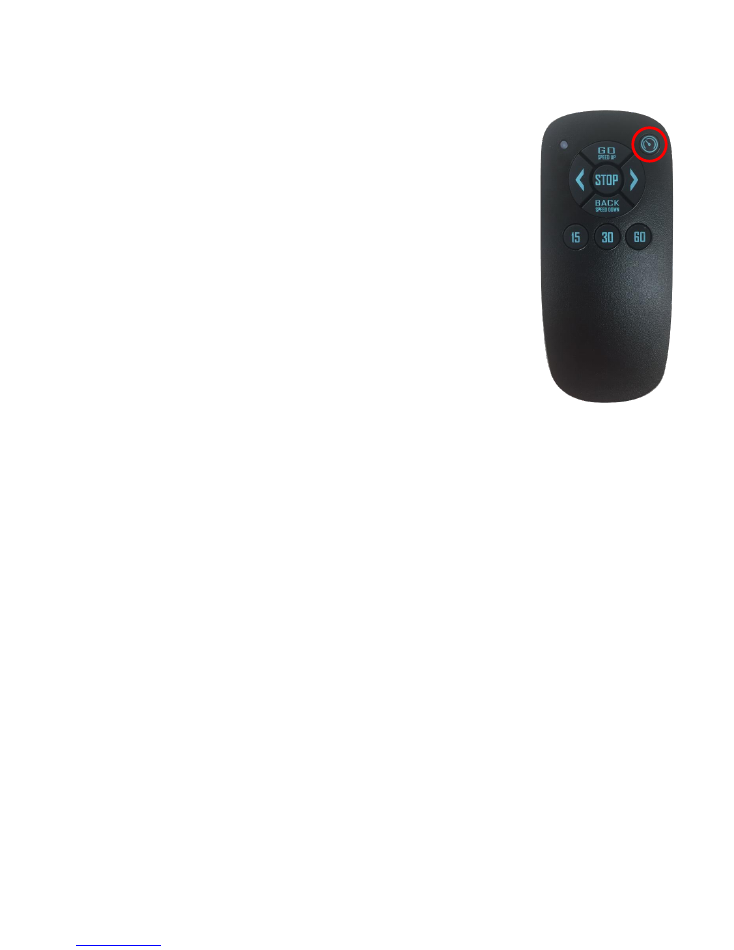
Controller: Cruise Control
Cruise Control regulates the uphill and downhill speed of the cart to keep the
speed constant. This is particularly useful on steep declines, where the cart may
otherwise accelerate to a potentially dangerous speed.
Cruise Control keeps both wheels at the same speed which also keeps the cart
tracking a straighter line. We recommend using Cruise Control for long, straight
runs.
To activate Cruise Control, press the upper right “speedometer” icon button
once. The yellow LED on the Club Booster Console will light up.
To deactivate, simply press the upper right button again and the yellow LED on
the console will go out.
Do not steer the cart manually with Cruise Control engaged.
Warning
:
Do not use Cruise Control on concrete.
16
Controller: Electronic Brake Release
When in tight quarters, we always recommend releasing the electronic
brake and pushing your cart.
You can disable the electronic brake from your remote or by powering off
your Club Booster on the Console. To disable from the remote: press and
hold the “Stop” button for
4 - 5 seconds. The red LED on the controller will
start to blink. The electronic brake is now disabled, and you may push the
cart without resistance.
To go back to normal mode, press any button on the remote.

17
Controller: Pairing Your Remote and Club Booster
Your Club Booster is paired with the remote at the factory. However, if your remote and Club Booster
are not communicating, it is possible to pair them.
Pairing the Remote with your Club Booster:
Step 1
Power off the Club Booster.
Step 2
Remove one battery from the Controller.
Step 3
Press and hold the “Stop” button and reinsert the battery.
Step 4
Power on the Club Booster.
Step 5
Release the “Stop” button.
The LED on the Controller will start blinking.
After a few seconds the LED on the Controller will stay on and the units
are now paired and ready to use.

18
Warranty Information
The Club Booster, Battery and Charger are covered by a 24-Month Limited Warranty from the date of
purchase.
Proof of Purchase and Registration required for all warranty claims. To register your Club Booster,
please visit www.alphardgolfusa.com.
Warranty covers manufacturing defects that occur during normal use. Any breakage caused by
accidently damage, abuse or misuse (as stated in this Manual), or commercial use, is not covered.
Warranty is subject, but not limited to, the following exclusions:
1.
Accidental damage, consumer misuse, abuse or neglect.
2.
Abnormal wear and tear.
3.
Rental or other commercial use.
4.
Unauthorized modifications to the product.
5.
Faulty repairs by consumer or unauthorized agent.
6.
Failure to follow battery charging instructions, or using any charger purchased from an unauthorized
supplier.
7.
Removal of, or defacing Serial Numbers from any item invalidates the warranty.
If you have a claim covered by the warranty, please call
Alphard Golf USA at 833-539-1200
to identify
and resolve the problem. Instructional videos and additional information can be found on our website
at www.alphardgolfusa.com. Please have your serial number when you call. The serial number is inside
the battery housing of the remote and on the bottom of the main unit.
833-539-1200
info
@
alphardgolfusa.com
1200 SE 2
nd
Avenue
Canby, OR 97013