Full Text Searchable PDF User Manual

SR4 MP3 audio player Manual Version 2.0
For SR4 release starting Sept 2008.
INTRODUCTION:
The SR4 is a self-contained Solid State audio player housed in a small aluminum enclosure. The SR4
utilizes the latest development in DVD single chip technology to decode MP3 audio and VOB (DVD)
video file.
The SR4 has a complete set of Audio out connectors. It has 2 RCA line level audio out, a pair of stereo
speaker out and stereo mini jack headphone out.
The SR4 also has a complete set of Video out connector.
It has VGA (video) out that direct connection into a standard PC Monitor. It has Composite video out
for connection into a small LCD monitor and S Video out (using VGA to S Video adapter) for
connection into a larger LCD monitor.
The SR4 plays from a single Compact Flash Card Drive. CF card capacity is up to 4 Gig byte.
SR4 has 5 digital input configured in binary and 2 digital input for volume control. To play using the
input, the SR4 requires a playlist.txt file.
The SR4 has a RS485 Serial port for connection to IN6 input board and RL4 relay board. The SR4 can
be connected into 8 IN6 board for a total of 96 input. Together with the RL4 board the SR4 can turn
ON/OFF up to 16 relays in sync with the Audio/Video.
The SR4 is an ideal replacement for a professional CD/DVD player. It is extremely rugged, easy to
program, fully interactive, has superb video quality and at a much lower cost.
SR4 at a glance:
1.
SR4 plays from Compact Flash card only up to 4 GigB. You can use any brand name
Compact Flash card.
2.
SR4 plays MP3 audio files xxx.mp3 and PCM audio xxx.wav.
3.
SR4 plays DVD video files xxx.vob , xxx.mpg and Jpeg picture files xxx.jpg.
4.
SR4 has 14Watt stereo Speaker out and 1 Watt Headphone out.
5.
SR4 has VGA out, Composite and S Video out (special socket adapter required).
6.
Use PC only to copy files into the Compact Flash card, do not use MAC. SR4 will not play
correctly if the files are copied using MAC.
7.
To loop file(s) automatically after powering up OR to to play using push buttons the
Compact Flash card requires at least A/V File(s), playlist.txt and File Folder(s).
8.
A/V File (s) are file(s) that the SR4 will automatically loop after powering up.
9.
playlist.txt is a text file that contains the SR4 setup and instruction on how you want the
input (push button) to play the files that are located inside the file folder(s).
10.
File folder(s) contains files that you want to play using the input (push buttons). These files
will not play automatically, it will only play using the input (push button) OR the IN6 input
board.
11.
The IN6 input board can be set to either operate as a normal input or to operate as an IR
Remote control.
12.
Input #1 of the IN6 board is line 01 in the playlist.txt, Input #2 of the IN6 board is line 02 in
the playlist.txt etc.
13.
Input from IN6 board will only play files that are located inside the file folder(s).
14.
You can replace the IN6 with your own external Micro controller and play the files through
SR4 built in RS485 port.
15.
SR4 can also play relay (s) in sync with the audio/video. Use RL4 relay board and xxx.tmr
text file.

SR4 MEMORY STORAGE:
The SR4 plays from Compact Flash card only. To copy video files into the CF Card, use a USB card
reader and a PC (USB2.0 port). Copy (drag and drop) the files into the CF card
IMPORTANT: Do not use MAC to directly copy the files into the CF card. Mac files might have
MAC Binary structure where each Mac file has a “data file” and a “resource file.” The SR4
does not recognize and can not handle the resource file. This will cause the SR4 to operate
erratically.
TYPE of COMPACT FLASH CARD:
Use any brand Compact Flash card.
Maximum CF card size is 4 Giga byte. The SR4 player
reads Compact Flash card that uses Windows (98 to XP) DOS (FAT32) format only, not NTSF. Do not
format a new CF card. However if you have to format a used CF card, format it with DOS (FAT or
FAT32) format only (not NTFS). Do not copy using MAC.
POWER REQUIREMENT:
The SR4 is supplied with a desktop switching power supply. The power supply operates from 120VAC
to 240VAC at 50/60Hz. Power draw is 30 watt. The power supply is supplied with a PC style plug AC
power cord that fits a standard North America power jack.
AUDIO file types:
xxx.mp3 (Std MP3 audio format):
The SR4 plays only standard
stereo mp3 audio format
at up to 320kbps.
xxx.wav (Std pcm16 wav audio format):
The SR4 plays only standard
stereo PCM 16 bit audio format
at up to 48Khz. The file extension is
xxx.wav.
VIDEO file types:
Note:
SR4 is identical to a DVD player. Any xxx.vob video file that has been created for a DVD disk,
can be played by SR4.
xxx.vob (VOB file from DVD, 16X9 format):
The SR4 plays std wide screen format (4X3) VOB files. It will also play wide screen format.
(Anamorphic or Square Pixel).
xxx.mpg (Mpeg2):
The SR4 will play Mpeg2 video files at up to 10 Mbps. The bit rate is limited by the CF card transfer
speed. It will decode wide screen format.
JPEG PICTURE File:
While looping a single Jpeg picture, the SR4 will display the picture continuously without any black
screen in between. When playing a series of jpeg pictures, the SR4 will go into a slide mode. Use the
IR remote to access the onscreen menu and adjust the slide mode.
MONITOR TYPES:
PC Monitor with VGA input
The SR4 has VGA out for direct connection into a std VGA monitor. Connect the RCA Audio out of
the SR4 into the RCA audio in of the monitor. If the monitor has stereo mini jack input, then use a
standard stereo mini jack connector.
LCD Monitor with composite (CVBS) and S Video input
The SR4 has CVBS and S Video video out for direct connection into a std LCD monitor. Connect the
RCA or S Video out of the SR4 into the RCA or S Video in of the monitor. Connect the RCA Audio

out of the SR4 into the RCA Audio in of the monitor. If the monitor has stereo mini jack input, then
use a standard stereo mini jack connector.
SR4 SOFTWARE:
•
To loop file(s) automatically after powering up OR to to play using push buttons the
Compact Flash card requires at least A/V File(s), playlist.txt and File Folder(s).
•
A/V File (s) are file(s) that the SR4 will automatically loop after powering up.
•
playlist.txt is a text file that contains the SR4 setup and instruction on how you want the
input (push button) to play the files that are located inside the file folder(s).
•
File folder(s) contains files that you want to play using the input (push buttons). These files
will not play automatically, it will only play using the input (push button).
Here is a typical content of a CF card:
F:\
Bird,mp3 (this is the root directory)
playlist.txt (this is a text file)
Test:\ (note: this is a File folder)
Dog.mp3 (this file will be played by a PB)
Cat.mp3 (this file will be played by a PB)
The SR4 has a built in software program that will automatically search the root directory of the CF
card for Playlist.txt file (after powering up).
Besides searching for the playlist.txt, the SR4 will also search for A/V files in the root directory and
for A/V file(s) inside the file folder. If the playlist.txt does not exist, then SR4 will automatically use
the known last setting. However if the playlist.txt exists, then it will play (loop or single play) the files
that are located in the root directory according to the playlist. Files that are stored inside the file folder
will not automatically play. They can only be played using the push buttons.
The playlist.txt
(all lower case, no capital letter) is a text file that contains information on how to play
the video files using SR4’s digital input. In addition to using playlist.txt, the playback can be
controlled using an optional IR handheld unit. The IR unit function is similar to a standard DVD IR
remote control unit. It has std DVD functions such as pause, stop, next, previous etc.
HOW TO PLAY ONCE AUDIO/VIDEO AFTER POWERING UP:
If you are not using push button and want to play the audio/video once automatically after powering
up, copy the audio/video file(s) directly into the CF card.
In the playlist use the following line: PLAYMODE=SINGLE. After powering up the SR4 will play the
audio/video files once and then stop.
HOW TO LOOP AUDIO/VIDEO AFTER POWERING UP:
If you are not using push button and want to loop the audio/video automatically after powering up,
copy the audio/video file(s) directly into the CF card. In the playlist use the following line:
PLAYMODE=REPEAT. After powering up the SR4 will loop the audio/video files.
HOW TO PLAY AUDIO/VIDEO USING SR4 INPUT:
To play audio/video using the input (push button), you have to create a text file playlist.txt and one file
folder. The name of the file folder does not matter. Inside the file folder copy the audio/video files that
you want to play using the SR4 input.

After powering up the SR4 will only loop the files that are located in the root directory, not the ones
inside the file folder. The files inside the file folder can be triggered using the input OR IN6.
HOW TO NAME A FILE FOLDER AND TO NAME THE AUDIO/VIDEO FILE:
USE simple letters only and DO NOT use any space in the file name.
The SR4 will not play if a file
has a space in its name.
Example:
Big Bird.ts. This file will not play because of the space between Big and Bird. To play, change it to
Big_Bird.ts (no space).
Bad dog.ts. This file will not play (space between Bad and Dog).
Bad_dog.ts. This file will play (no space in it’s name).
The file folder name does not matter since the SR4 will recognize it as a file folder. However it is a
good idea to name it using 8 characters or less. Copy the audio/video files that you want to play using
the SR4 digital input into this folder. You do not have to re-name the audio/video files. Remember DO
NOT USE MAC to copy these files.
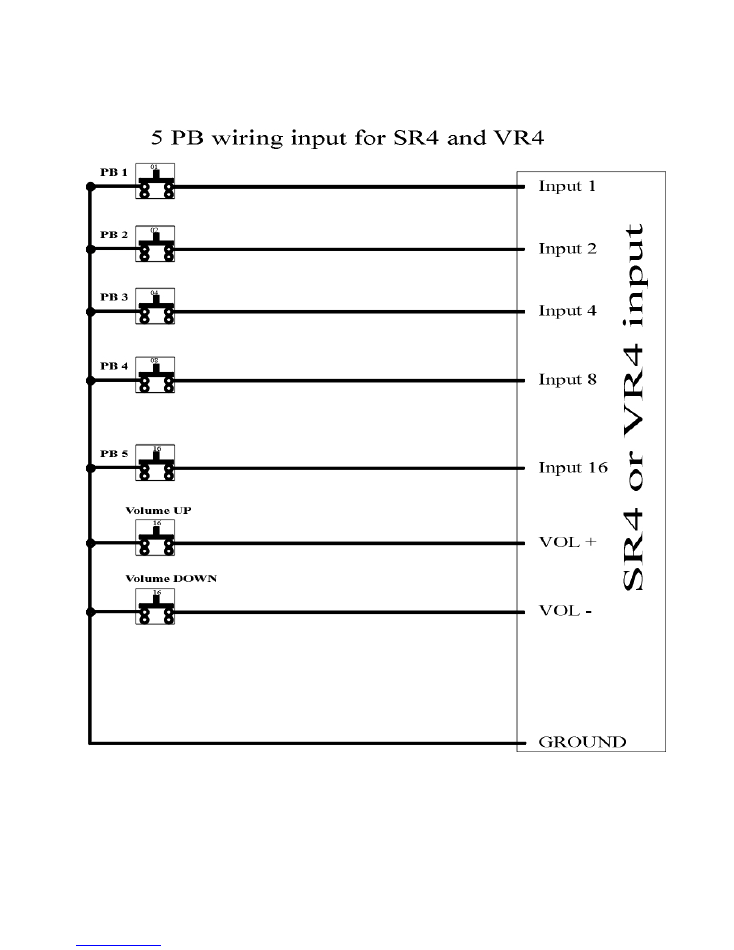
SR4 INPUT:
The SR4 has
5 inputs that can be used to play a audio/video file.
These inputs are configured as
binary. The 5 inputs are IN1, IN2, IN4, IN8 and IN16.
HOW to trigger an INPUT:
To trigger input 1,2,4,8,or 16, short it momentarily to ground.
To trigger input 3, short both 1 and 2 momentarily to ground.
To trigger input 5, short both 1 and 4 momentarily to ground.
To trigger input 6, short both 2 and 4 momentarily to ground.
To trigger input 9, short both 1 and 8 momentarily to ground.
To trigger input 10, short both 2 and 8 momentarily to ground.
To trigger input 12, short both 4 and 8 momentarily to ground.
To trigger input 17, short both 1 and 16 momentarily to ground.
To trigger input 18, short both 2 and 16 momentarily to ground.
To trigger input 20, short both 4 and 16 momentarily to ground.
To trigger input 24, short both 8 and 16 momentarily to ground.
The above single and 2 input combination (total 15 inputs) can be triggered directly using
the push
button that is available from our web site.
To trigger 3 or more input combination at once, you have
to use a diode network.
HAND HELD IR UNIT:
The Hand held IR unit is identical to a DVD remote control. It has functions similar to a DVD such as
Forward, Rev, Step, Pause, Stop, A-B etc. The IR hand held unit can also be used to bring up the Main
Menu. Use the arrow UP/Down and Left/Right keys to navigate the menu. From this main menu you
can access and modify SR4 settings. From the main menu you can change various Audio setting,
Audio/video setting and other preferences.
Please note that the play list will override this setting after powering up.
The Hand held IR unit can be used to trigger SR4 input. Use this to test your play list program.
Example:
To trigger SR4’s input 1, press key 1.
To trigger SR4’s input 2, press key 2.
To trigger SR4’s input 16, press keys 1 and 6.

playlist.txt:
NOTE: name playlist.txt using lower case letters. Do not use capital letters. This file is required
only if you want to play video using push buttons.
The playlist.txt is a file that relates (lists) video files to certain inputs. The purpose of this playlist is to
create “software input” so that each file can be associated with “an input”. Create playlist.txt using any
text editor such as Notepad, Wordpad, MS Word etc.
If using NOTEPAD, save the file as follows:
Use your cursor and Go to FILE
Go to SAVE AS
Choose the location on your hard drive
In the File name column type lower case only:
playlist
Important: DO NOT type playlist.txt, type playlist only
All letters in lower case only.
Save as type: Text Documents (*.txt)
Encoding: ANSI and save the file.
If using WORDPAD, save the file as follows:
Use your cursor and Go to FILE
Go to SAVE AS.
Choose the location on your hard drive
In the File name column type lower case only:
playlist
Important: DO NOT type playlist.txt, type playlist only
All letters in lower case only.
Save as type: Text Documents and save the file.
If using MSWORD, save the file as follows:
Use your cursor and Go to FILE
Go to SAVE AS
Choose the location on your hard drive
In the File name column type lower case only:
playlist
Important: DO NOT type playlist.txt, type playlist only
All letters in lower case only.
Save as type: Text only (*.txt
And save the file.
Here is an example of a playlist.txt:
playlist.txt:
ADDRESS=08
VOLUME=06
V-ADJUST=04
PLAYMODE=SINGLE
VIDEO=VGA
And here is the explanation of the modes:
playlist.txt:
ADDRESS=08
This unit serial address is 08.
VOLUME=06 (range is 0 to 16)
Smart volume setting, this unit volume is 06. If Volume is not specified in the Playlist.txt, use
the previous volume setting. Volume is 1 to 16.

V-ADJUST=04 (range is 0 to 16)
This unit volume adjustment is 04. If the volume is 6 and V-Adjust is 4, then the lowest volume
setting is 2 and maximum volume setting is 10.
PLAYMODE = REPEAT or SINGLE
If PLAYMODE=REPEAT, Loop files after powering up. SR4 will loop the files in the root
directory.
If PLAYMODE = SINGLE, Play the files in the root after powering up and then stop.
VIDEO=VGA or VIDEO=CVBS
If VIDEO=VGA, the VGA output is active.
Use this statement if you are using the VGA oitput.
If VIDEO=CVBS then both Composite and S Video outputs are active.
Use this statement if you are using eother the CVBS (composite) or S Video out.
INPUT DEFINITION in PLAYLIST.TXT:
Each input is define by using a six number system. Here is the example of the six number system:
SIX NUMBER DEFINITION:
First and second numbers are for input.
Third number is not used.
Fourth number is for interrupt.
Fifth and sixth numbers are for what to do OR where to go after playing a file.
First and second numbers are for input.
Example:
010199=Dog.mp3
Input 1 plays dog.mp3.
020120=bird.mp3
Input 2 plays bird.mp3.
030197=Cat.mp3
Input 3 plays cat.mp3
Third number is NOT USED.
Fourth number is for interrupt.
Fourth number:
if
0
play the file with
interrupt
if
1
play the file
NO interrupt
.
Example:
010199= Dog.mp3
Play this file with NO interrupt.
020020=bird.mp3
Play this file with interrupt.
030197=Cat.mp3
Play this file with NO interrupt
Fifth and sixth numbers are for “what to do” OR “where to go” after
playing a file.
Example:
010120=bird.mp3 (jump to an input after playing the file, in this case jump to input
20).
01
: First and second number is the input. Input 01 plays bird.mp3
0
: Third number: Not used.

1
: Fourth number: if
0
play the file with
interrupt
if
1
play the file
NO interrupt
.
Fifth and Sixth number
20
is for Jump to input OR one of the special functions below. In this case
jump to Input20.
SPECIAL FUNCTIONS for fifth and sixth number.
Numbers: 00, 99,98,97,96,95 and 94.
CODE 00, return to home position after playing a file
011000=cats.mp3
RETURN TO HOME POSITION after playing a file.
Fifth and Sixth number is NUMBER 00 :
Number 00 is for Home position, eg. 0110
00
=cats.mp3.
After finish playing cats.mp3ob, go to home position (root).
CODE99, stop after playing and wait for another input.
011099=cats.mp3
STOP after playing a file and WAIT for Input.
Fifth and Sixth number is NUMBER 99 :
Number 99 is for Stop after playing a file and wait for input. eg. 0110
99
=cats.mp3
Stop after playing cats.mp3 and wait for another input.
CODE98, Loop this file.
011098=cats.mp3
LOOP this file.
Fifth and Sixth number is NUMBER 98 :
Number 98 is for Loop playing. eg. 0110
98
=cats.mp3
Loop file cats.mp3.
CODE97, sequentially play next file when triggered.
011097=cats.mp3
STOP after playing a file and WAIT for Input. Play the NEXT file if the same input is
triggered.
Fifth and Sixth number is NUMBER 97 :
Number
97
is for Stop after playing a file and wait for input. If the same input is triggered
again, then play the next file on the list.
eg. 0110
97=
cats.mp3
0100
97=
Lion.mp3
0100
97=
Dog.mp3
Stop after playing Cats.mp3 and wait for another input. If input 1 is triggered again, then play
Lion.mp3 and wait for another input. If input 1 is triggered again, then play Dog.mp3 and wait
for another input.
If input 1 is triggered again, then return to play Cats.mp3 again and wait for another input.
NOTE:
This function (97) only works after the file stops playing. If the same input is triggered
while playing, then it will simply repeat the same file.

CODE96, automatically play next file.
010096=lion.mp3
AUTO PLAY the NEXT line inside a file folder.
Fifth and Sixth number is NUMBER 96 :
Number
96
is to auto play the next file.
0100
96=
lion.mp3
0100
96=
bird.mp3
0100
96=
horse.mp3
If input 01 is triggered lion.mp3, bird.mp3 and horse.mp3 will automatically play.
CODE95, Audio/Audio/video on Hold (root directory).
This function will pause audio or audio/video file being played at the root directory, play the
input and then return to continue playing the paused audio/video.
EXAMPLE:
Intro1.mp3 ….
This file is in the root directory
010095=dog1.mp3 …..
this file is inside a file folder
Example: 010095=dog1.mp3
Suppose Intro1.mp3 is now being played in the root directory.
If input 1 is triggered, the player will PAUSE Intro1.mp3 and immediately play Dog1.mp3
After finish playing Dog1.mp3, player will resume playing Intro1.mp3 from the paused
position, not from the start.
APPLICATION EXAMPLE:
Example 1:
F:\
Cats.mp3
Playlist.txt
TEST:\ (note: this is a File folder)
Bird.mp3
And below is the content of the Playlist.txt:
PLAYLIST.TXT
ADDRESS=0
VOLUME=08
V-ADJUST=04
PLAYMODE=REPEAT
010000=Bird.mp3
Explanation of example 1:
After powering up, the SR4 will loop Cats.mp3.
Volume setting is 08. The volume adjustment is 04, so minimum vol is 4 (8-4) and max vol is 12
(8+4).
If input 1 is triggered, Bird.mp3 will play. After playing SR4 will return to home position and loop.
Example 2:
F:\
Cats.mp3
Playlist.txt
TEST:\ (note: this is a File folder)
Bird1.mp3
Bird 2.mp3

Bird 3.mp3
Bird 4.mp3
Bird5.mp3
Bird6.mp3
Bird7.mp3
Bird8.mp3
Bird9.mp3
Silent05.mp3
And below is the content of the Playlist.txt:
playlist.txt
ADDRESS=0
VIDEO=VGA
VOLUME=06
V-ADJUST=04
PLAYMODE=REPEAT
010000=Silent05.mp3
020000=Bird1.mp3
030000=Bird2.mp3
040000= Bird3.mp3
050097=Bird4.mp3
050097=Bird5.mp3
050000=Bird6.mp3
060099=Bird7.mp3
080020= Bird8.mp3
200000= Bird9mp3
Explanation of the example 2:
After powering up, the SR4 will loop Cats.mp3.
Volume setting is 06. The volume adjustment is 04, so minimum vol is 2 (6-4) and max vol is 10
(6+4).
If input 2 is triggered, Bird1.mp3 will play. After playing SR4 will return to home position and loop
Cats.mp3.
If input 3 is triggered, Bird2.mp3 will play. After playing SR4 will return to home position and loop
Cats.mp3.
If input 4 is triggered, Bird3.mp3 will play. After playing SR4 will return to home position and loop
Cats.mp3.
If input 5 is triggered, Bird4.mp3 will play. After playing SR4 will stop and wait for an input.
If input 5 is triggered, Bird5.mp3 will play. After playing SR4 will stop and wait for an input.
If input 5 is triggered, Bird6.mp3 will play. After playing SR4 will return to home position and loop
Cats.mp3.
If input 6 is triggered, Bird7.mp3 will play. After playing SR4 will wait for another input.
If input 86 is triggered, Bird 8.mp3 will play. After finish playing it will jump to IN20 (200000) and
play Bird9.mp3. After finish playing Bird9.mp3, SR4 will return and loop Cats.mp3. again.
While playing any of the above audio (audio inside file folder TEST), if Input 1 is triggered a short
dark screen will appear momentarily and immediately return to root directory. It will continue playing
Cats.mp3 from the last known position (not from start).
For testing, download either SR4 or VR4 Test files from our website
www.akman.com.
It is listed under product support, Test CF card files.

RS485 port:
The RS485 port is a bi-directional port. It uses RJ12 cable to communicate with the SR4.
RJ12 cable is a 6 conductor (wire), 2 station telephone OR Modem cable.
This cable has 6 wires
(NOT 4 wires) with 2 telephone plugs, one on each end. The RJ12 cable is a crossed wire cable.
This means that one of the telephone plug is a reversed image of the other telephone plug. Pin 1 on one
of the plug is pin 6 on the other plug.
To test that the wires are crossed, do the following: Place each plug facing each other and look at the
color of the wires. If the colors of the wires match, then the wires are crossed. This 2 station
telephone/Modem cable is available from Wal_Mart, Radio Shack etc. Or you can build it yourself
using a bulk telephone cable, RJ12 plugs and the crimping tool.
RS485 Communication protocol:
The SR4 can play through the RS485 port. The setting is 9600 baud, 8 bit, N, 1 stop bit.
Using the RS485 port, you can control the playback from a PC or other micro controller, The RS485
command is @0:xx, where xx is the input in the
autoplay.txt
OR IR command.
Example:
To trigger 020099=Bird.mp3, the command is: @0:2
To trigger 150000=lion.mp3, the command is: @0:15
For IR function PAUSE, the command is @0:PAUSE
For IR function STOP, the command is @0:STOP
For IR function NEXT, the command is @0:NEXT etc.
The IR command is exactly as written on the IR remote keys.
IN6 INPUT BOARD:
The IN6 input board does not require power supply. The 12 vdc power comes from the RS485 port. If
you are using a single IN6 board, use the RJ12 cable to connect the IN side of the RS485 port of the
IN6 board into the SR4’s RS485 port.
If you are using 2 or more IN6 input boards:
Using the RJ12 cable, connect one end into the SR4 and the other end into the IN port of the IN6. To
connect the second IN6 board, use the RJ12 to connect the OUT port of the first IN6 board into the IN
port of the second IN6 board. Make sure to set the IN6 board address correctly.
To connect the third IN6 board, use the RJ12 to connect the OUT port of the second IN6 board into the
IN port of the third IN6 board. Make sure to set the IN6 board address correctly.
To connect the fourth IN6 board, use the RJ12 to connect the OUT port of the third IN6 board into the
IN port of the fourth IN6 board. Make sure to set the IN6 board address correctly.
IN6 INPUT BOARD SETTING:
IN6 board has 2 settings, Normal and IR mode settings.
The setting is determined by JP1 and is indicated by LED #1. To set JP1, remove the top cover and
use the shorting bar either to connect (ON) or disconnect (OFF) JP1.
The setting is as followed:
JP1 is OFF ……. IN6 board is in normal mode.
JP1 is ON …….. IN6 is in IR mode.
IN6 BOARD ADDRESS:
Each board can be set for a board address 1,2,3 OR 4. To set the address, remove the top cover. Locate
jumpers JP2, Jp3 and JP4 behind LED’s D13, D14 and D15.
If JP2, JP3 and JP4 are OFF (no jumper), the board address is 0.
If only JP2 is ON (shorted) board address is 1.

If only JP3 is ON (shorted) board address is 2.
If only JP4 is ON (shorted) board address is 4.
If JP2, JP3 and JP4 are all ON (shorted), the board address is 7.
After powering up, one of the LED will be on to indicate the board address.
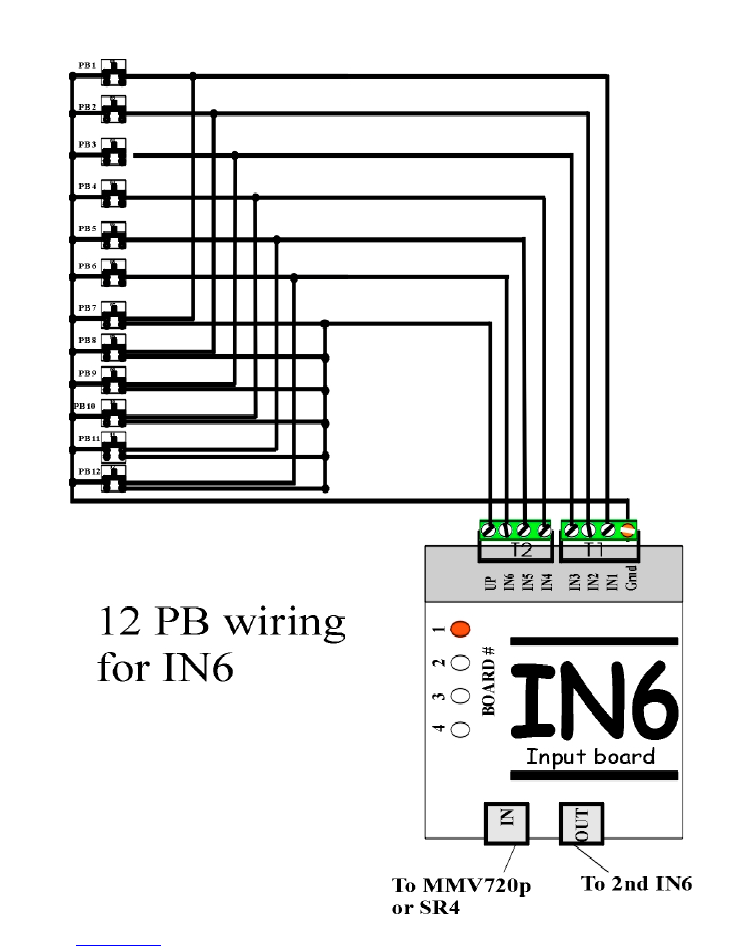
HOW TO CONNECT PUSH BUTTONS INTO THE IN6 BOARD:
For wiring diagram please visit out web site and download the IN6 wiring diagram.
The input board has 1 ground terminal, 6 input terminals and 1 UP terminal. There are a total of 8
terminals. Facing the green terminals from left to right:
The first terminal is GROUND.
IN1 is the
second terminal
. To trigger input #1, momentarily short IN1 to ground. Line
0100xx=xxx.mp3 in the autoplay.txt will play.
IN2 is the
third terminal
. To trigger input #2, momentarily short IN2 to ground. Line
0200xx=xxx.mp3 in the autoplay.txt will play.
IN3 is the
fourth terminal
. To trigger input #3, momentarily short IN3 to ground. Line
0300xx=xxx.mp3 in the autoplay.txt will play.
IN4 is the
fifth terminal
. To trigger input #4, momentarily short IN4 to ground. Line
0400xx=xxx.mp3 in the autoplay.txt will play.
IN5 is the
sixth terminal
. To trigger input #5, momentarily short IN5 to ground. Line
0500xx=xxx.mp3 in the autoplay.txt will play.
IN6 is the
seventh terminal
. To trigger input #6, momentarily short IN6 to ground. Line
0600xx=xxx.mp3 in the autoplay.txt will play.
The last terminal is UP. Use this input to trigger IN7 to IN12 as follows:
To trigger input #7, momentarily short IN1 and UP together to ground. 07 in the autoplay.txt will play.
To trigger input #8, momentarily short IN2 and UP together to ground. 08 in the autoplay.txt will play.
To trigger input #9, momentarily short IN3 and UP together to ground. 09 in the autoplay.txt will play.
To trigger input #10, momentarily short IN4 and UP together to ground. 10 in the autoplay.txt will
play.
To trigger input #11, momentarily short IN5 and UP together to ground. 11 in the autoplay.txt will
play.
To trigger input #12, momentarily short IN6 and UP together to ground. 12 in the autoplay.txt will
play.
STD MODE, IN6 INPUT BOARD OPERATION:
Set JP1 to OFF (no shorting bar). When an input is triggered, the IN6 board will send a command to
the SR4 to play the same input as listed in the autoplay.
Example:
If input 1 is triggered, the IN6 will send an instruction to the SR4 to play line 01 in the
autoplay.txt.
If input 3 is triggered, then In6 will send a command to the SR4 to play line 03 in the
autoplay.txt.
If input 12 is triggered, then In6 will send a command to the SR4 to play line 12 in the
autoplay.txt.
IR MODE, IN6 INPUT BOARD OPERATION:
If JP1 to ON
(shorting bar is ON), then the IN6 input will become an IR input and send the following
IR commands to SR4 when triggered:
IN1 is now NEXT.
IN2 is now Prev. (Previous).
IN3 is now STOP.
IN4 is now Pause/Play.

IN5 is now VOL+.
IN6 is now VOL-
UP is now Mute.
SR4 Technical specification:
AUDIO FORMAT:
MP3 audio , stereo only.
Wav audio, stereo only
BIT RATE:
MP3 Maximum audio bit rate is 329kbps.
Wav PCM16bit, maximum bir rate is 48Khz
VIDEO FORMAT:
Video format is:
-
DVD – XXX.VOB video files
-
MPG - Mpeg2 Programmed video files.
-
JPEG – JPG still pictures
BIT RATE:
Maximum video bit rate is 9 Mbps.
VIDEO TYPE:
Std Pixel (4X3) and Wide Screen (16X9).
Wide screen format is encoded as 4X3 using Anamorphic encoding or square (squeezed) Pixel .
VIDEO OUTPUT:
VGA
– 640 X480, Std HD15 connector on board. Does not decode closed caption.
CVBS(Composite)
– 720 X480/576, Std RCA connector. Does not decode closed caption.
S-VIDEO
– 720 X480/576, Std 4 pin DIN S Video connector. Requires VGA to S Video adapter.
COMPACT FLASH CARD:
Any brand Compact flash card. Maximum size is 4 Gigabyte.
AUDIO OUTPUT:
Audio line out is 2 V p/p stereo (adjustable) on 2 RCA jacks.
SPEAKER OUT:
14 Watt nominal, stereo at 8 0hm. Output is available on 4 screw on green terminals.
HEADPHONE OUT:
100 mW, stereo at 36 ohm. Headphone out is available on stereo mini jack.
VOLUME CONTROL INPUT:
2 Digital input to control Vol UP and Vol Down. To trigger short the input momentarily to ground.
Volume control and adjustment range is adjustable via playlist.
DIGITAL INPUT:
5 digital inputs are in binary mode. To activate input 1,2,4,8,and 16, short it momentarily to ground. To
activate other input, short 2 or more inputs to ground.

SERIAL INPUT/OUTPUT:
Serial port is RS485 bi-directional for connection to optional IN6 input board and RL4 relay output
board. You can connect up to 8 IN6 board and up to 4 RL4 board.
MOTION DETECTOR PORT:
For direct connection into a motion detector. This motion detector input is input 32 in the playlist.
Output port is RJ12, std 6 wire telephone jack. Pin1 is 12Vdc, Pin2 is Input32. Pin3 and 4 are Ground.
ENCLOSURE SR4:
Aluminum enclosure (desktop), 6” W X 4.25” D X 1.3” H.
Weight is approximately 1.3 lbs.
UPS/Fedex shipping weight with Power Supply & cord is 3 lbs.
Optional: NEMA (weatherproof) enclosure for outdoor application is also available.
Power supply SR4:
120 – 240VAC Universal switching power supply complete with a detachable PC style power cord.
Power output is 12VDC, 30 watt.
When using custom power supply, maximum power input is 12.5VDC. Use switching power supply
only.
Please consult us before using any custom power supply.
For technical support contact:
Akman Inc
Tel: (407) 948 0562 & (407) 847 3998
Fax: (321) 459 1086
Web site: http://
www.akman.com