Full Text Searchable PDF User Manual
Heart Rate Monitor
User Manual

Heart Rate Monitor
General Information
AFTER SALES SUPPORT
service@produktservice.info / www.produktservice.info
1-800-493-9137
2
Imprint / Editor of the user manual
Krippl-Watches, Warenhandels GmbH, Maria-Theresia-Str. 41, A-4600 Wels, Austria
Tel. ++43/7242/52323, Email: krippl@krippl-watches.com, www.krippl-watches.com
Product description
Heart Rate Monitor
Model No.
AU4-PU-4A/4B/4C/4D
Importer
Krippl-Watches Warenhandels GmbH, Maria-Theresia-Str. 41, A-4600 Wels, Austria
PRODUCT COMPONENTS / SCOPE OF DELIVERY
1 heart rate monitor
Model no. AU4-PU-4A (4B/4C/4D) (Type HRM-F68-BA)
Incl. 1 x 3 V CR2032 battery (lithium button cell), already inserted
1 chest strap
Model no. AU4-PU-4 (Type TH-S4-LF)
Incl. 1 x 3 V CR2032 battery (lithium button cell), already inserted
1 bike mounting bracket
1 user manual with warranty card and warranty conditions
TABLE OF CONTENTS
1.
GENERAL INFORMATION.............................................................................. 3
2.
SAFETY AND SERVICING.............................................................................. 3
Batteries .................................................................................................. 4
2.1
Operational Environment Conditions ....................................................... 4
2.2
Water Resistance .................................................................................... 4
2.3
Disposal .................................................................................................. 5
2.4
Maintenance ............................................................................................ 5
2.5
Cleaning and Care .................................................................................. 5
2.6
Storage .................................................................................................... 6
2.7
Notes on operating instructions ............................................................... 6
2.8
3.
FUNCTION KEYS OF THE HEART RATE MONITOR .................................... 6
4.
START-UP – BEFORE STARTING ................................................................. 6
Function keys of the heart rate monitor ................................................... 6
4.1
Chest strap .............................................................................................. 7
4.2
5.
MAIN FUNCTIONAL MODES .......................................................................... 7
Basic, Normal or Profi mode ................................................................... 7
5.1

Heart Rate Monitor
General Information
AFTER SALES SUPPORT
service@produktservice.info / www.produktservice.info
1-800-493-9137
3
Time mode .............................................................................................. 9
5.2
Heart rate mode .................................................................................... 10
5.3
Stopwatch mode.................................................................................... 17
5.4
Countdown mode .................................................................................. 18
5.5
Alarm Mode ........................................................................................... 18
5.6
Display light ........................................................................................... 19
5.7
Technical data ....................................................................................... 19
5.8
Battery Change ..................................................................................... 20
5.9
Conformity ............................................................................................. 21
5.10
6.
TROUBLESHOOTING/FAQS ........................................................................ 21
7.
CONTACT DATA ........................................................................................... 23
1. GENERAL INFORMATION
Please read and follow this user manual carefully before using your heart rate
monitor.
Area of Application
The heart rate monitor is usable as a wristwatch. In addition to this, it can be used as
a training aid for monitoring and displaying your heart rate. It is designed for private
purposes and is not suitable for commercial purposes. The heart rate monitor is not a
medical device. Please read these operating instructions, in order to familiarise
yourself with all of the options for your heart rate monitor and ensure faultless
function. All data quoted are only nominal values. Subject to technical modifications.
2. SAFETY AND SERVICING
Please read the safety instructions carefully and only use the heart rate monitor as
described in these instructions to avoid accidental injuries or damage. Retain these
instructions for future reference. These instructions should be handed over when
passed on to a new owner.
Important:
Always consult a physician before starting a regular training program.
The heart rate monitor is not a medical device, it is a training tool for monitoring and
displaying your heart rate. Wearers of pacemakers should only use devices for
monitoring heart rate after consulting their doctor.

Heart Rate Monitor
Safety and Servicing
AFTER SALES SUPPORT
service@produktservice.info / www.produktservice.info
1-800-493-9137
4
Note
: This chest strap can contain latex components. In rare cases, allergic reactions
can occur to this substance, in the form of – possibly relatively intensive – skin
irritations and redness. Therefore, if you should even only notice slight redness,
please discontinue using the chest strap immediately. In this case, we recommend
that you see a dermatologist.
Batteries
2.1
Your heart rate monitor runs on a 3 V CR2032 battery.
Below are some directions on the use of batteries:
•
Never expose the batteries to excessive heat such as sunlight, fire or the like -
increased danger of leakage!
•
Never recharge the battery.
•
Do not short-circuit the battery and do not take it apart – explosion hazard!
•
If necessary clean the battery and unit contacts before inserting the battery.
•
Flat batteries should be immediately removed from the device. There is
increased danger of leakage.
•
Remove the battery when the device is not in use for a longer period of time.
•
Caution! There is a risk of explosion, if the battery is not changed correctly. Only
replace the battery with one of the same or similar type.
•
Keep the batteries and heart rate monitor out of reach of children. Batteries can
be swallowed by children. Seek immediate medical attention, if this happens.
•
Avoid contact with skin, eyes and mucous membrane if leakage occurs. Upon
contact with battery acid rinse the affected area with plenty of water and seek
medical help immediately.
Non-compliance with these instructions can lead to damage and under certain
circumstances to explosion of the batteries. Details on how to change the batteries
can be found under Section 5.9 „Battery change“.
Operational Environment Conditions
2.2
The heart rate monitor can be operated continuously at an ambient temperature of 32
°F to 122 °F. The heart rate monitor is protected against shocks, which may occur
during normal wearing on the arm. No evidence of condensation is allowed in a heart
rate monitor as this might trigger a short circuit. The heart rate monitor should
therefore never be exposed to extreme changes in temperature. The unit should
never be placed near very strong magnet fields (e.g. electrical welding equipment,
current transformers) as this could cause variations in the time measurement. Non-
compliance with these directions can result in malfunction or damage of the heart
rate monitor.
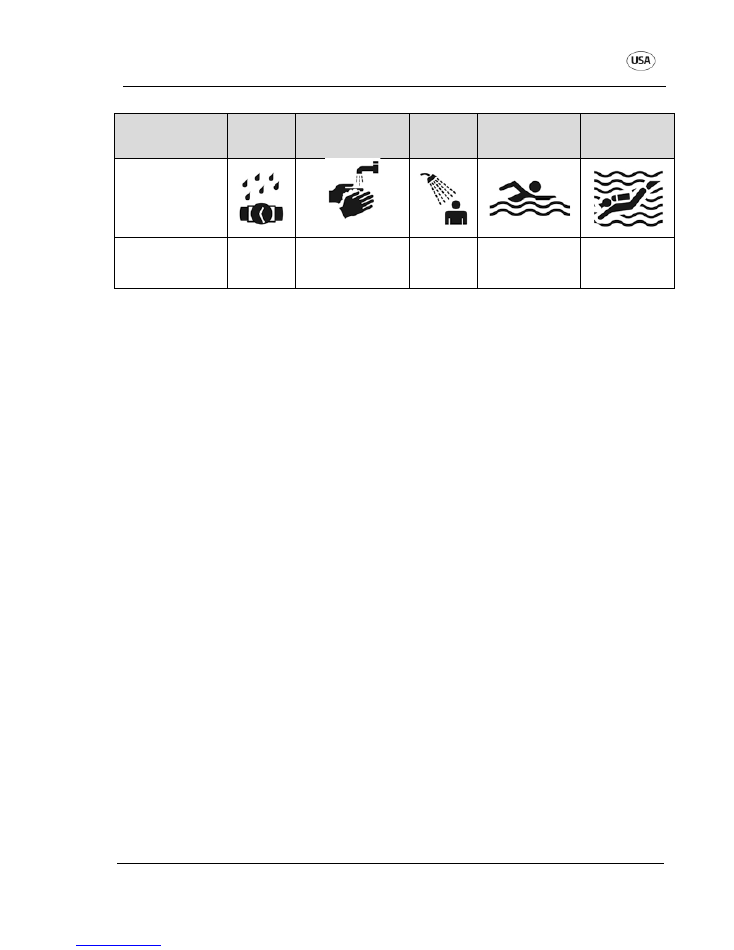
Water Resistance
2.3
The heart rate monitor and its chest strap are water-resistant up to 98 feet. In the
table below, you can see the activities and conditions for which the heart rate
monitor is suitable. The details are based on a test of water-resistance according to
DIN 8310.
Heart Rate Monitor
Safety and Servicing
AFTER SALES SUPPORT
service@produktservice.info / www.produktservice.info
1-800-493-9137
5
Rain,
Spray
Washing hands Shower
Bathing,
Swimming
Water sport
up to 98 feet
water resistant
Yes
Yes, do not
immerse the
watch in water!
No
No
No
Make sure that you do not use the keys when the watch is wet. Water can only
penetrate the housing and damage the movement through the keys. Please note
that salt water and thermal water can lead to corrosion of metal parts.
Please note that with extreme temperature differences (e.g. from the sauna into the
pool, from sunbathing into the cold sea), the water-resistance cannot be guaranteed.
Condensation can form as a result of the temperature differences and thereby
damage the movement.
In order to ensure the water-resistance of your heart rate monitor, battery
replacement should be carried out by a watch specialist, in order to avoid damage to
the seal ring and housing.
Disposal
2.4
Dispose of the packaging in the proper manner. Batteries need to be properly
disposed of. For this purpose, shops selling batteries provide special containers for
environmentally-friendly disposal. Furthermore, empty batteries will be taken back at
public waste collection points. Should you wish to dispose of the article, do so in
accordance with the latest provisions. Details are available from your local authority.
Maintenance
2.5
The heart rate monitor and chest strap do not contain and parts that require
maintenance. However, we recommend that you clean the sensor surfaces of the
chest strap after or prior to each use.
Cleaning and Care
2.6
Use only a soft, damp, lint-free cloth to clean the heart rate monitor and the chest
strap. Do not use solvents, abrasive or gaseous cleaning materials. Ensure that all
water droplets are removed from the display. Water can cause permanent
discolouration. Ensure that the heart rate monitor display is not exposed to glaring
sunlight or ultraviolet rays.
Heart Rate Monitor
Function Keys of the heart rate monitor
AFTER SALES SUPPORT
service@produktservice.info / www.produktservice.info
1-800-493-9137
6
Storage
2.7
Store the heart rate monitor and chest strap in a cool and dry place. Once the battery
has been removed, the heart rate monitor can be stored at 32 °F to 104 °F.
Notes on operating instructions
2.8
We have structured the operating instructions for this heart rate monitor in such a
way that you can always find the information you require using the themed topics in
the table of contents.
Additionally, you can refer to the FAQ section on our online product service page for
further help with your heart rate monitor.
http://www.produktservice.info EAN Code: 20015152
3. FUNCTION KEYS OF THE HEART RATE MONITOR
4. START-UP – BEFORE STARTING
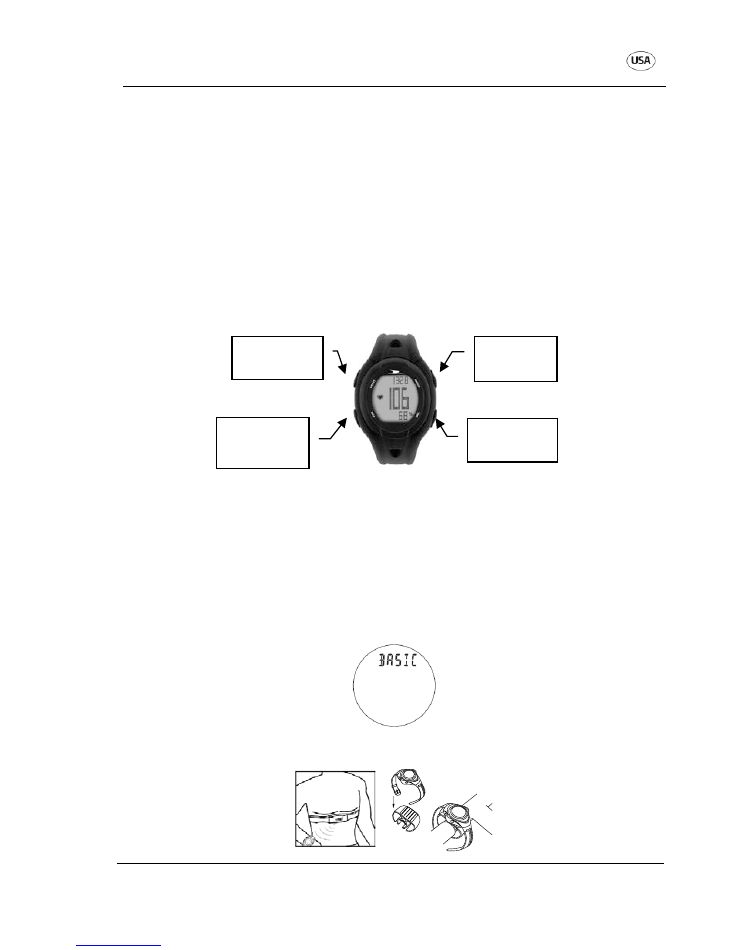
Function keys of the heart rate monitor
4.1
If you intend to start the heart rate monitor for the first time, please remove the
protective film from the display and press any key, until all segments are briefly
displayed, after this “BASIS” will flash in the display. At this point, we recommend
confirming the basic mode by pressing the “SET” key or “MODE” key. Later (see
point 5.1 “Basic, Normal or Profi mode”), you can select the required mode and carry
out other settings.
The heart rate monitor can be worn like a watch or be attached to the handlebars of
your bicycle using the supplied bracket.
“LIGHT”
key
“SEL”
key
“MODE”
key
“SET”
key

Heart Rate Monitor
Main functional modes
AFTER SALES SUPPORT
service@produktservice.info / www.produktservice.info
1-800-493-9137
7
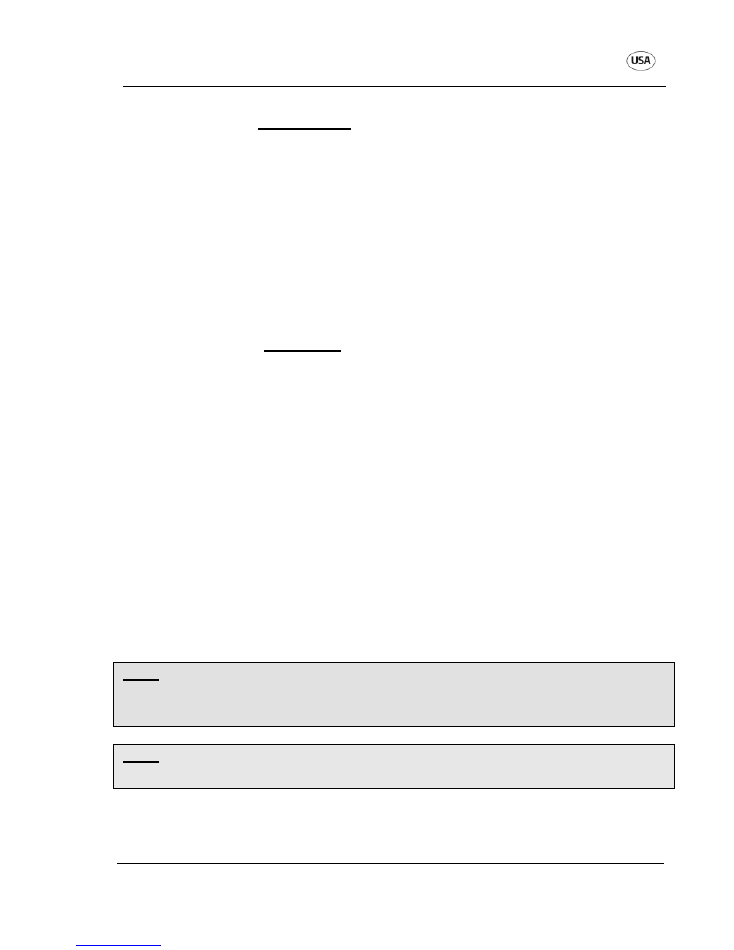
Chest strap
4.2
Connect the strap to the sensor.
Set the elastic strap so that the sensor is
securely next to the chest, below the
chest muscles.
In order to ensure good contact with the skin, you need to moisten the contacts of the
sensor or use EEG gel (available in medical specialist shops).
5. MAIN FUNCTIONAL MODES
Basic, Normal or Profi mode
5.1
The heart rate monitor has a Basic, Normal and Profi mode, which are mainly
differentiated by the number of available functions:
•
In the Basic mode, only the heart rate mode is available with the display of the
stop watch. The “MODE” and “SEL” key do not work in this mode.
•
In the Normal mode, only the time mode and the heart rate mode are available,
with the displays, time, stopwatch and training zone.
•
In Profi mode, all of the following modes and displays are available.
Selection of Basic, Normal or Profi mode
Keep the “LIGHT” key pressed, “BASIC”, “NORMAL” or “PRO” flashes for the
currently selected mode. Now, press the “SEL” key, in order to select between Basic,
Normal and Profi mode.
Confirm with the “SET” key, if you want to go through the setup mode (input langue,
time and personal data).
Confirm with the “MODE” key to skip right to the selected mode.
In
Basic mode
, no basic settings are required by the user. The heart rate monitor
uses default values.
Heart Rate Monitor
Main functional modes
AFTER SALES SUPPORT
service@produktservice.info / www.produktservice.info
1-800-493-9137
8
With the selection of
Normal mode
, several user-defined settings need to be carried
out in the following order:
•
Language (English/German)
•
12/24 hour display (12/24)
•
Set the time and date
•
Date of birth (year, month, day)
•
Gender (male/female)
•
maximum heart rate (value from 80 to 240)
For these, settings, with the selection of Normal mode, the following applies:
•
“SEL” key – set/select value
•
“SET” key – confirm value
With the selection of
Profi mode
, several user-defined settings need to be carried
out in the following order:
•
Language (English/German)
•
12/24 hour display (12/24)
•
Set the time and date
•
Date of birth (year, month, day)
•
(If you were born prior to 1950, simply increase the year beyond 2011 and the
counter will start again at 1900.)
•
Gender (male/female)
•
Maximum heart rate (value from 80 to 240)
•
Unit (kilogram/pound)
•
Weight (value from 20 to 199 kg / 40 to 439 pounds)
•
LED indicator (on/off)
•
Key sounds (on/off)
For these settings, with the selection of Profi mode, the following applies:
•
“SEL” key – set/select value
•
“SET” key – confirm value
Note:
If you intend to change settings later, such as language or date of birth, keep
the “LIGHT” key pressed and select the Normal or Profi mode. You will reach the
basic settings again, as described above.
Note:
By pressing and holding the “SEL” key, you can use the fast-forward function
for settings.
Heart Rate Monitor
Main functional modes
AFTER SALES SUPPORT
service@produktservice.info / www.produktservice.info
1-800-493-9137
9
In Profi mode, there are
five main function modes
available, which are described in
more detail in the following chapters:
-
Time mode
-
Heart rate mode
-
Stopwatch mode
-
Countdown mode
-
Alarm mode
Press the “MODE” key, in order to switch between the different modes. The individual
modes are described in point 5.2 to point 5.6
Please note that all of the modes and functions described below are only
available in Profi mode, as described in the information box at the beginning of
this point.
Time mode
5.2
Press the “MODE” key repeatedly until you are in the time mode (displayed by “ZEIT”
/ “TIME”).
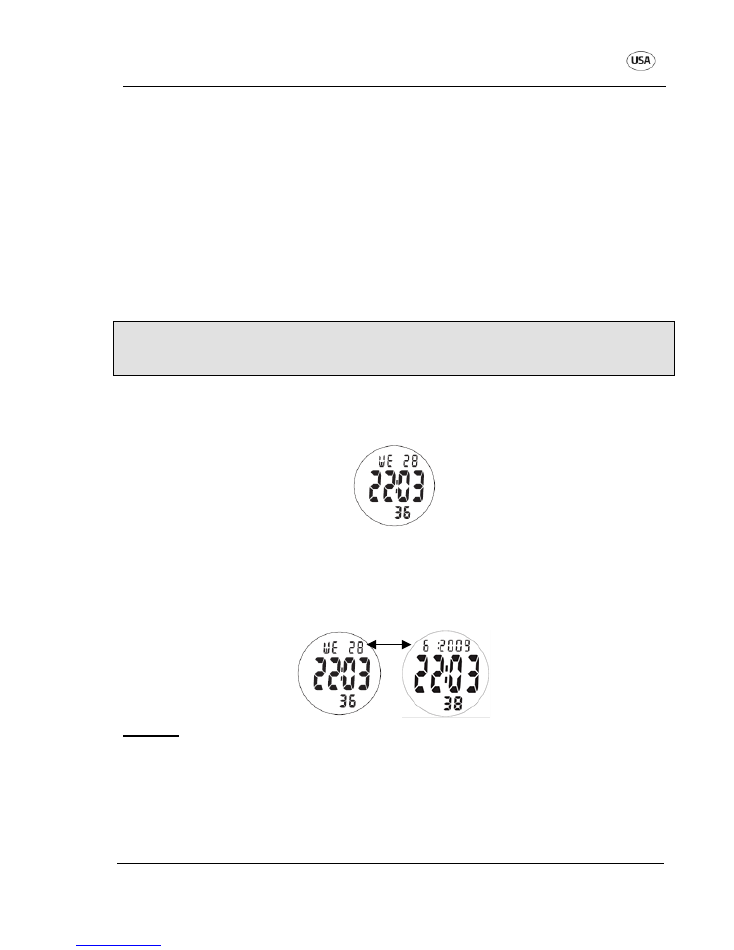
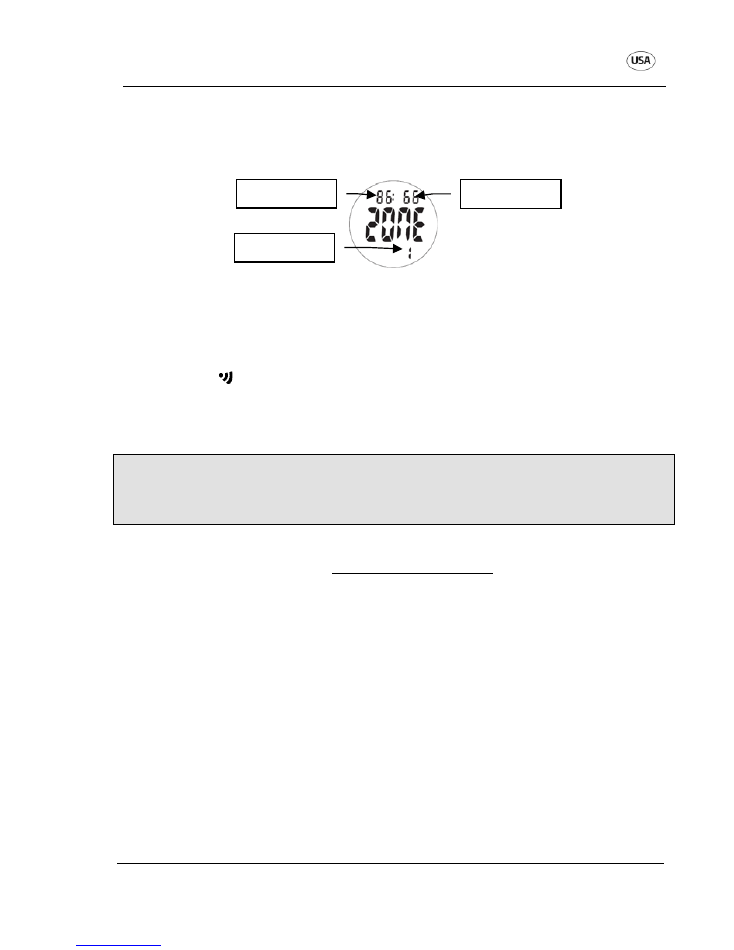
In time mode, the day of the week and date are shown in the top display segment,
the hours and minutes in the middle section and the seconds in the bottom section.
Press the “SEL” key in order to change the display in the top segment from “day of
the week and date” to “month and year”. After 5 seconds – or when you press the
“SEL” key – the display returns to the “day of week and date” view again.
Set time
•
Keep the “SET” key pressed for approx. 3 seconds. Use the “SEL” key to select
between the 12-hour and 24-hour display. Confirm your selection with the “SET”
key, the hours will flash.
•
Set the hours with the “SEL” key and confirm with the “SET” key, the minutes will
flash.
•
Set the minutes with the “SEL” key and confirm with the “SET” key, the seconds
will flash.
Heart Rate Monitor
Main functional modes
AFTER SALES SUPPORT
service@produktservice.info / www.produktservice.info
1-800-493-9137
10
•
Press the “SEL” key in order to set the seconds to zero. Confirm with the “SET”
key, the year will flash.
•
Set the year with the “SEL” key and confirm with the “SET” key. Set the month
and date in the same way. Now, press the “MODE” key, all settings are saved.
Note:
By pressing and holding the “SEL” key, you can use the fast-forward function
for settings.
Note:
In order to correct any incorrect entries, start the relevant setting process over
again.
Heart rate mode
5.3
Press the “MODE” key repeatedly until you are in the heart rate mode (displayed by
“PULS” / “PULSE”).
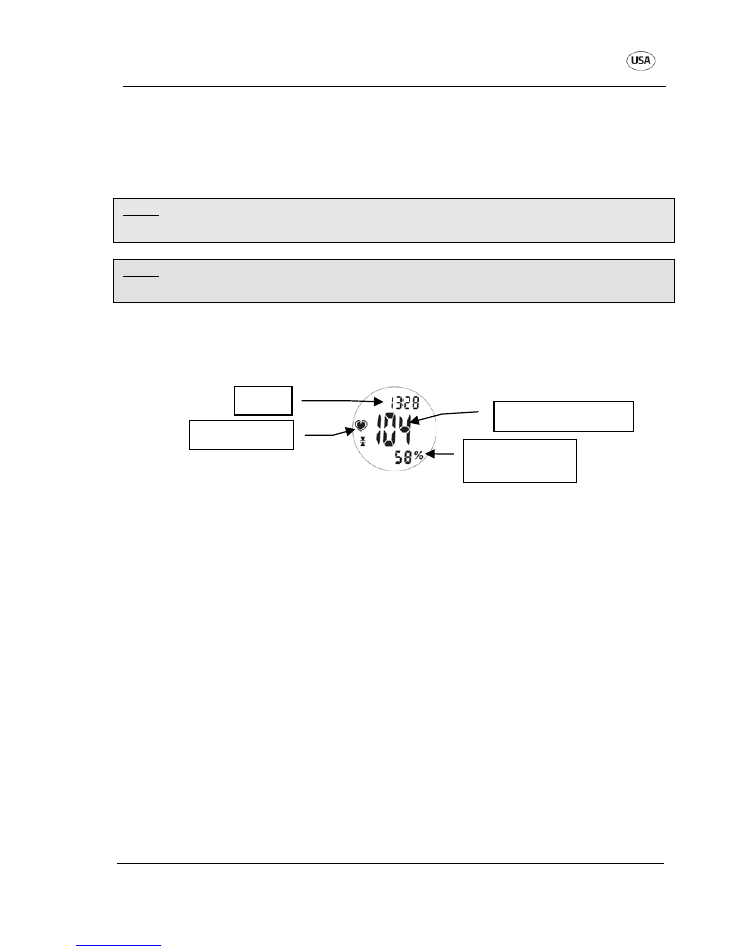
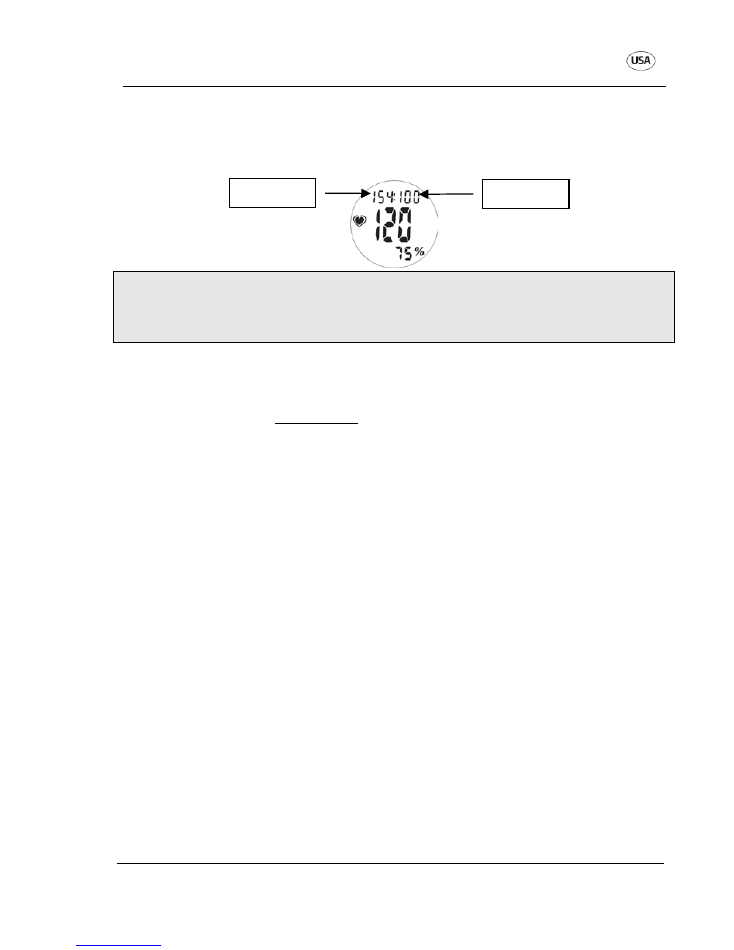
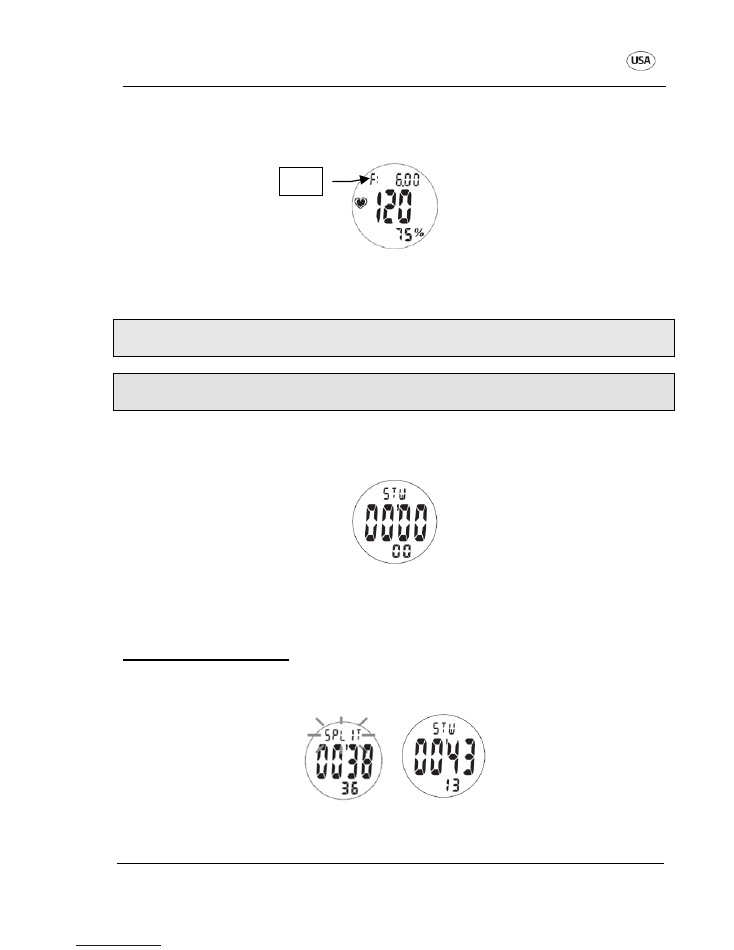
In heart rate mode, the time is shown in the top display segment, the current heart
rate in the middle segment and the % of maximum heart rate in the bottom segment
The maximum heart rate is calculated automatically be entering the personal details,
such as date of birth and weight. If these details have not been entered, the watch
reverts to the default values.
The maximum heart rate can also be entered manually in Normal and Profi mode,
see point 5.1 “Basic, Normal or Profi mode” / point 5.3.4 “Training zones”.
Press the “SEL” key in order to switch between the following sub-functions in for the
display in the top segment (in this order):
•
Time
•
Stopwatch (training timer)
•
Time within/above/below training zone
(switch displays by pressing the “SET” key)
•
Memory
•
Training zones
•
Fitness level
•
Calories
•
Fat
Time
Current heart rate
% of maximum
heart rate
Heart symbol
Heart Rate Monitor
Main functional modes
AFTER SALES SUPPORT
service@produktservice.info / www.produktservice.info
1-800-493-9137
11
When the chest strap is being worn, the current heart rate in the middle display
segment is shown. Otherwise, “—“ is shown. The heart symbol flashes if the heart
rate is being received by the chest strap. If no signal is received anymore, the heart
symbol stops flashing and the last heart rate remains in the display.
Caution:
If the watch should not receive any heart rate in Basic mode within the first
two minutes, the black bars “
—“
will stop flashing. In this case, please check the
placement of your chest strap and moisten the contact surfaces. Then, please press
the “MODE” key, in order to restart the search for the chest strap signal.
Caution:
All of the sub-functions described below only work with the chest strap
attached.
5.3.1
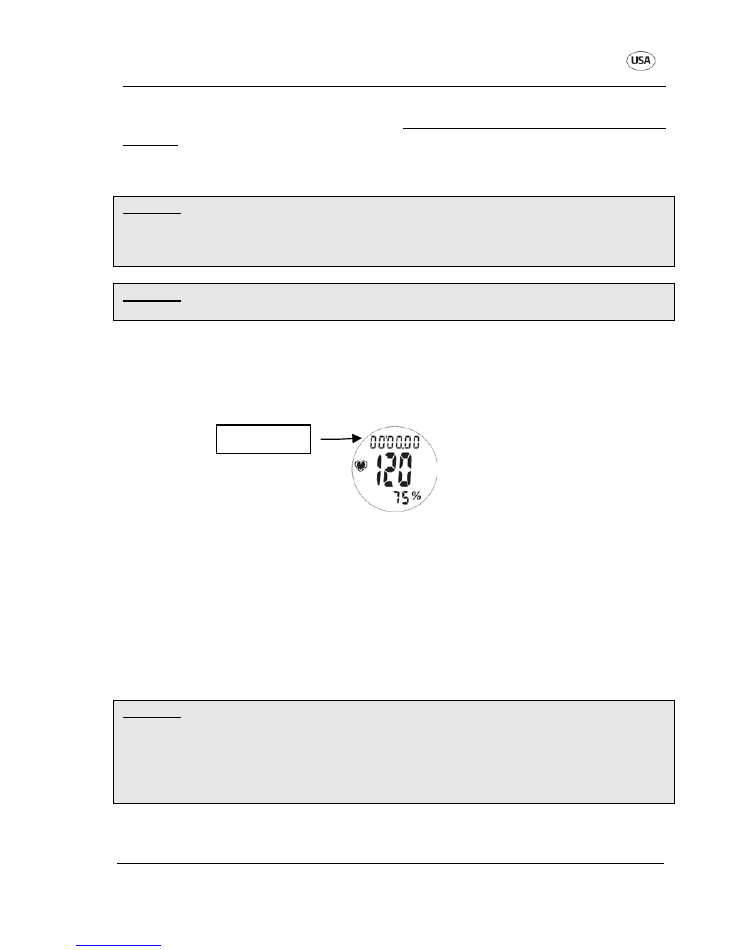
Stopwatch
The stopwatch in the heart rate mode has the function of a training timer.
In heart rate mode, press the “SEL” key until the stopwatch (“STOPP” / “STW”) is
displayed in the top display segment:
When you start training, you can keep track of the training time, in order to effectively
know how you were active.
•
Press “SET” key – start timer
•
Press “SET” key – stop timer
•
Keep “SET” key pressed in order to reset the training time to zero
The training time shows the total time, from the moment when you activate the timer
until the point at which you stop the timer. Even if you switch from heart rate mode to
one of the other modes, the time continues to run in the background.
Caution:
Please note that training data, such as highest, lowest and average heart rate, as
well as the training time within, above and below the set training zone can only be
saved, if you have activated the timer (stopwatch) in heart rate mode.
The values for calories and fat are calculated automatically, as soon as the chest
strap attached and a heart rate is received.
Training time
Heart Rate Monitor
Main functional modes
AFTER SALES SUPPORT
service@produktservice.info / www.produktservice.info
1-800-493-9137
12
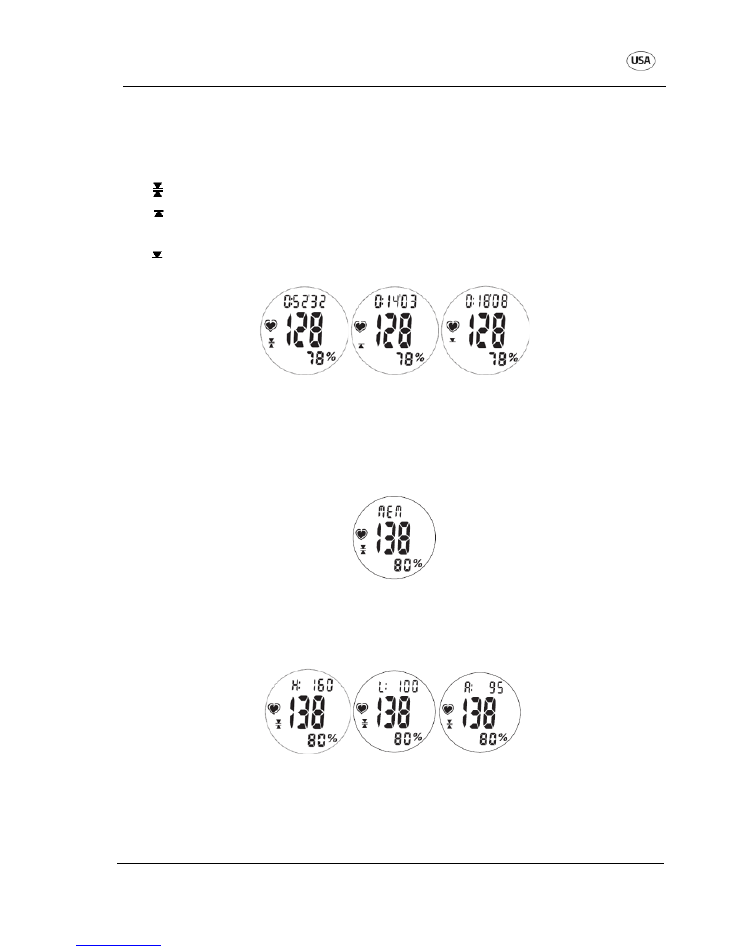
5.3.2
Time within/above/below training zone
In heart rate mode, press the “SEL” key until the time within/above/below the training
zone (“IN”) is displayed in the upper segment.
If you briefly press the “SET” key, you can select between the following views:
•
the time during which you were within the selected training zone (“IN”)
•
the time during which you were above the selected training zone (“OBER” /
“ABOVE”)
•
the time during which you were below the selected training zone (“UNTER” /
“BELOW”)
In order to reset these values to zero, please keep the SET key in the stopwatch view
pressed for approx. 3 seconds. The total training time is also set to zero this way.
The average, highest and lowest heart rate is also set automatically to zero this way.
5.3.3
Memory
In heart rate mode, press the “SEL” key until the memory (“SPEICH” / “MEM”) is
displayed in the top segment.
By pressing the “SET” key, you can view the following values:
•
highest heart rate (“H”)
•
lowest heart rate (“U” / “L”)
•
average heart rate (“D” / “A”)
•
In the stopwatch view, please keep the SET key pressed for approx. 3 seconds, in
order to set all three values to zero. The total training time is also set to zero this
way.
Heart Rate Monitor
Main functional modes
AFTER SALES SUPPORT
service@produktservice.info / www.produktservice.info
1-800-493-9137
13
5.3.4
Training zones
In heart rate mode, press the “SEL” key until the training zones (upper limit and lower
limit) (“ZONE”) are displayed in the top segment.
In Profi mode:
Selection between training zone 1, 2, 3 or U
Set the maximum heart rate
In Normal mode: Only training zone 1 is available
Set the maximum heart rate
There are three specified training zones (1, 2 and 3), as well as a user-defined
training zone (U).
The heart rate monitor automatically calculates your maximum heart rate (MHR) on
the basis of your age, as well as your personal upper and lower limits of the three
specified training zones (
Zone 1
: 50-65% of MHR,
Zone 2
: 65-80% of MHR,
Zone 3
:
80-95% of MHR).
Different training zones:
Depending on which goal you are pursuing with your
training, you set that training zone accordingly at the start:
Zone 1 - Wellbeing (50% - 65% MHR):
This training zone is for long training units
with little effort. Through exercise in this zone, you improve your mental and physical
wellbeing.
Zone 2 - Fitness (65% - 80% MHR):
This training zone is suitable for athletes, who
intend to improve their performance and stamina with elevated calorie burning.
Zone 3 – Competitive sport (80% - 95% MHR):
This training zone is ideal for short
and very intensive training units. Competitive athletes train in this zone in order to
improve strength and speed.
User-defined training zone (U):
Upper limit and lower limit can be set manually.
Lower limit
Upper limit
Heart Rate Monitor
Main functional modes
AFTER SALES SUPPORT
service@produktservice.info / www.produktservice.info
1-800-493-9137
14
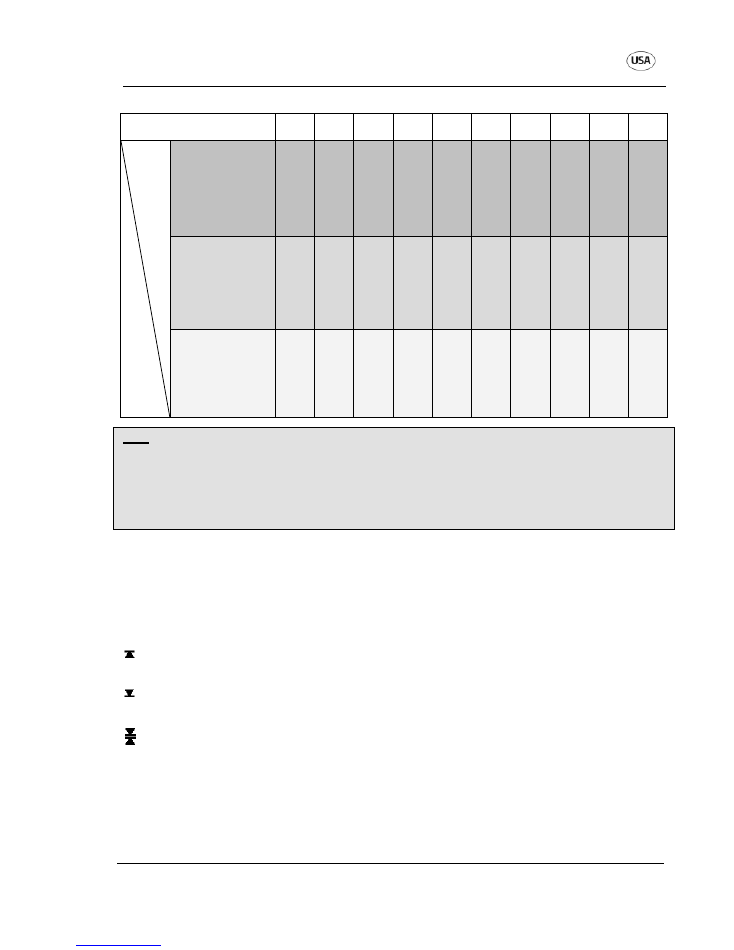
Age:
20
25
30
35
40
45
50
55
60
65
F
at
bur
ni
n
g
G
luc
o
s
e b
ur
ni
ng
Zone 3
Top
performance
80-95%
190
to
160
185
to
156
180
to
152
175
to
148
171
to
144
166
to
140
161
to
136
156
to
132
152
to
128
147
to
124
Zone 2
Fitness
65-80%
160
to
130
156
to
126
152
to
123
148
to
120
144
to
117
140
to
113
136
to
110
132
to
107
128
to
104
124
to
100
Zone 1
Health
50-65%
130
to
100
126
to
97
123
to
95
120
to
92
117
to
90
113
to
87
110
to
85
107
to
82
104
to
80
100
to
77
Tip:
For example, if you are aiming for increased fitness, set the upper limit of your
training zone to 80% of your maximum heart rate and 65 % of your maximum heart
rate as the lower limit (Zone 2).
Example:
Upper limit (80 %) = 188 x 0.8 = 150
Lower limit (65 %) = 188 x 0.65 = 122
5.3.4.a Setting the alarm type, the maximum heart rate and the training zones
In heart rate mode, press the “SEL” key until the training zones (upper limit and lower
limit) are displayed in the top section (“ZONE”).
Keep the “SET” key pressed, the alarm symbol will flash. Select the required alarm
type using the “SEL” key:
Alarm only when exceeding the upper limit of the heart rate
(2 signal tones)
Alarm only when falling below the lower limit of the heart rate
(1 signal tone)
Alarm when exceeding the upper limit of the heart rate or falling below the lower
limit of the heart rate
Confirm you selection with the “SET” key, the maximum heart rate will flash. Set this
value with the “SEL” key (between 80 and 240) or leave the default, automatically
calculated value.
Confirm with the “SET” key, the training zone will flash.
Heart Rate Monitor
Main functional modes
AFTER SALES SUPPORT
service@produktservice.info / www.produktservice.info
1-800-493-9137
15
With the “SEL” key, select zone 1, 2, 3 or the user-defined training zone (U).
Confirm the selection of training zone 1, 2 or 3 with the “MODE” key. The setting is
completed. The upper and lower limits are calculated automatically.
With the selection of the user-defined training zone (U), press the “SET” key, upper
limit will flash, set with the “SEL” key, confirm with the “SET” key, lower limit will flash,
set with the “SEL” key and confirm with the “MODE” key, the settings are completed.
5.3.4.b Training zone alarm
In the view of the upper and lower limit, press the “SET” key briefly:
Alarm symbol
appears = training zone alarm activated
Alarm symbol extinguishes = training zone alarm deactivated
If the heart rate falls below the lower limit or rises above the upper limit, the alarm will
sound (if activated!).
Please note that with disruptions to the transmission of the heart frequency or
with an irregular heart, under certain circumstances, it can occur that the LED
indicator and the training zone alarm will temporarily stop, in order to avoid
incorrect information.
5.3.4.c Alarm when exceeding the maximum heart rate
Under the current heart rate, the % of maximum heart rate is displayed.
If your heart rate reaches or even exceeds 99% of your maximum heart rate, a
warning tone will sound constantly, in order to make you aware of it. This way, you
can minimise the risk of overexertion.
The alarm for the maximum heart rate is independent of whether the training zone
alarm is activated or not.
The warning tone is end automatically as soon as your current heart rate falls below
99% of the maximum heart rate.
5.3.5
LED Indicator
The watch additionally has an LED indicator (on the right, next to the LCD display).
This flashes GREEN if you are within the selected training zone and RED, if you are
above/below the selected training zone or if the maximum heart rate is reached.
The LED indicator is activated by default, but can be deactivated in Profi mode, see
point 5.1 „Basic, Normal or Profi mode”.
Training zone
Upper limit
Lower limit
Heart Rate Monitor
Main functional modes
AFTER SALES SUPPORT
service@produktservice.info / www.produktservice.info
1-800-493-9137
16
Please note that with disruptions to the transmission of the heart frequency or
with an irregular heart, under certain circumstances, it can occur that the LED
indicator and the training zone alarm will temporarily stop, in order to avoid
incorrect information.
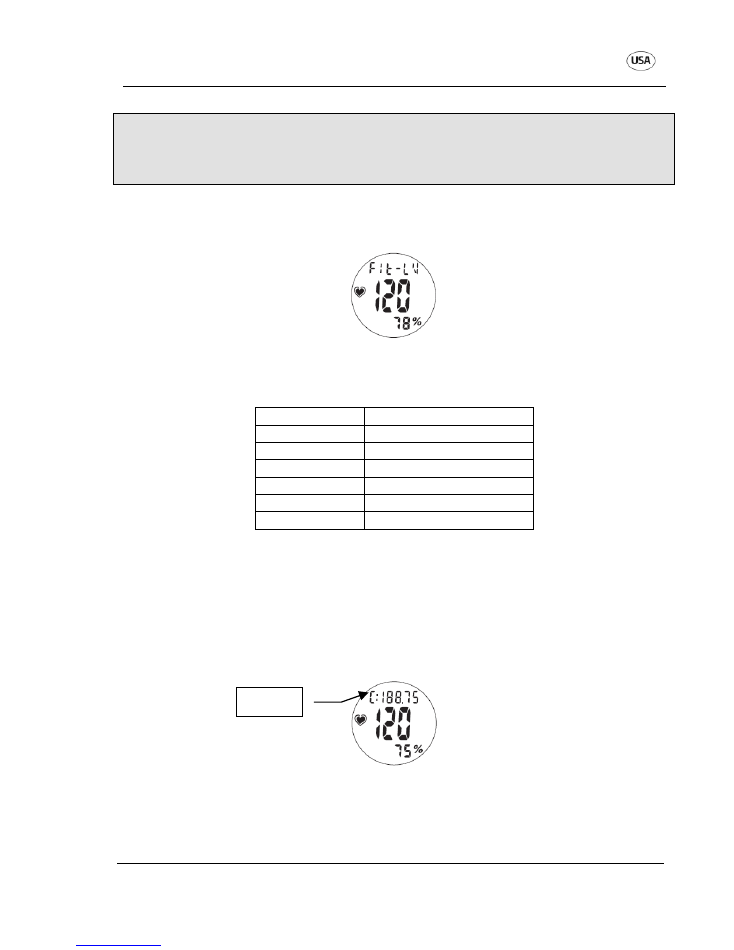
5.3.6
Fitness level
In heart rate mode, press the “SEL” key until the fitness level (“FIT-N” / “FIT-LV”) is
displayed in the top segment:
Directly after training (wearing the chest strap), press the “SET” key in order to start a
5-minute countdown. After the countdown
(= recovery phase), your heart rate and fitness level will be displayed.
Fitness level
Heart rate after 5 min
Level 6
> 130
Level 5
130-120
Level 4
120-110
Level 3
110-105
Level 2
105-100
Level 1
< 100
Level 1 means that you are very fit, as your heart rate has already fallen to below 100
beats/minute 5 minutes after ending training.
Level 6 means that you are not fit, as your heart rate is still above 130 beats/minute 5
minutes after ending training.
5.3.7
Calories
In heart rate mode, press the “SEL” key until the calories (“KAL” / “CAL”) are
displayed in the top segment.
The metabolic rate in calories is automatically measures when the heart rate is
received in heart rate mode.
Press and hold the “SET” key to set the value to zero.
Calories
Heart Rate Monitor
Main functional modes
AFTER SALES SUPPORT
service@produktservice.info / www.produktservice.info
1-800-493-9137
17
5.3.8
Fat
In heart rate mode, press the “SEL” key until the burned fat (“FETT” / “FAT”) is
displayed in the top segment.
As soon as the heart rate signal is received in heart rate mode, the estimated value
of burned fat is displayed in grams.
Press and hold the “SET” key to set the value to zero.
Note:
In order
to obtain a meaningful value for calorie consumption and fat burning, it
is necessary to enter the date of birth and weight correctly.
Note:
The body fat function is only active when the heart rate is higher than 120
beats/minute.
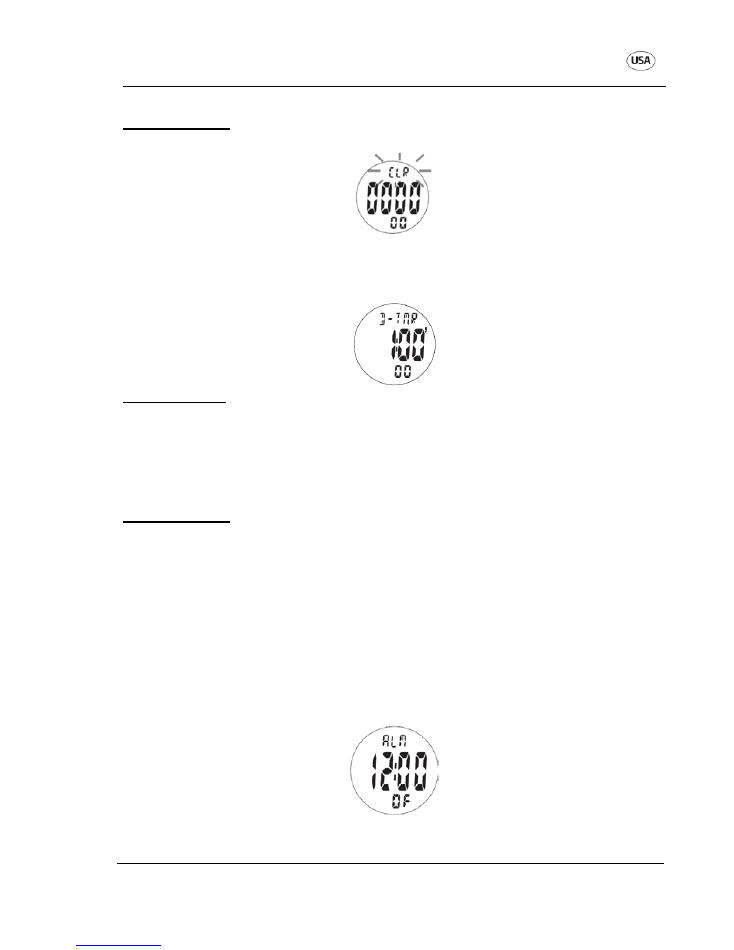
Stopwatch mode
5.4
Press the “MODE” key repeatedly until you are in stopwatch mode (indicated by
“STOPP” / “STW”).
•
Press “SET” key
Start timer
•
Press “SET” key
Stop timer
•
Press “SET” key
Timer is continued
Check intermediate time
Press the “SEL” key briefly while the time is running. The intermediate time is shown
for approx. 5 seconds in the display, while the stopwatch continues to run in the
background.
Fat
Heart Rate Monitor
Main functional modes
AFTER SALES SUPPORT
service@produktservice.info / www.produktservice.info
1-800-493-9137
18
Set time to zero
Keep the “SET” key pressed during stopped or running time.
Countdown mode
5.5
Press the “MODE” key repeatedly until you are in the countdown mode (indicated by
“TIMER” / “D-TMR”).
Set countdown
•
Keep the “SET” key pressed for approx. 3 seconds.
•
Use the “SEL” key to set the hours. Confirm your selection with the “SET” key,
the minutes will flash.
•
Set the minutes with the “SEL” key.
•
Now, press the “MODE” key, all settings are saved.
Use countdown
•
Press “SET” key
Start countdown
•
Press “SET” key again
Stop countdown
•
Press “SET” key again
Continue countdown
•
Press “SEL” key with stopped time
the originally set countdown time is
displayed again.
3 seconds before the countdown has reached zero, an alarm sounds, which ends
after a few seconds, or can be ended by pressing the “SEL” key.
Alarm Mode
5.6
Press the “MODE” key repeatedly until you are in the alarm mode (indicated by
“ALM”).

Heart Rate Monitor
Main functional modes
AFTER SALES SUPPORT
service@produktservice.info / www.produktservice.info
1-800-493-9137
19
Set alarm
•
Keep the “SET” key pressed for approx. 3 seconds, the hours will flash. Set the
hours using the “SEL” key. Confirm your selection with the “SET” key, the
minutes will flash.
•
Set the minutes with the “SEL” key.
•
Now, press the “MODE” key, all settings are saved.
Activate/deactivate alarm
Press the “SET” key in the alarm time view:
Alarm symbol
displayed = Alarm on (ON)
Alarm symbol not displayed = Alarm off (OF)
Note:
The activation/deactivation of the alarm not only works in alarm mode, but also
in time mode.
Switch off alarm
When the alarm sounds, you can switch it off by pressing the “MODE”, “SEL”, “SET”
or “LIGHT” key.
Display light
5.7
By pressing the “LIGHT” key, the display is illuminated for approx. 5 seconds, so that
the display of the heart rate monitor can also be read in darkness. However, please
note that more power is consumed for the display light, which results in a shorter
battery life.
Technical data
5.8
Your heart rate monitor is operated with a 3V lithium battery, type CR2032 (1 x 3V
0.02 mA CR2032).
The chest strap is also operated with a 3V lithium battery, type CR2032 (1 x 3V
0.043 mA CR2032).
Transmission frequency of the chest strap to the heart rate monitor: 5.3 kHz
Stopwatch (stopwatch mode):
•
Measurement range: 99 hours 59 minutes 59 seconds
•
Resolution:
1/100 second
Heart Rate Monitor
Main functional modes
AFTER SALES SUPPORT
service@produktservice.info / www.produktservice.info
1-800-493-9137
20
Stopwatch (in heart rate mode):
•
Measurement range: 99 hours 59 minutes 59 seconds
•
Resolution:
1/100 second
Countdown:
•
Measurement range: 9 hours 59 minutes
•
Resolution:
1 second
Heart rate:
•
Measurement range: 30 to 240 bpm (beats/minute)
•
Resolution:
1 bpm
Calories
•
Measurement range: 0 to 99,999 kcal
•
Resolution:
0.01 to 999.99 kcal
above 0.1 / 1
Fat
•
Measurement range: 0 to 99,999 g
•
Resolution:
0.01 to 999.99 g
above 0.1 / 1
Battery Change
5.9
Caution!
Risk of explosion with improper replacement of the battery. Replacement
only with the same or equivalent type of battery.
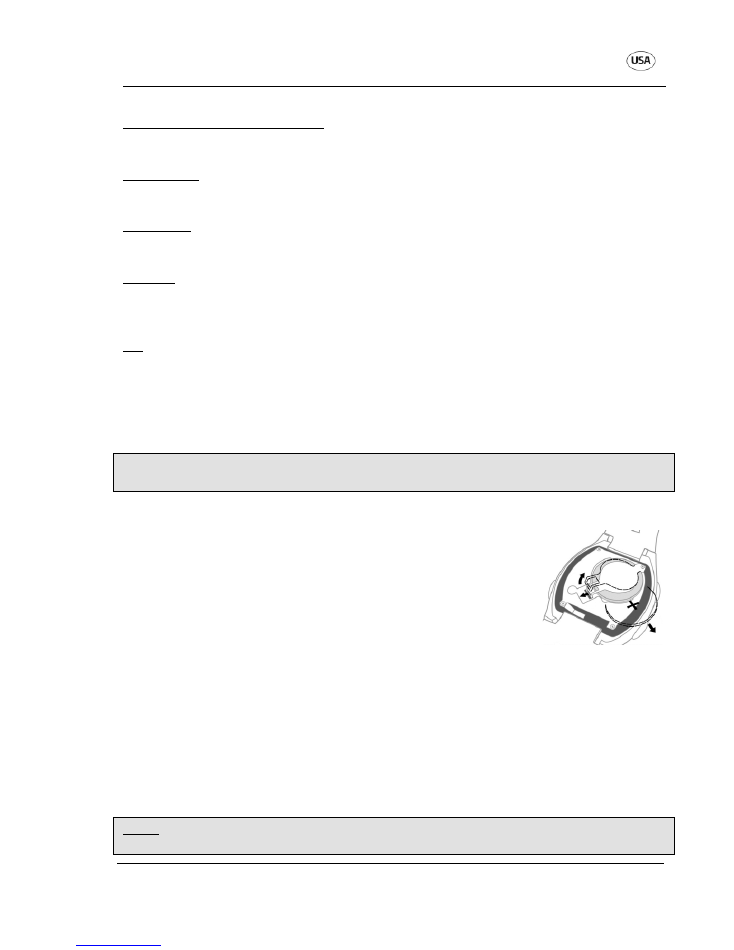
For battery replacement, proceed as follows:
•
Using a small, crosshead screwdriver, unscrew the four
screws on the cover at the back of the heart rate monitor
and remove them.
•
Then, open the battery holder by carefully lifting the locking
bracket over the locking hook using the screwdriver.
•
Remove the depleted battery and dispose of it properly
and environmentally.
•
Insert a new 3V battery type CR2032 with the positive
terminal (+) upwards into the holder and push it until it locks in. Ensure that you
pay attention to the correct polarity.
•
Place the back cover back onto the battery compartment. When doing so,
ensure that the rubber seal of the watch is not shifted or damaged. Screw the
cover back on with the four screws.
•
Start the watch as described in point 5 “Main functional modes”.
•
If irregular symbols should appear in the display, remove the battery again and
reinsert it. This will reset the microprocessor. After this, the heart rate monitor
should function normally again.
Note:
Please note that after a battery replacement, all personal data needs to be re-
entered.
Heart Rate Monitor
Troubleshooting/FAQs
AFTER SALES SUPPORT
service@produktservice.info / www.produktservice.info
1-800-493-9137
21
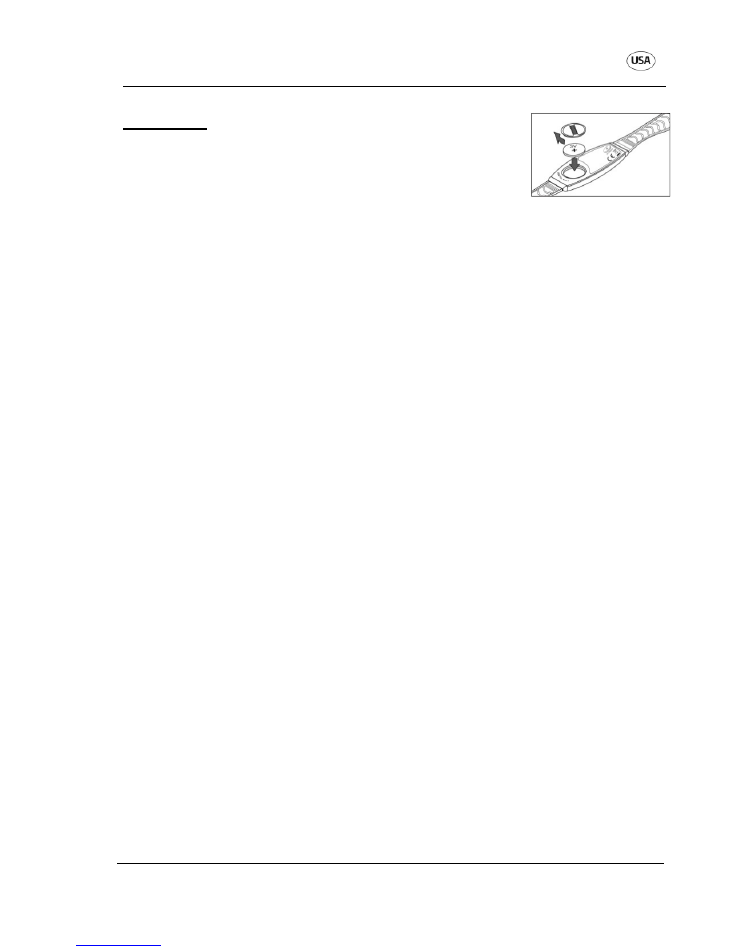
Chest strap:
Open the battery compartment lid using a coin.
Insert a 3V battery type CR2032. Ensure that the positive
terminal (+) is pointing upwards. Close the battery
compartment. Ensure that the cover is closed securely, so
that no moisture can penetrate the chest strap.
Conformity
5.10
This device complies with Part 15 of the FCC Rules. Operation is subject to the
following two conditions: (1) this device may not cause harmful interference, and (2)
this device must accept any interference received, including interference that may
cause undesired operation.
NOTE: This equipment has been tested and found to comply with the limits of a
Class B digital device, pursuant to Part 15 of the FCC Rules. These limits are
designed to provide reasonable protection against harmful interference in a
residential installation. This equipment generates, uses and can radiate radio
frequency energy and, if not installed and used in accordance with the instructions,
may cause harmful interference to radio communications. However, there is no
guarantee that interference will not occur in a particular installation. If this equipment
does cause harmful interference to radio or television reception, which can be
determined by turning the equipment off and on, the user is encouraged to try to
correct the interference by one or more of the following measures:
•
Reorient or relocate the receiving antenna.
•
Increase the separation between the equipment and receiver.
•
Connect the equipment into an outlet on a circuit different from that to which the
receiver is connected.
•
Consult the dealer or an experienced radio/TV technician for help.
WARNING: changes or modifications to this unit not expressly approved by the
party responsible for compliance could void user's authority to operate the
equipment.
Company Krippl-Watches
Telephone number: please refer to the information given in the warranty card.
6. TROUBLESHOOTING/FAQS
Before submitting a claim about the heart rate monitor, please check the
battery and change it if required.
How to make a claim:
Please inform us about the article number of the product and
the reason of the claim (email). Additionally, you can refer to the FAQ section on our
online product service page for further help with your heart rate monitor.
http://www.produktservice.info EAN: 20015152

Heart Rate Monitor
Troubleshooting/FAQs
AFTER SALES SUPPORT
service@produktservice.info / www.produktservice.info
1-800-493-9137
22
What can the reason be for the calorie consumption/fat burning not being
correct?
Please check the entry of date of birth and weight. The calorie consumption
measurement is only a computed approximation. The device cannot provide an exact
calculation of calorie consumption.
What should I do if my weight changes?
Enter the new weight, as the previously entered weight remains saved until it is
changed.
How can the heart rate monitor contribute to me keeping fit?
Example: If you have body weight of approx. 60 kg (~132 lbs) and walk/run 10000
steps per day, you can consume around 300 Kcal per day.
Why is the heart rate monitor not displaying a heart rate?
-
Please check the chest strap. Possible error sources are:
-
The chest strap is not placed correctly.
-
The skin is too cold or too dry.
-
The sensor contact surfaces are not moistened or are dirty.
-
Atmospheric or radio interferences occur, e.g. from high-voltage lines (above
ground and underground), overhead cables, electric motors, car motors, mobile
phones, aircraft, etc.
-
Battery in chest strap too weak – please replace.
-
Distance to the chest strap is too large
-
(max. 60 cm = ~ 23.6 inches).
-
Signals from other chest straps in a vicinity of less than 2 metres can cause
incorrect values.
The heart rate display is not correct, why?
-
Perhaps the sensor contact surfaces of the chest strap are not moistened.
-
Check the chest strap for firmer positioning around the chest.
-
Also check the battery.
-
It is not advisable to simultaneously use the heart rate monitor and a radio
bicycle computer, as the signals from the bicycle computer transmitter can cause
functional errors with the heart rate monitor.
-
Signals from other chest straps in the vicinity of less than 2 metres can cause
incorrect values.
Why is the heart rate monitor displaying a heart rate that is fluctuating/too
high?
This can be caused by:
-
Electromagnetic disturbances, e.g. from high-voltage lines (above ground and
underground), overhead cables, electric motors, car motors, mobile phones,
other training devices, etc.
-
Fluctuations in heart rate are absolutely normal. The heart rate can fluctuate
daily, it depends on many factors.

Heart Rate Monitor
Contact Data
AFTER SALES SUPPORT
service@produktservice.info / www.produktservice.info
1-800-493-9137
23
What can be the reason why the display of my heart rate monitor is no longer
responding?!
If the display is “frozen” or irregular symbols appear:
-
Press and hold the “SEL” and “SET” key simultaneously for approx. 2 seconds.
All display segments will briefly appear and you will reach the default settings
again (see point 5 “Main functional modes”).
-
Alternatively: Remove the battery and reinsert it. This will reset the
microprocessor.
-
Please pay attention to the small spring protruding from the movement. Handle it
carefully so that this spring is not lost.
After this, heart rate monitor should function normally again.
The display is weak, barely readable, what can I do?
Replace the battery as soon as the display becomes weaker or fades entirely. When
inserting the new battery, always pay attention to the correct polarity. If the battery
needs to be removed and reinserted, the personal data will need to be re-entered.
Why is the display light not working?
Is the battery perhaps depleted? Please check the battery. If it is depleted, replace it
with a new one (3V / CR2032). Please pay attention to the +/- terminal.
Why is an incorrect average heart rate displayed after training?
This is probably because you did not stop the timer (stopwatch) in heart rate mode,
but are no longer wearing the chest strap. In this case, the heart rate monitor is no
longer receiving a heart rate from the chest strap, so that the watch is calculating with
the heart rate value of 0. This allows the average heart rate fall further and further.
Therefore, after
training
, stop the timer (stopwatch) in order to obtain a meaningful
heart rate.
Why are the times specified within, above and below the training zone not
correct?
This is probably because you did not stop the timer (stopwatch) in heart rate mode
after training. That is why the time for these values continues to run. Please stop the
timer (stopwatch) in heart rate mode after training.
7. CONTACT DATA