Full Text Searchable PDF User Manual
PL201708 EN LIMITED PRODUCT WARRANTY SOLAR INVERTERS - V. 1.0
Solar Solutions GmbH | Schneckenhofstrasse 19 | 60596 Frankfurt am Main | Germany | www.aeg-industrialsolar.de
1-5
AEG WIFI200
WIFI STICK
INSTALLATION MANUAL

1
PD201802 AEG WIFI200 INSTALLATION MANUAL V.1-18 EN
1
AEG WIFI STICK INSTALLATION MANUAL
Thank you for choosing the reliability of AEG grid-tied solar inverters!
This installation manual is intended for dealers and installers involved in the planning, installation and
commissioning of photovoltaic systems deploying AEG solar inverters. These instructions are meant to provide
you with valuable information to ensure that the installation of the components runs smoothly.
The AEG WiFi200 communication module (or “WiFi Stick”) is a device which enables the transmission of
relevant performance data from your AEG inverter to the monitoring software (AEG InverterControl App and
AEG InverterControl Monitoring Webportal).
The AEG WiFi200 is used (at the time of writing) with mono-phase inverters of the series AS-IR01 and AS-
IR01-2, and with three-phase inverters of the series AS-IC01 and AS-IC01-2. The AEG WiFi200 can only be
installed by qualified professional companies.
Please observe the standards and regulations applying to photovoltaic systems in the relevant countries, as
well as the rules of the employers’ liability insurance associations for accident protection. Failure to comply with
these can result in major injuries and damage.
Product series: AEG WiFi200

2
PD201802 AEG WIFI200 INSTALLATION MANUAL V.1-18 EN
2
Table of Contents
Table of Contents
........................................................................................................................................................................................................................................... 2
1. Safety Precautions ....................................................................................................................................................................................................................................... 3
2. Unpacking ........................................................................................................................................................................................................................................................... 3
3. Introduction to AEG WiFi200........................................................................................................................................................................................................... 3
3.1 Product function and compatibility with AEG inverters ............................................................................................................................... 3
3.2 Local monitoring and Remote monitoring................................................................................................................................................................ 4
4. Installation and Configuration of AEG WiFi200 ............................................................................................................................................................ 4
4.1 Product looks and fitting position ..................................................................................................................................................................................... 4
4.2 Installing the AEG WiFi200 ..................................................................................................................................................................................................... 5
4.3
Configuring the AEG WiFi200 .............................................................................................................................................................................................. 5
4.3.1 Local monitoring (#1): Direct connection via mobile phone ........................................................................................................ 7
4.3.2
Local monitoring (#2): Configuration via PC + home WiFi (LAN) ......................................................................................... 9
4.3.3
Registering a Remote Monitoring Account ................................................................................................................................................. 11
4.3.4 Remote monitoring (#1): Configuration via mobile phone + internet access ......................................................... 13
4.3.4
Remote monitoring (#2): Configuration via PC+ internet access ........................................................................................ 18
5. Resetting the AEG WiFi200 ........................................................................................................................................................................................................... 22
6. Contacts ............................................................................................................................................................................................................................................................. 22
3
PD201802 AEG WIFI200 INSTALLATION MANUAL V.1-18 EN
3
1. Safety Precautions
Please comply with the following precautionsl to prevent physical injury and product damage.
Only qualified electricians are allowed to install AEG WiFi200.
Do not store, place or install AEG WiFi200 on or close to combustible materials.
The installation site and equipment should not be publicly accessible nor accessible to children.
Remove metal accessories such as rings or bracelets before installation and electrical connection of
the components to avoid electric shock.
Ensure reliable connection between AEG WiFi200 and the inverter
2. Unpacking
Double-check the order information and the product nameplate to ensure the consistency of the order.
Please keep the packaging of your AEG WiFi200, especially the cardboard box. On the box you will
relevant information such as the Serial Number and the Product Key which are needed for completing
specific configuration processes as explained in 4.3 “Configuring the AEG WiFi200”. Alternatively, you
will find these information also on the product itself.
3. Introduction to AEG WiFi200
3.1 Product function and compatibility with AEG inverters
The AEG WiFi200 is a communication module, a wireless monitoring device developed to be used in
combination with AEG grid-tied solar inverters of the series AS-IR01, AS-IR01-2, AS-IC01 and AS-IC01-2 up to
30 kW. It allows users to configure inverter parameters, and control and monitor the inverter locally and
remotely. The WiFi Stick fits the RS485 port of the AEG inverters.
4
PD201802 AEG WIFI200 INSTALLATION MANUAL V.1-18 EN
4
3.2 Local monitoring and Remote monitoring
There are two modes with which the AEG WiFi200 allows you to monitor your inverter: Local monitoring and
Remote monitoring.
Local Monitoring allows you to monitor your AEG inverter through your home WiFi (WLAN). Local Monitoring
only works within the signal reach of your WLAN.
To set up Local Monitoring you will need to connect the AEG WiFi200 (WiFi Stick), your (home) WLAN router
and the AEG InverterControl app; or, you can establish a direct connection between the AEG WiFi Stick and
the AEG InverterControl app.
Remote Monitoring allows you to monitor your AEG inverter from any place you have a mobile internet
connection, (via the AEG Invertercontrol App) or via PC (via the AEG InverterControl Webportal).
Chapter 4 will explain in detail how the WiFi stick has to be configured in order to work in Local or in Remote
Monitoring mode.
4. Installation and Configuration of AEG WiFi200
4.1 Product looks and fitting position
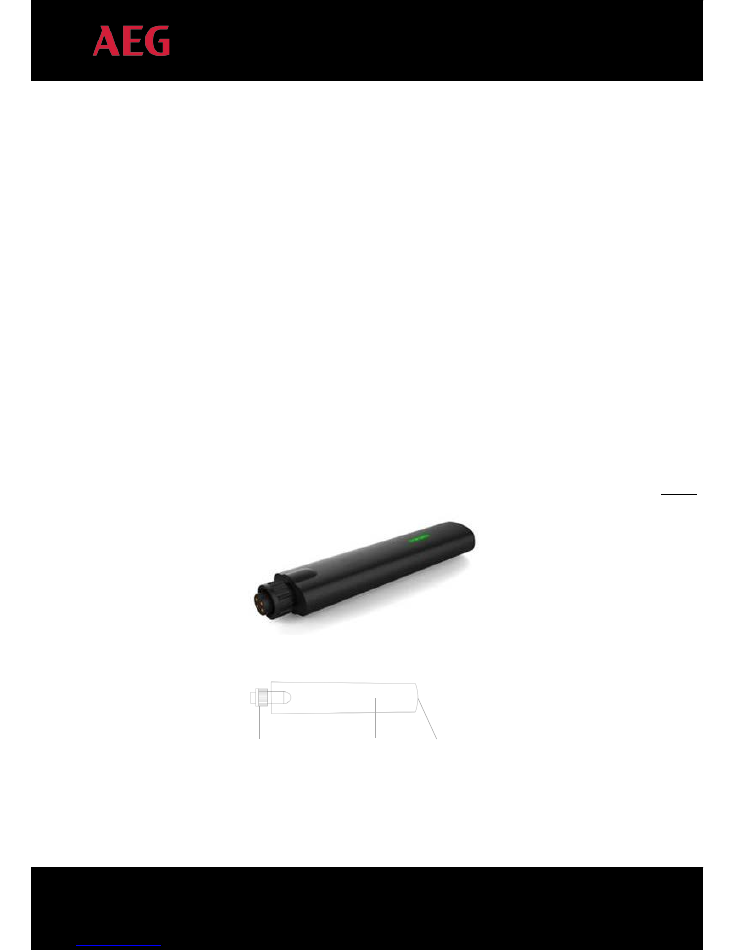
Figure 1: AEG WiFi200 looks
RS485 port
LED indicator
Reset button
5
PD201802 AEG WIFI200 INSTALLATION MANUAL V.1-18 EN
5
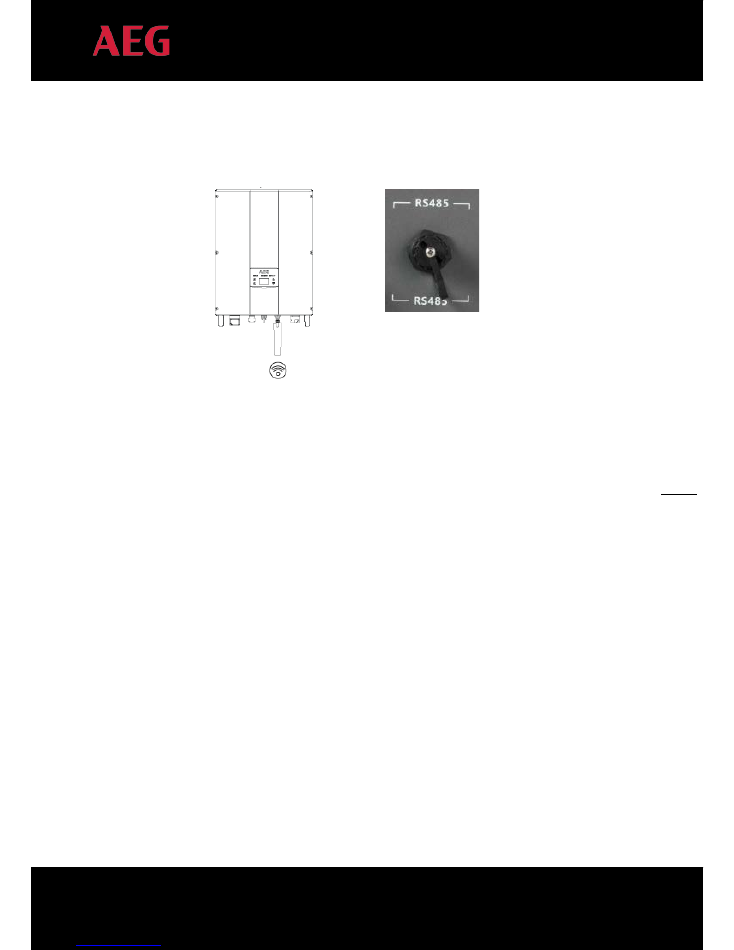
The AEG WiFi200 should be fastened to the RS485 port of AEG solar inverter.
Figure 2: Example of AEG WiFi200 connected to an AEG inverter
4.2 Installing the AEG WiFi200
1.
Complete the installation of your AEG inverter in the selected place. Connect the DC input and
switch on the inverter without the AC grid (AC disconnect/switch off)
2.
Fasten up the AEG WiFi200 (WiFi Stick) to the RS 485 communication port of your inverter.
3.
Wait until the hotspot “AEG” can be found. You will be able to check if the AEG hotspot was
successfully set up by checking on your mobile phone or on your PC phone the available wireless
networks.
4.
Configure the WiFi Stick.
4.3
Configuring the AEG WiFi200
Preliminary requirements:
1)
Before configuring the AEG WiFi200 please make sure it is correctly installed (see 4.2 “Installing the
AEG WiFi200”).
2)
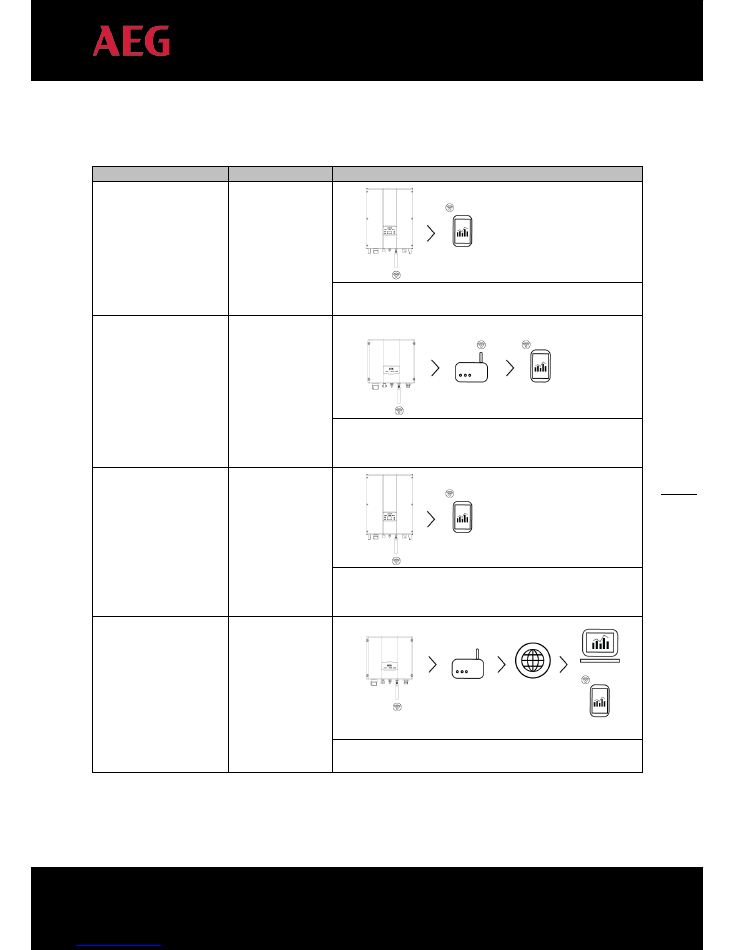
Please see the overview below (“Monitoring Type / Configuration Type / Scheme & Components”) to
understand which components are involved.
3)
Remote Monitoring requires the registration of a Remote Monitoring Account. Please find the related
instructions in 4.3.3 “Registering a Remote Monitoring Account”.
6
PD201802 AEG WIFI200 INSTALLATION MANUAL V.1-18 EN
6
The AEG WiFi200 has four possible configuration procedures, two for Local Monitoring and two for Remote
Monitoring. Here below is an overview of which they are and which components are involved.
Monitoring Type
Configuration Type Scheme and Components
Local Monitoring (#1)
Direct connection
via mobile phone
You will need: your AEG inverter, the AEG WiFi200 (WiFi
Stick), a mobile phone, the AEG InverterControl App
Local Monitoring (#2)
Configuration via
PC + home WiFi
(LAN)
You will need: your AEG inverter, the AEG WiFi200 (WiFi
Stick), a WLAN router, a mobile phone, the AEG
InverterControl App
Remote Monitoring (#1) Configuration via
mobile phone +
internet access
You will need: your AEG inverter, the AEG WiFi200 (WiFi
Stick), a mobile phone with a mobile internet connection,
the AEG InverterControl App.
Remote Monitoring
(#2)
Configuration via
PC + internet
access
You will need: your AEG inverter, the AEG WiFi200 (WiFi
Stick), a PC, a mobile phone, the AEG InverterControl App
The configuration for the above cases will be explained in detail in the below paragraphs.
7
PD201802 AEG WIFI200 INSTALLATION MANUAL V.1-18 EN
7
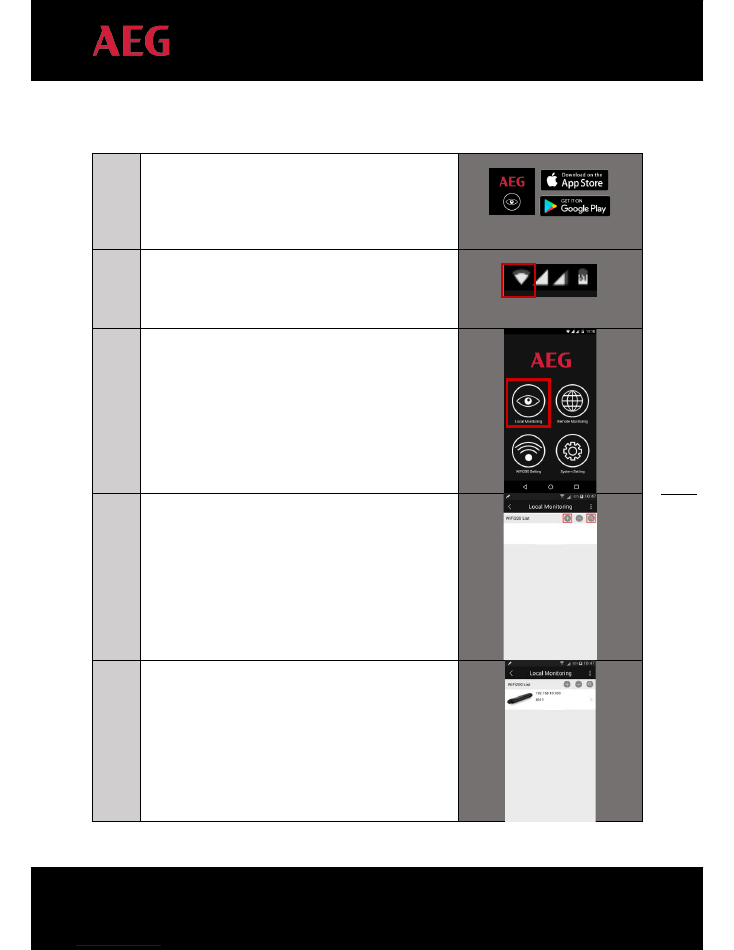
4.3.1 Local monitoring (#1): Direct connection via mobile phone
1
On your mobile device, download the AEG InverterControl
App from the App Store / Google Play (look for “AEG
InverterControl” in the App Store/Google Play application on
your mobile) and launch it
2
Enable the WiFi on your mobile phone and connect it
to the hotspot “AEG WiFi”.
3
Launch the AEG InverterControl App.
Select “Local Monitoring”
4
Click the “search” (lens) icon to find the WiFi Stick.
Alternatively, click the “+” icon and confirm the IP address.
5
Find the AEG WiFi Stick. Click on it.
8
PD201802 AEG WIFI200 INSTALLATION MANUAL V.1-18 EN
8
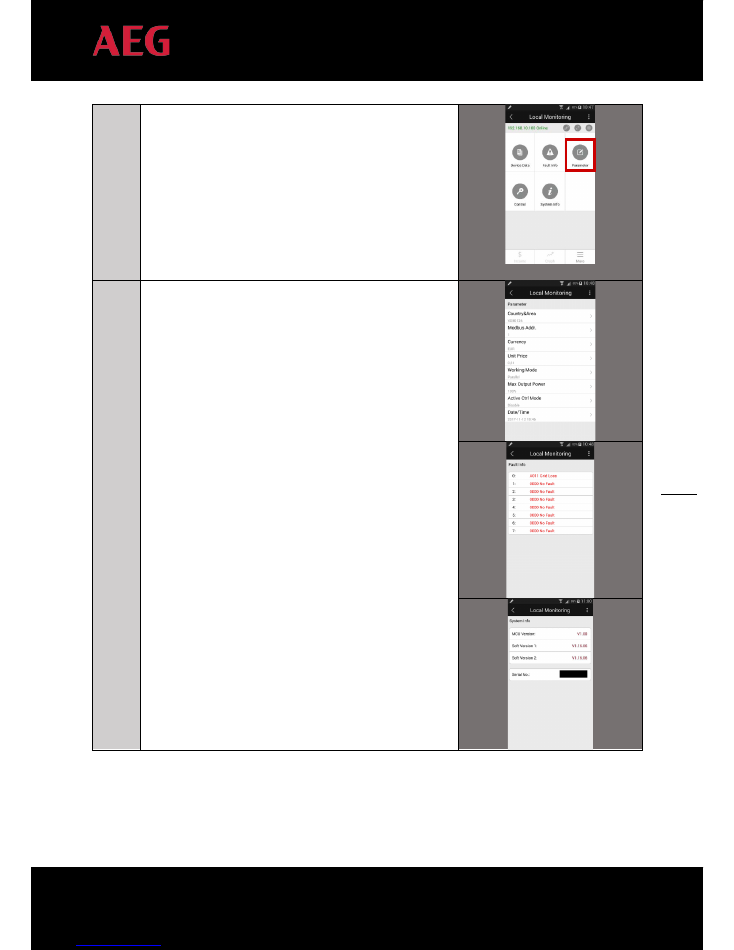
6
Click on the “Parameters” section
7
Check the parameters. Done! You can now start to monitor
the performance of your AEG Inverter with the AEG
InverterControl App.
9
PD201802 AEG WIFI200 INSTALLATION MANUAL V.1-18 EN
9
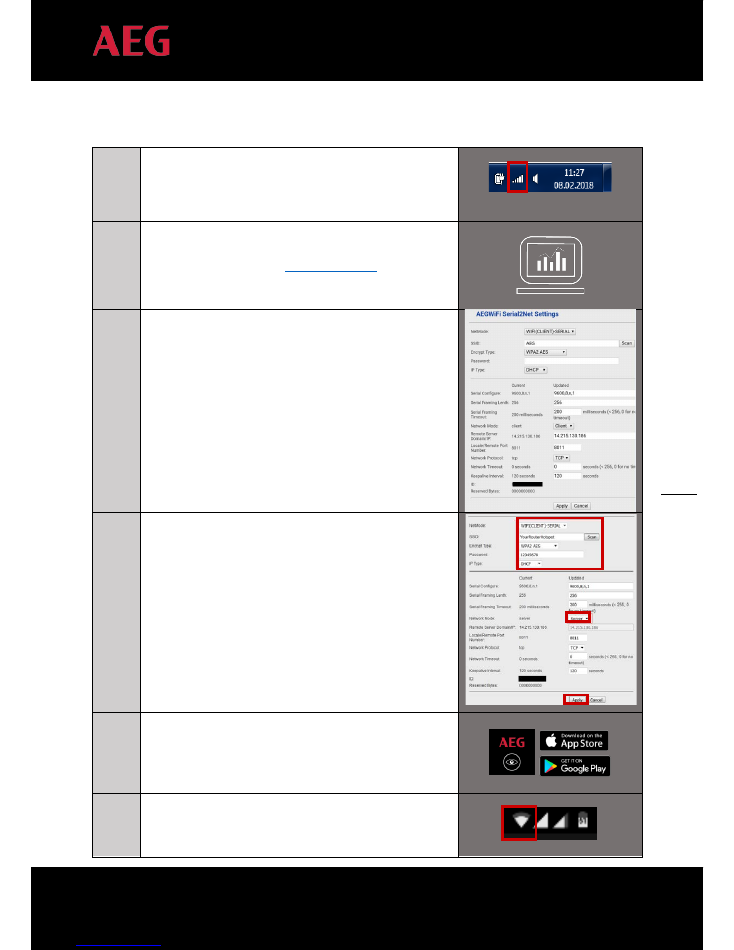
4.3.2
Local monitoring (#2): Configuration via PC + home WiFi (LAN)
1
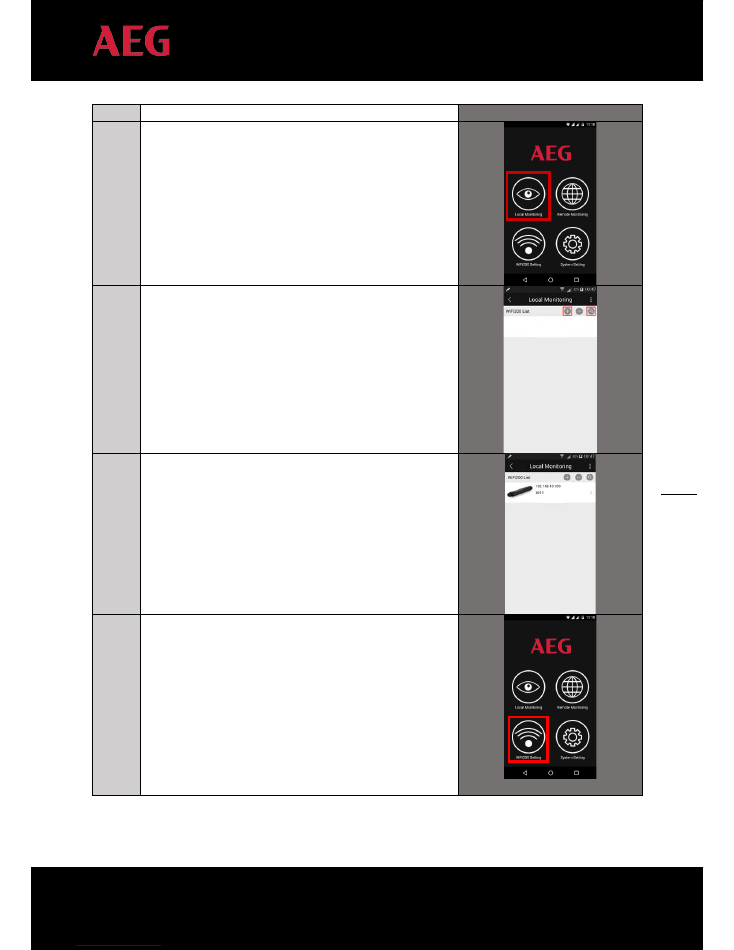
Scan for wireless networks. Connect your PC with the “AEG
WiFi” hotspot.
2
Open the web browser and access the configuration website of
AEG WiFi200 with IP address
http://192.168.16.254
.
3
Log in with the username “admin” and the password “admin”.
This will take you to the configuration interface (see the
right column here).
4
Set the parameters for LOCAL MONITORING
NetMode: select WIFI(CLIENT)-SERIAL
SSID: click “Scan” and select the Hotspot name of your
router
Encrypt Type: Automatically updated after you select your
hotspot (or. Select according to your router, e.g. “WPA2-
AES”).
Password: Hotspot password of the wireless router.
IP Type: Leave it as “DHCP”.
Network Mode: Leave it as “Server”.
Click “Apply” to save the changes.
5
On your mobile phone, download the AEG InverterControl
App from the App Store / Google Play (Look for “AEG
InverterControl” from the App Store/Google Play on your
mobile) and launch it
6
Enable the WiFi on your mobile phone and connect it
to the hotspot of your router.
10
PD201802 AEG WIFI200 INSTALLATION MANUAL V.1-18 EN
10
7
Launch the AEG InverterControl App.
Select “Local Monitoring”
8
Click the “search” (lens) icon to find the WiFi Stick.
Alternatively, click the “+” icon and confirm the IP address.
9
Find the AEG WiFi Stick.
Done!
You can now start monitoring your AEG Inverter performance
with your AEG InverterControl App by clicking on the WiFi
stick displayed in the list.
(--- If you wish to double-check if the connection between the
WiFi stick and your router works correctly, connect your
mobile phone to the wireless network of your router and
select “WiFi Setting”. If you can find the WiFi200 and the
corresponding parameters, it means the setting is correct.
11
PD201802 AEG WIFI200 INSTALLATION MANUAL V.1-18 EN
11
4.3.3
Registering a Remote Monitoring Account
Monitoring the performance of your AEG inverter from remote requires you to set up the AEG WiFi200 for
Remote Monitoring and preliminarly registering a Remote Monitoring Account. You will be able to register your
Remote Monitoring Account via:
A)
The AEG InverterControl App.
B)
The AEG InverterControl Monitoring Webportal (
www.invertercontrol.com
).
Please find below the instructions on how to register a Remote Monitoring Account.
A)
Registering a Remote Monitoring Account via the AEG InverterControl App
1
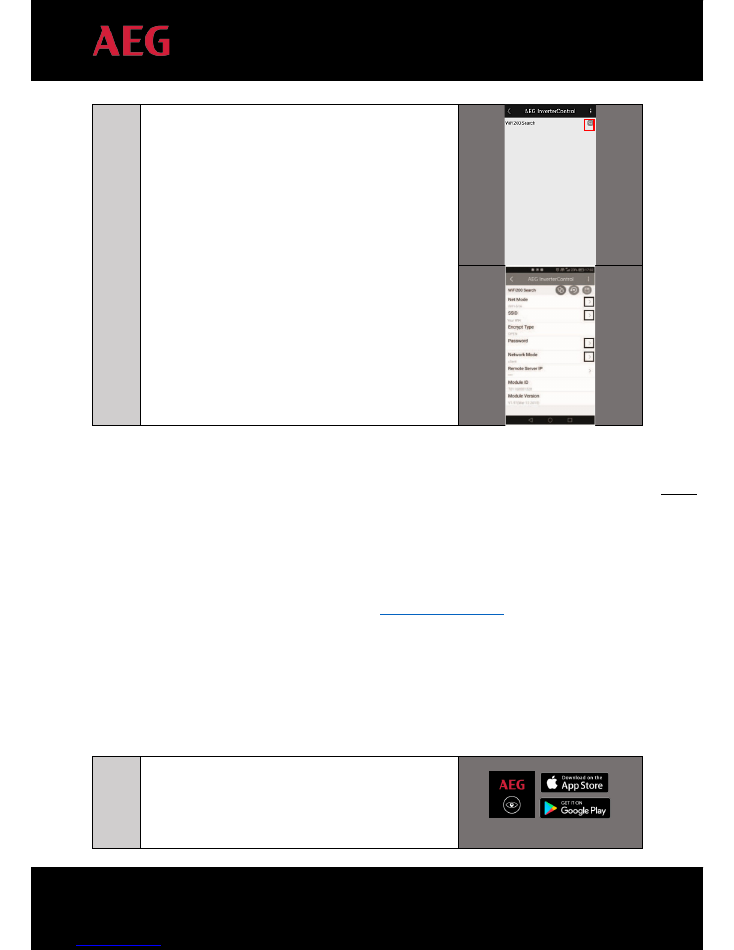
Download the AEG InverterControl App from the App Store
/ Google Play (look for “AEG InverterControl” in the App
Store/Google Play application on your mobile) and launch it
12
PD201802 AEG WIFI200 INSTALLATION MANUAL V.1-18 EN
12
2
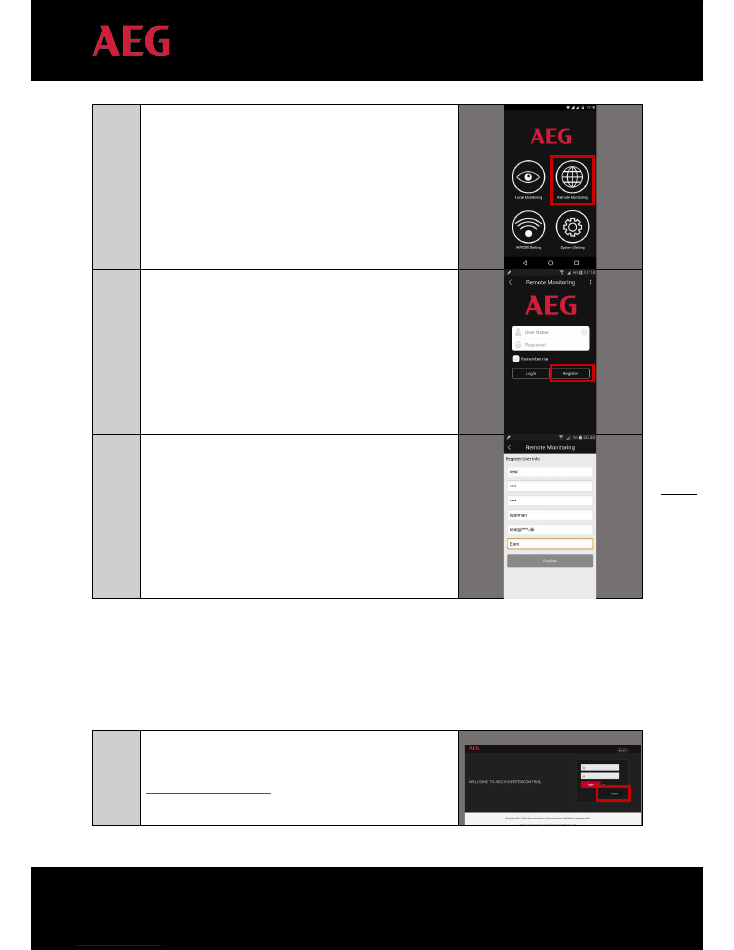
Select “Remote Monitoring”in the AEG InverterControl app
9
You will be prompted to the Login and Registration page.
Click on the Register button.
10
Please make sure you select a User Name without special
characters / blank spaces. Confirm the information and
finalize the registration.
B)
Registering over the AEG InverterControl Monitoring Webportal
1
Go to the AEG InverterControl Monitoring Webportal page
www.invertercontrol.com
. Click on “Register”
13
PD201802 AEG WIFI200 INSTALLATION MANUAL V.1-18 EN
13
2
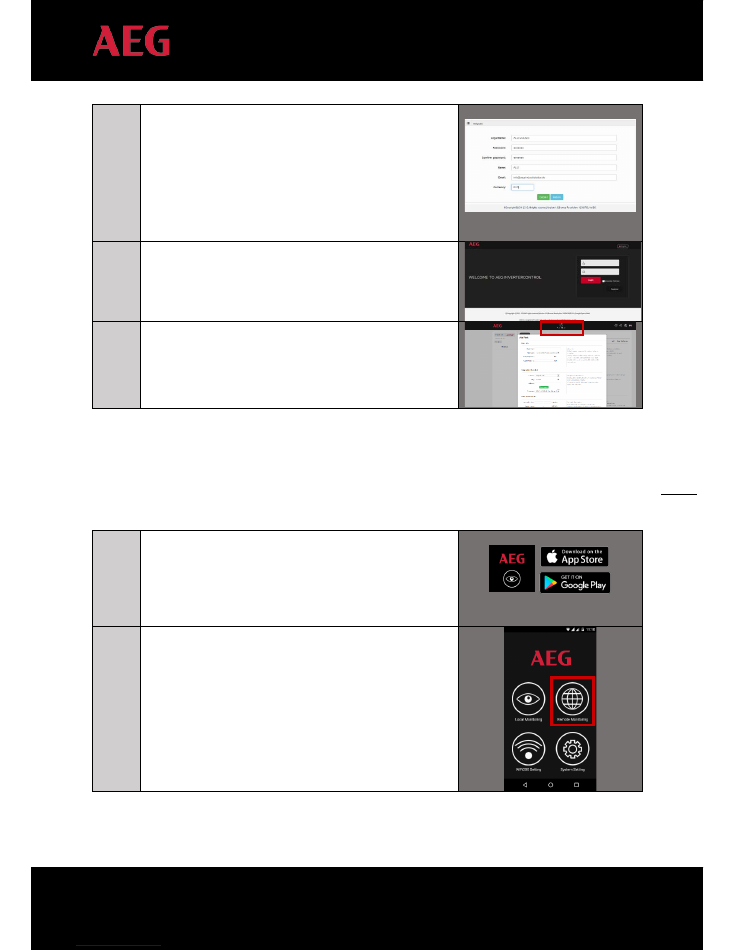
Register by selecting a Login Name, a Password, and
inputting your name, email, and preferred currency. Click
“Submit” to confirm.
Please make sure you select a Login Name without special
characters / blank spaces.
3
You will be prompted back to the main page of the AEG
InverterControl Monitoring Webportal. Log in with the credentials
you just created.
4
Click on the “Plant Mgmt” icon. The interface “Add Plant” will
appear. Make sure that the Timezone is correctly selected.
Fill in the plant data and click “Confirm” to complete the
registration.
You can now proceed to configure the AEG WiFi Stick for Remote Monitoring.
4.3.4 Remote monitoring (#1):
Configuration via mobile phone + internet access
1
On your mobile phone, download the AEG InverterControl
App from the App Store / Google Play (look for “AEG
InverterControl” in the App Store/Google Play application on
your mobile) and launch it
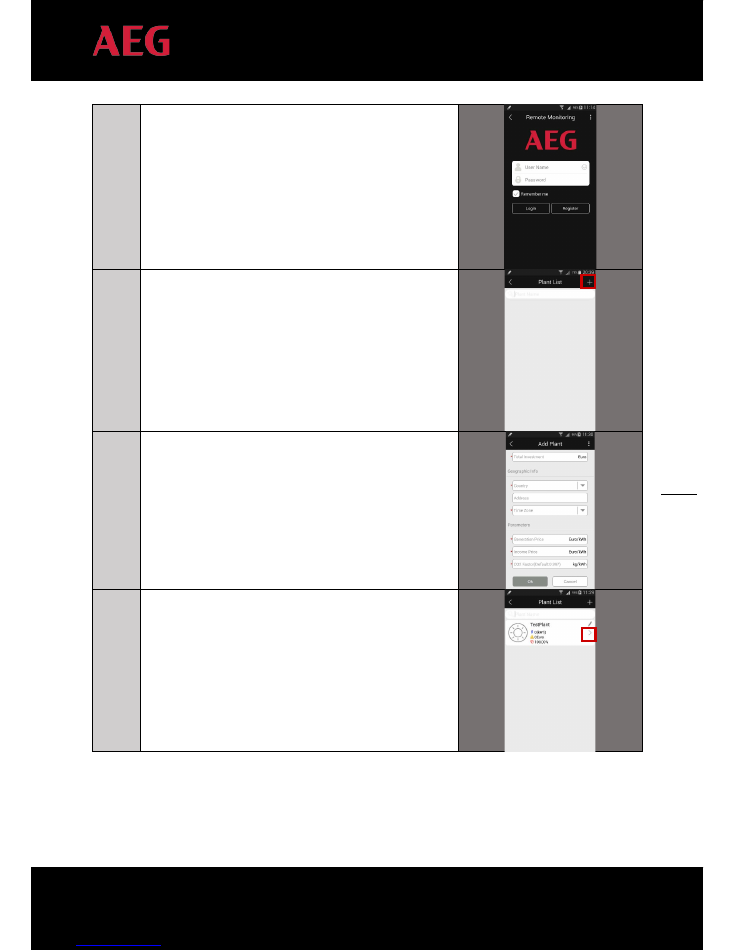
2
Select “Remote Monitoring”
14
PD201802 AEG WIFI200 INSTALLATION MANUAL V.1-18 EN
14
3
Login with your Remote Monitoring Account.
4
Click “+” to add a new plant.
5
Fill in the required data and confirm with “OK”
6
Now add the AEG WiFi200 (WiFi Stick): select your plant
and click on the Plant or “
”
15
PD201802 AEG WIFI200 INSTALLATION MANUAL V.1-18 EN
15
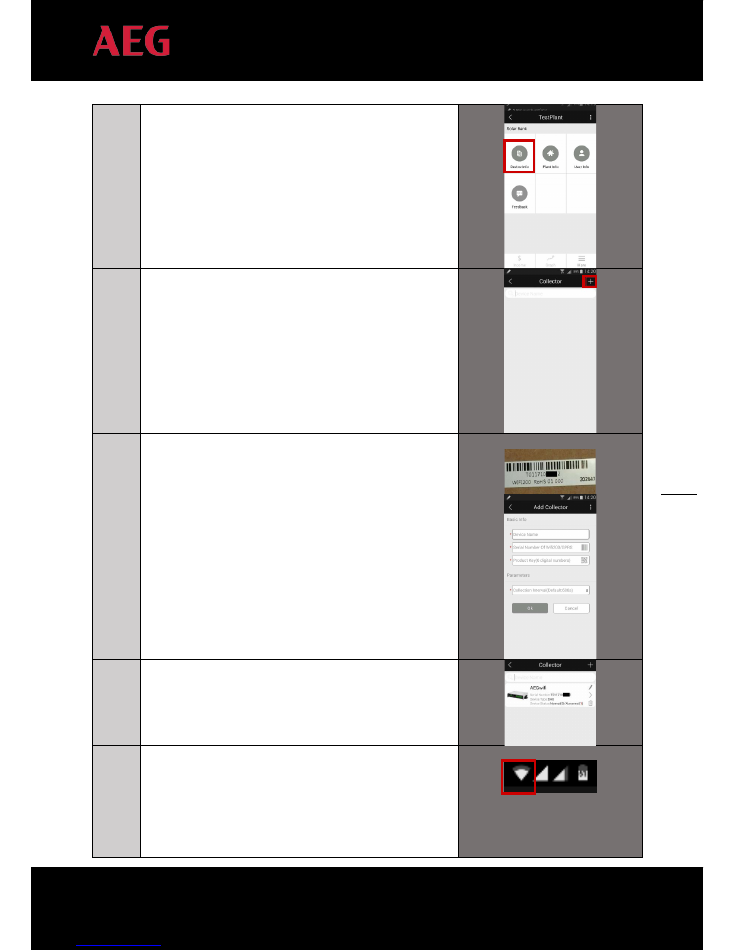
7
Click on “Device Info”
8
Click on Collector “+” to add a WiFi Stick
9
Input the Name of a WiFi Stick, along with its Serial Number
and Key which you will find on the product packaging.
10
Refresh the app and you will find the newly added WiFi Stick.
If you have more inverters in your plant, you can repeat the
previous step to add more WiFi Sticks.
11
Now set the parameters of the WiFi stick for remote
monitoring.
Enable the WiFi on your mobile phone and connect it
to the hotspot “AEG WiFi”.
16
PD201802 AEG WIFI200 INSTALLATION MANUAL V.1-18 EN
16
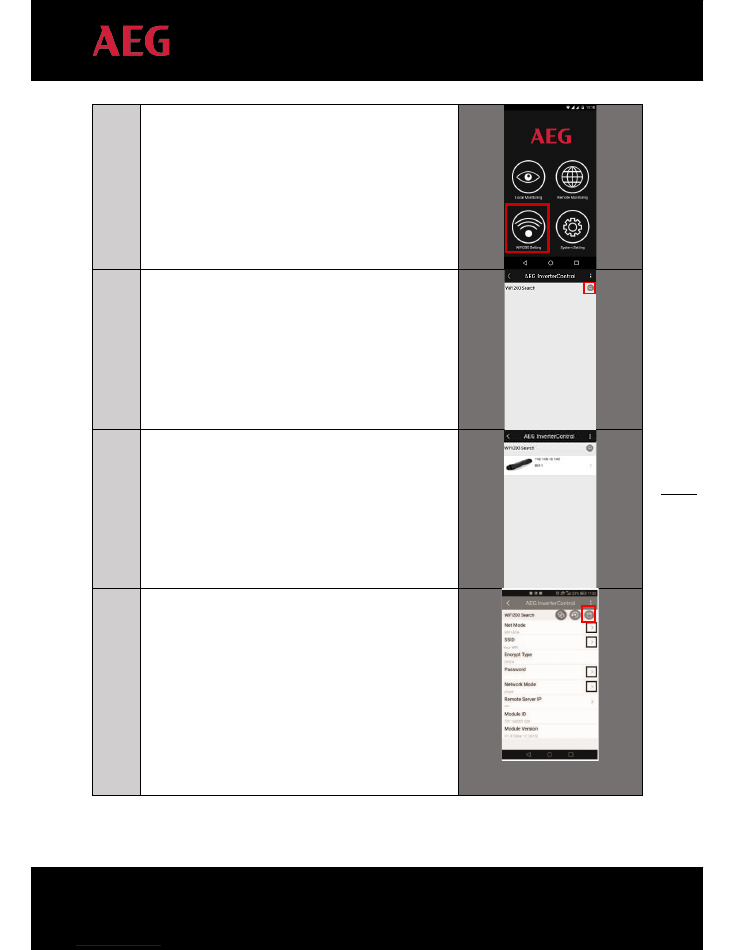
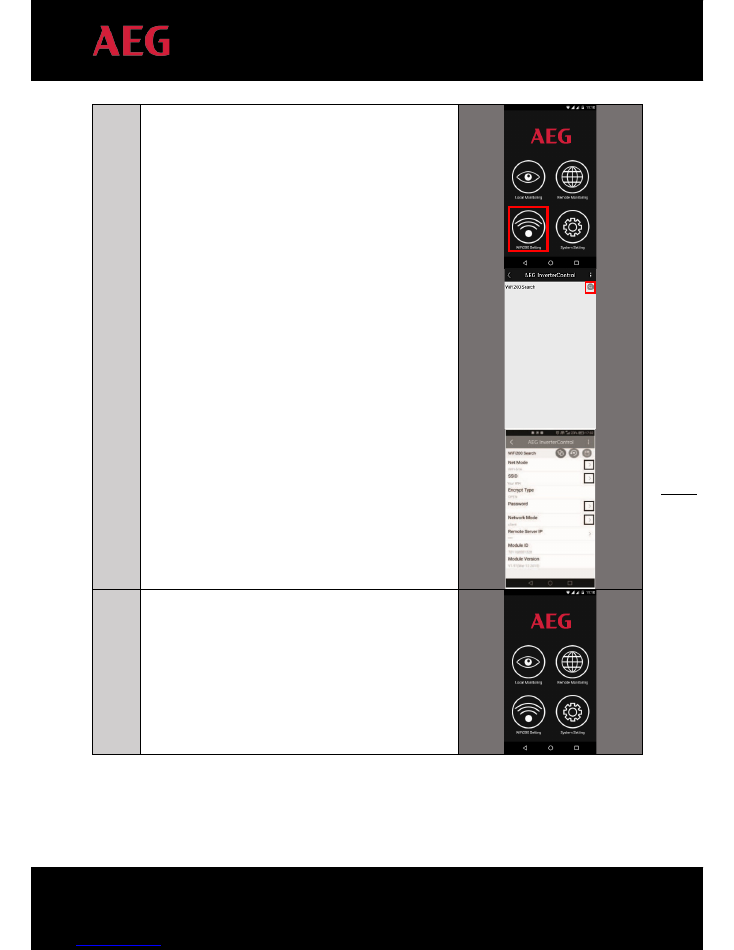
12
Launch the AEG InverterControl App.
Select “WiFi Settings”
13
Click the “search” (lens) icon to find the WiFi Stick.
Alternatively, click the “+” icon and confirm the IP address.
14
Find the AEG WiFi Stick in the list and click on it.
15
Select and set the parameters as indicated here:
Net Mode: select WIFI-STA
SSID: Select your WiFi Router
Password: Hotspot password of the wireless router. .
Network Mode: Select “Client”.
Confirm the settings by clicking “Save” button (on the top
right of the App interface). Now WiFi stick’s hotspot “AEG
WiFi” will disappear.
17
PD201802 AEG WIFI200 INSTALLATION MANUAL V.1-18 EN
17
16
(--- If you wish to double-check if the connection between the
WiFi stick and your router works correctly, connect your
mobile phone to the wireless network of your router and
select “WiFi Setting”. If you can find the WiFi200 and the
corresponding parameters, it means the setting is correct.
If the setting is not correct, please reset the WiFi stick and set
the parameter again (step 11 to 15 ) ---)
17
Wait for approximately 15 minutes, then launch the AEG
InverterControl App again, select “Remote Monitoring” and
log in to monitor the performance of your AEG Inverter.
18
PD201802 AEG WIFI200 INSTALLATION MANUAL V.1-18 EN
18
4.3.4
Remote monitoring (#2):
Configuration via PC+ internet access
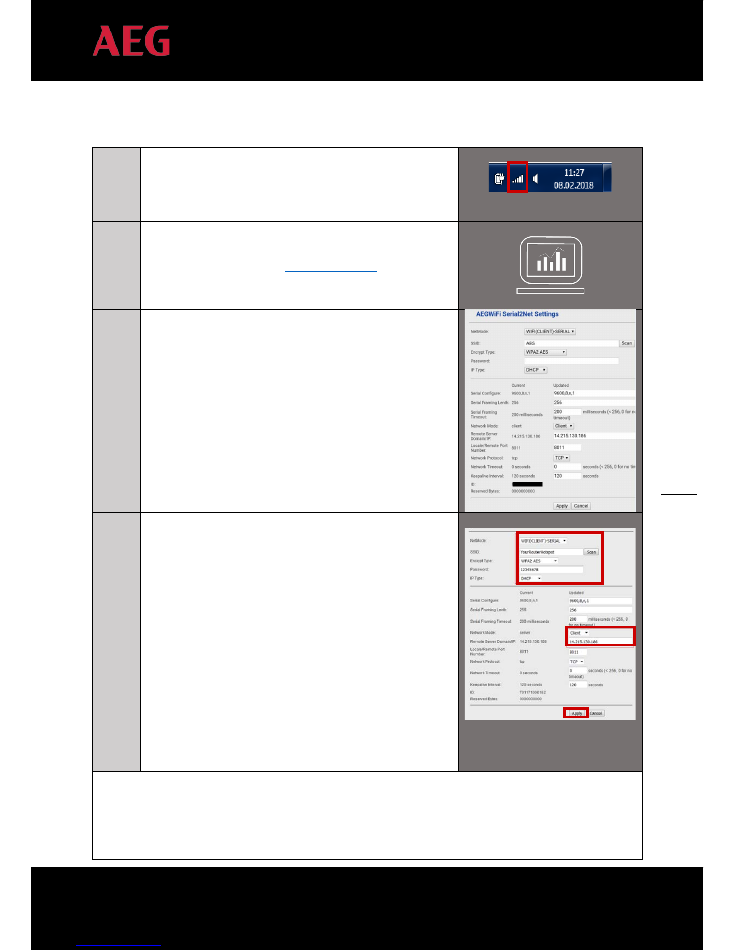
1
Scan for wireless networks. Connect your PC with the “AEG
WiFi” hotspot.
2
Open the web browser and access the configuration website of
AEG WiFi200 with IP address
http://192.168.16.254
.
3
Log in with the username “admin” and the password “admin”.
This will take you to the configuration interface (see the
right column here).
4
Set the parameters for REMOTE MONITORING
Net Mode: select WIFI(CLIENT)-SERIAL
SSID: click “Scan” and select the Hotspot name of your
router
Encrypt Type: Automatically updated after you select your
hotspot (or. Select according to your router, e.g. “WPA2-
AES”).
Password: Hotspot password of the wireless router.
IP Type: Leave it as “DHCP”.
Network Mode: Leave it as “Client”.
Remote Server Domain: 14.215.130.186
Click “Apply” to save the changes. Allow 15 minutes to update
Now you have to possibilities for continuing the setup: either via the AEG InverterControl App, or via the
AEG InverterControl Monitoring Webportal.
19
PD201802 AEG WIFI200 INSTALLATION MANUAL V.1-18 EN
19
If you wish to use the AEG InverterControl App, continue reading from instruction point number 5 below.
If you wish to use the AEG InverterControl Monitoring Webportal, skip to instruction point number 17 below.
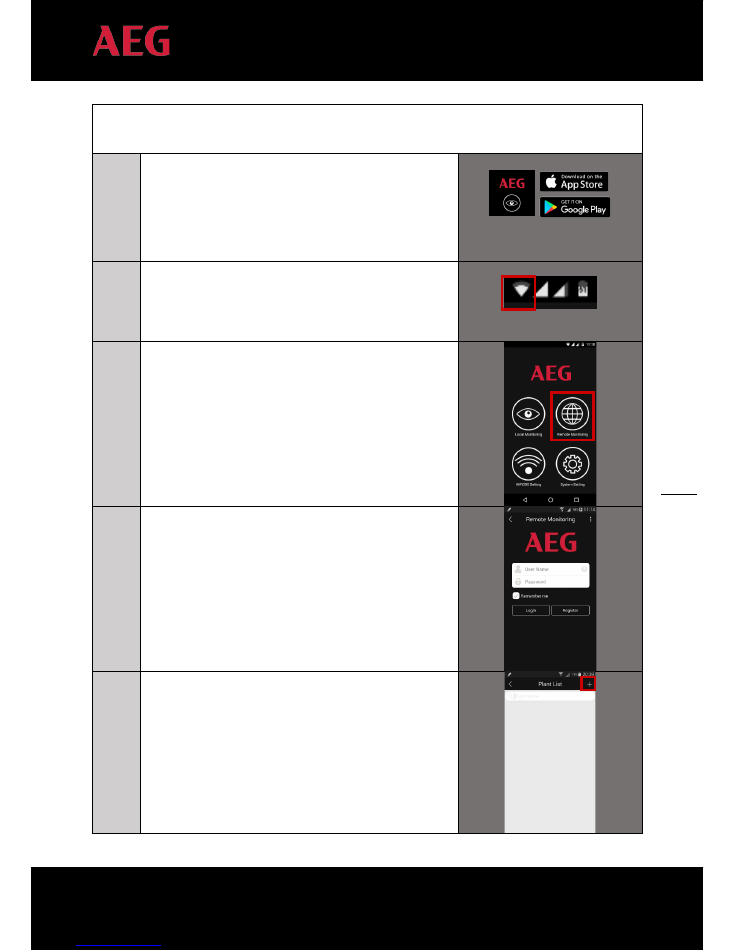
5
On your mobile device, download the AEG InverterControl
App from the App Store / Google Play (Look for “AEG
InverterControl” from the App Store/Google Play on your
mobile) and launch it
6
Enable the WiFi on your mobile phone and connect it
to the hotspot of your router.
7
Launch the AEG InverterControl App.
Select “Remote Monitoring”
8
Login using your Remote Monitoring Account.
9
Click “+” to add a new plant.
20
PD201802 AEG WIFI200 INSTALLATION MANUAL V.1-18 EN
20
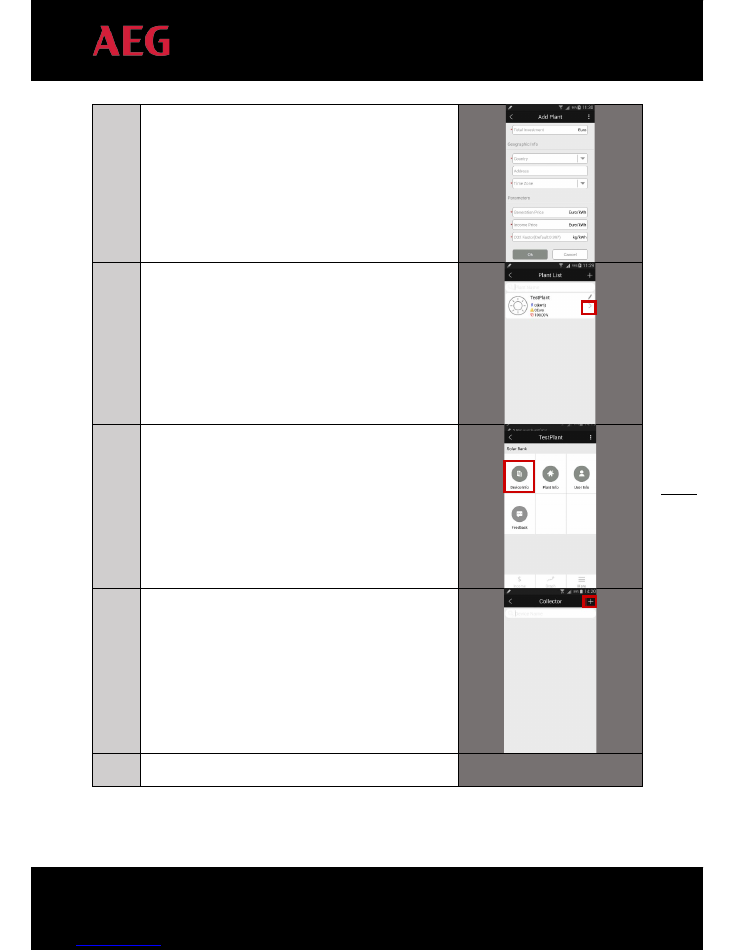
10
Fill in the required data and confirm with “OK”
11
Now add the AEG WiFi200 (WiFi Stick): select your plant
and click on the plant or on “
”
12
Click on “Device Info”
13
Click on Collector “+” to add a WiFi Stick
14
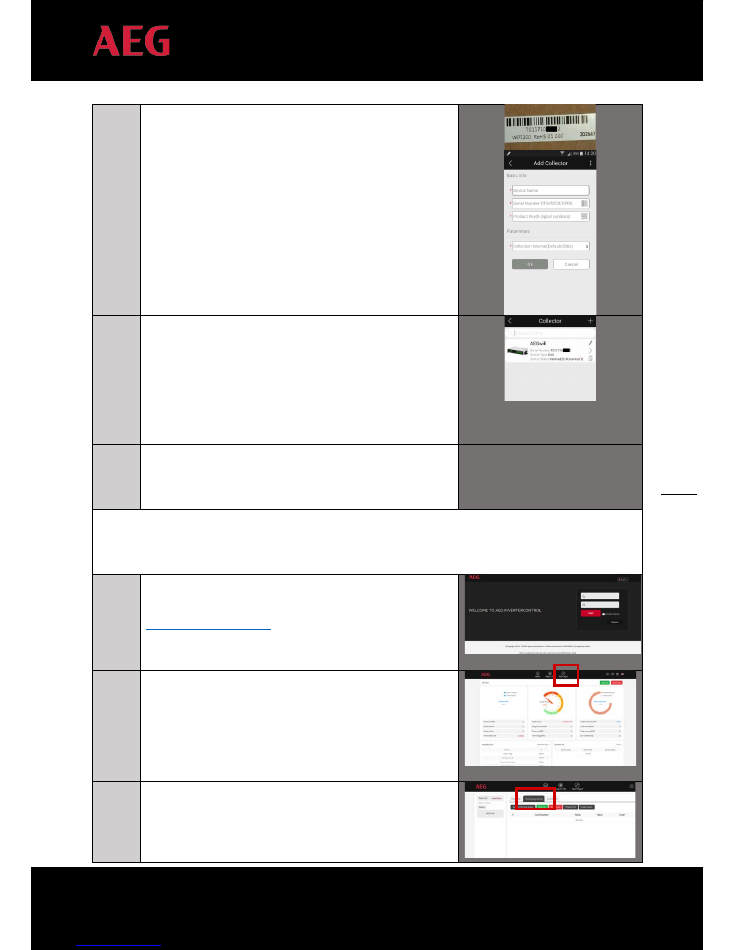
Input the Name of a WiFi Stick, along with its Serial Number
and Key which you will find on the product packaging.
21
PD201802 AEG WIFI200 INSTALLATION MANUAL V.1-18 EN
21
15
Refresh the app and you will find the newly added WiFi Stick.
If you have more inverters in your plant, you can repeat the
previous step to add more WiFi Sticks.
Done! You can now start monitoring the performance of
your inverter via the AEG InverterControl App.
16
If you have more than one Monitoring Device / Collector
(WiFi Stick) in your plant, repeat the operation from step 12
to 15
Please follow the below instructions if you are completing the configuration via
the AEG InverterControl Monitoring Webportal
17
Login in the AEG InverterControl Monitoring Webportal at
www.invertercontrol.com
using your Remote Monitoring
Account.
18
Select “Plant Mgmt” from the navigation bar
19
Select the tab “Monitoring Device”
22
PD201802 AEG WIFI200 INSTALLATION MANUAL V.1-18 EN
22
20
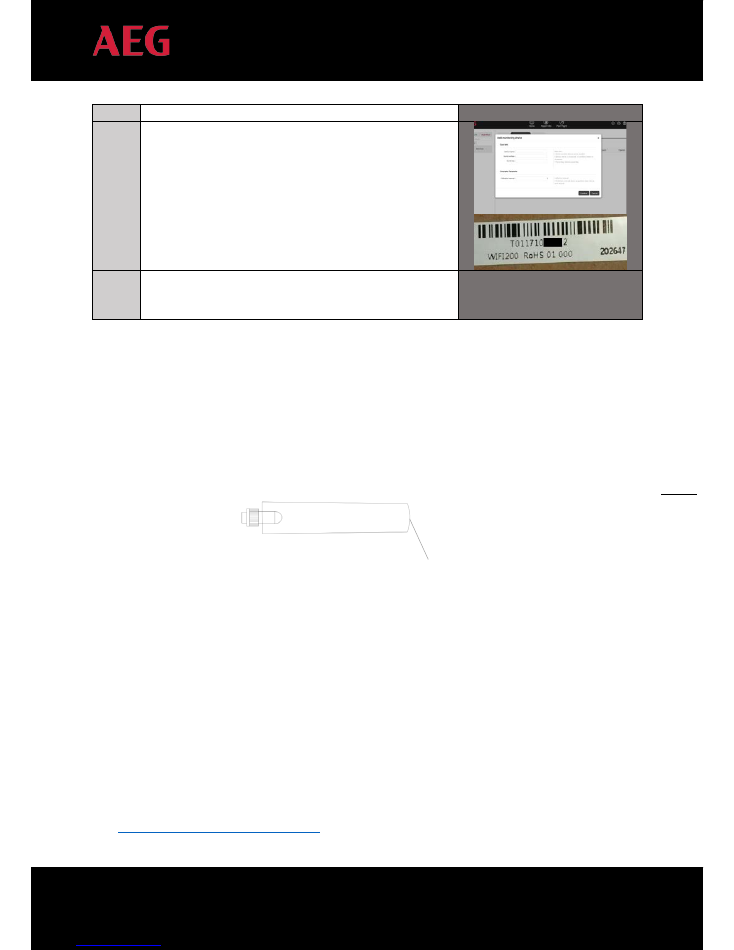
Select the tab “Add monitoring device”and the related
interface will appear. Input the Device name, the Serial
number and the product Key that you will find on the
packaging of your AEG WiFi200. Leave the default
connection interval that will appear, then click on “Confirm”
to save and proceed.
21
If you have more than one Monitoring Device / Collector
(WiFi Stick) in your plant, repeat the operation from step
from 19 to 20.
5. Resetting the AEG WiFi200
If malfunctioning occurs during operation of the AEG WiFi200, or if the settings are not properly adjusted, reset
the AEG WiFi200 by pressing and holding the reset button for 5 seconds.
6. Contacts
Solar Solutions GmbH
Schneckenhofstrasse 19
60596 Frankfurt am Main
Germany
Website: www.aeg-industrialsolar.de
AEG Inverter Technical Support:
Mail:
inverter-support@aeg-industrialsolar.de
Tel: +31 172 205 011
Reset button:
press and hold
for 5 seconds